
Creating a Landing Page on Azure
Learn how you can create a Landing Page with Azure and bootstrap your development process!

When you are just starting out with your startup, or you wish to grow a new product, a landing page is necessary. But which tools do you want to use for this as a developer? You could go the no-code path, but options are often scarce and if they exist, they cost quite a lot of money for an unknown user audience.
Goal
For my new project Signalr.io I wanted to create my own Landing Page that can:
- Be used for my beta version site (e.g., https://beta.signalr.io)
- Be used to host my backend
- Be used to host my other microservice workers
This way the landing page will grow with me and is designed as a real bootstrap project for Azure so instead of you spending a lot of time designing it yourself, get started instantly by following the 5-minute installation below!
5-Minute Installation
As a tl;dr I have included the below snippet which will allow you to clone the code I created from my repository. Simply execute the below and get up and running in just 5 minutes!
# Clone the repository
git clone https://github.com/XavierGeerinck/PublicProjects
cd Projects/Landing-Page

# Navigate to the directory
cd mydir

# Install the project
pulumi up --stack landing-page \
    -c glb-location=westeurope \
    -c glb-project-name=landing-page \
    -c glb-project-env=prd
Components Required
To build a landing page we should be able to do the following:
- Load a frontend
- Host a database for emails
- Submit an Email to the database
To keep costs as low as possible, we can use the following services:
- Azure Table Storage (simple key value store) (~0.1 eur / mo)
- Azure Container Registry (host our containers for the frontend) (~5 eur / mo)
- Azure App Service (~130 Eur / mo)
Totalling to ~135 eur / mo for the entire landing page! This might sound expense (and it is for a Landing Page!) but keep in mind that this often results in a Backend being added, full frontend, other microservices, other containers, ... with the cost being the same!
💡 If the above is to expensive, you could opt for: 1. A cheaper base plan for App Service (13 Eur /mo) or 2. Go towards a Static Site (frontend only) - but this will not allow us to use Streaming SSR
Infrastructure Setup
Before we get started, let's create the infrastructure that we will use to host all of our components. Create a simple infrastructure/ folder containing an index.ts file that contains our Pulumi definitions.
Next to this we will create a container-hello-world folder containing an example hello world to illustrate the deployed app to be working as configured.
Deployment Script
For the full code, see my repository which you can clone with git clone https://github.com/XavierGeerinck/PublicProjects; cd Projects/Landing-Page
Running
Now simply run
# [Optional] Configure Pulumi Statefile
az account set --subscription YOUR_SUB_ID
export PULUMI_CONFIG_PASSPHRASE=""
export AZURE_STORAGE_ACCOUNT="yoursaaccountname"
export AZURE_STORAGE_KEY="YOUR_STORAGE_ACCOUNT_KEY"
# Deploy our Infrastructure
pulumi up --stack landing-page \
-c glb-location=westeurope \
-c glb-project-name=landing-page \
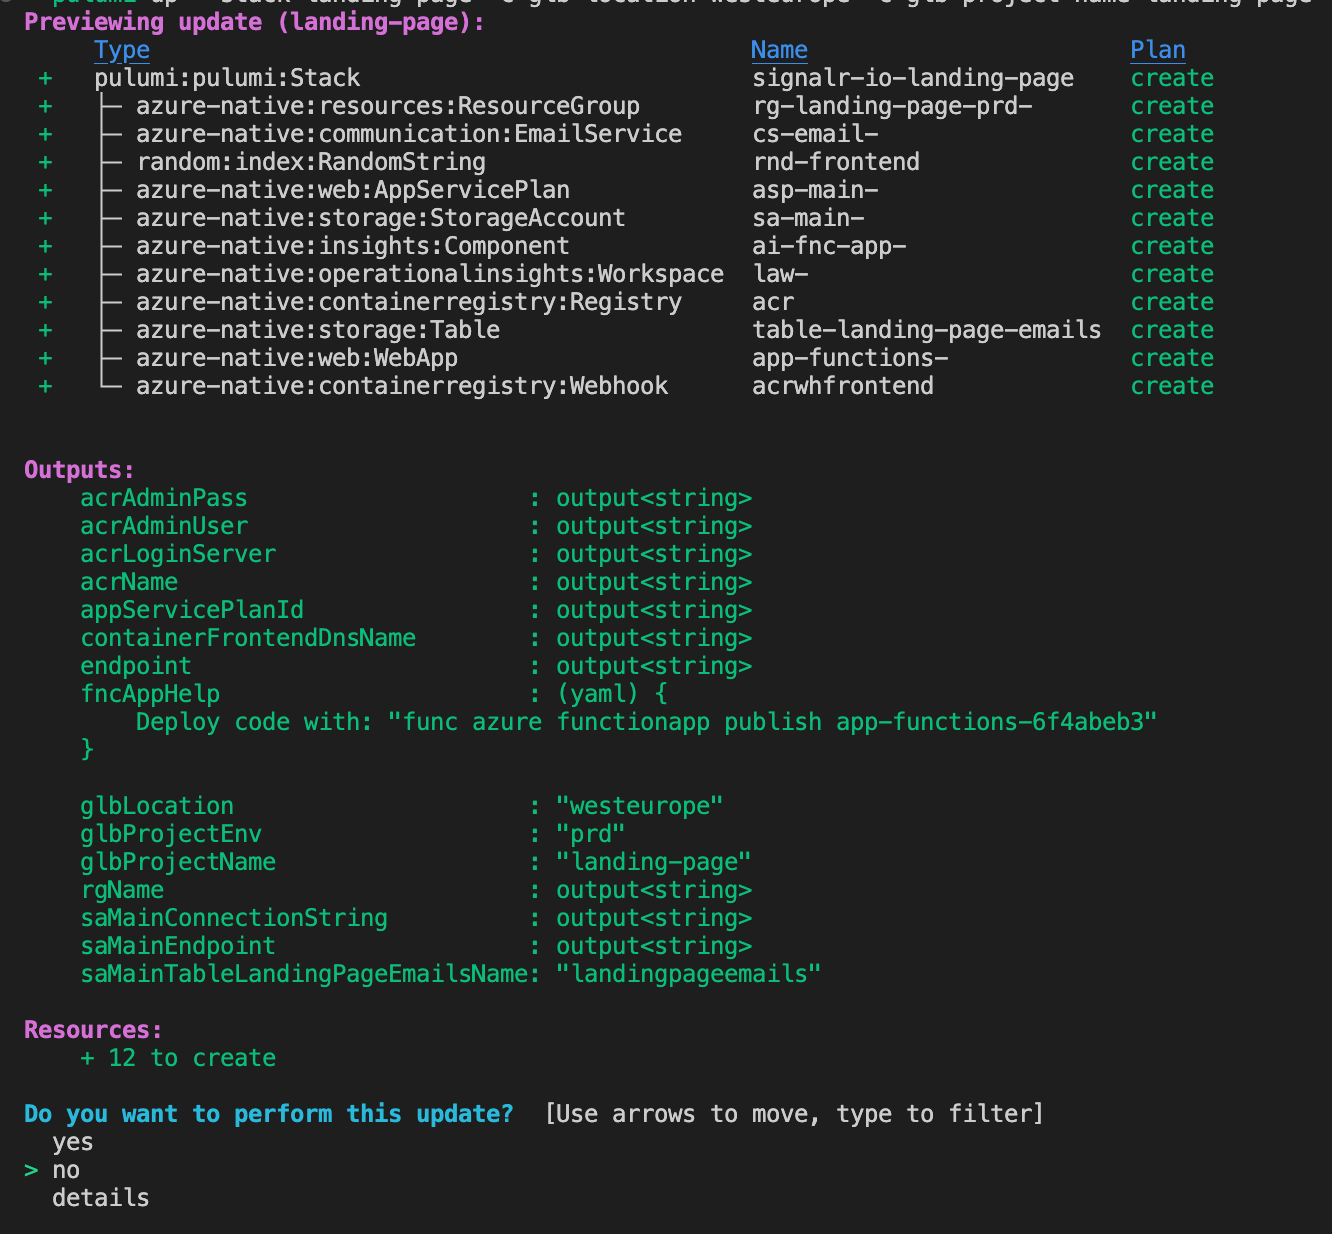
-c glb-project-env=prd This will bootstrap our application in Azure and provide the components necessary. One deployed, we will see something like this:
As a demo, we can go to our application url and should be presented with:

This is since we do not have an application deployed yet! We will get to this soon.
Creating our Application Components
Now we have our infrastructure deployed, let's continue creating our landing page!
Azure Function for Email Storage
The goal of the Function is to add an email record to our table storage component configured through the infrastructure code.
So initialize a new function project with
# Install the Azure Functions runtime
# more info: https://learn.microsoft.com/en-us/azure/azure-functions/functions-run-local?tabs=v4%2Cmacos%2Ccsharp%2Cportal%2Cbash#install-the-azure-functions-core-tools

# Initialize our function app
func init functions-node --language typescript --worker-runtime node

# Initialize our function
func new --name CreateLandingPageEmail --template "HTTP trigger" --authlevel "anonymous"
The above will create a functions-node/CreateLandingPageEmail directory where we can open the index.ts file to add the content below:
import { AzureFunction, Context, HttpRequest } from "@azure/functions";
import { v4 as uuidv4 } from "uuid";

const httpTrigger: AzureFunction = async function (
  context: Context,
  req: HttpRequest
): Promise<void> {
  const email = req.query.email || (req.body && req.body.email);

  context.bindings.bindingTableLandingPageEmails = {
    PartitionKey: "Email",
    RowKey: uuidv4(),
    Email: email,
  };

  context.log(`Added email ${email} to the table`);

  context.res = {
    // status: 200, /* Defaults to 200 */
    body: "Done",
  };
};

export default httpTrigger;
This will add our function and call the bindingTableLandingPageEmails binding as soon as the Function was invoked. This binding links to our table storage and we define it in functions-node/CreateLandingPageEmail/function.json:
{
  "bindings": [
    {
      "authLevel": "Anonymous",
      "type": "httpTrigger",
      "direction": "in",
      "name": "req",
      "methods": [
        "get",
        "post"
      ]
    },
    {
      "type": "http",
      "direction": "out",
      "name": "res"
    },
    {
        "type": "table",
        "name": "bindingTableLandingPageEmails",
        "tableName": "landingpageemails",
        "connection": "secret-landingpageemails-connectionstring",
        "direction": "out"
    }
  ],
  "scriptFile": "../dist/CreateLandingPageEmail/index.js"
}
This will simply state that we have a table named landingpageemails which we can access through the connection secret-landingpageemails-connectionstring
Finally, we need to update our dependencies to include uuid so open the package.json file and add "uuid": "9.0.0" under dependencies
Note: in ourhost.jsonfile we need to mark the extension bundle to utilize version 2.0 of the runtime as further version don't include the table binding"version": "[2.*, 3.0.0)"
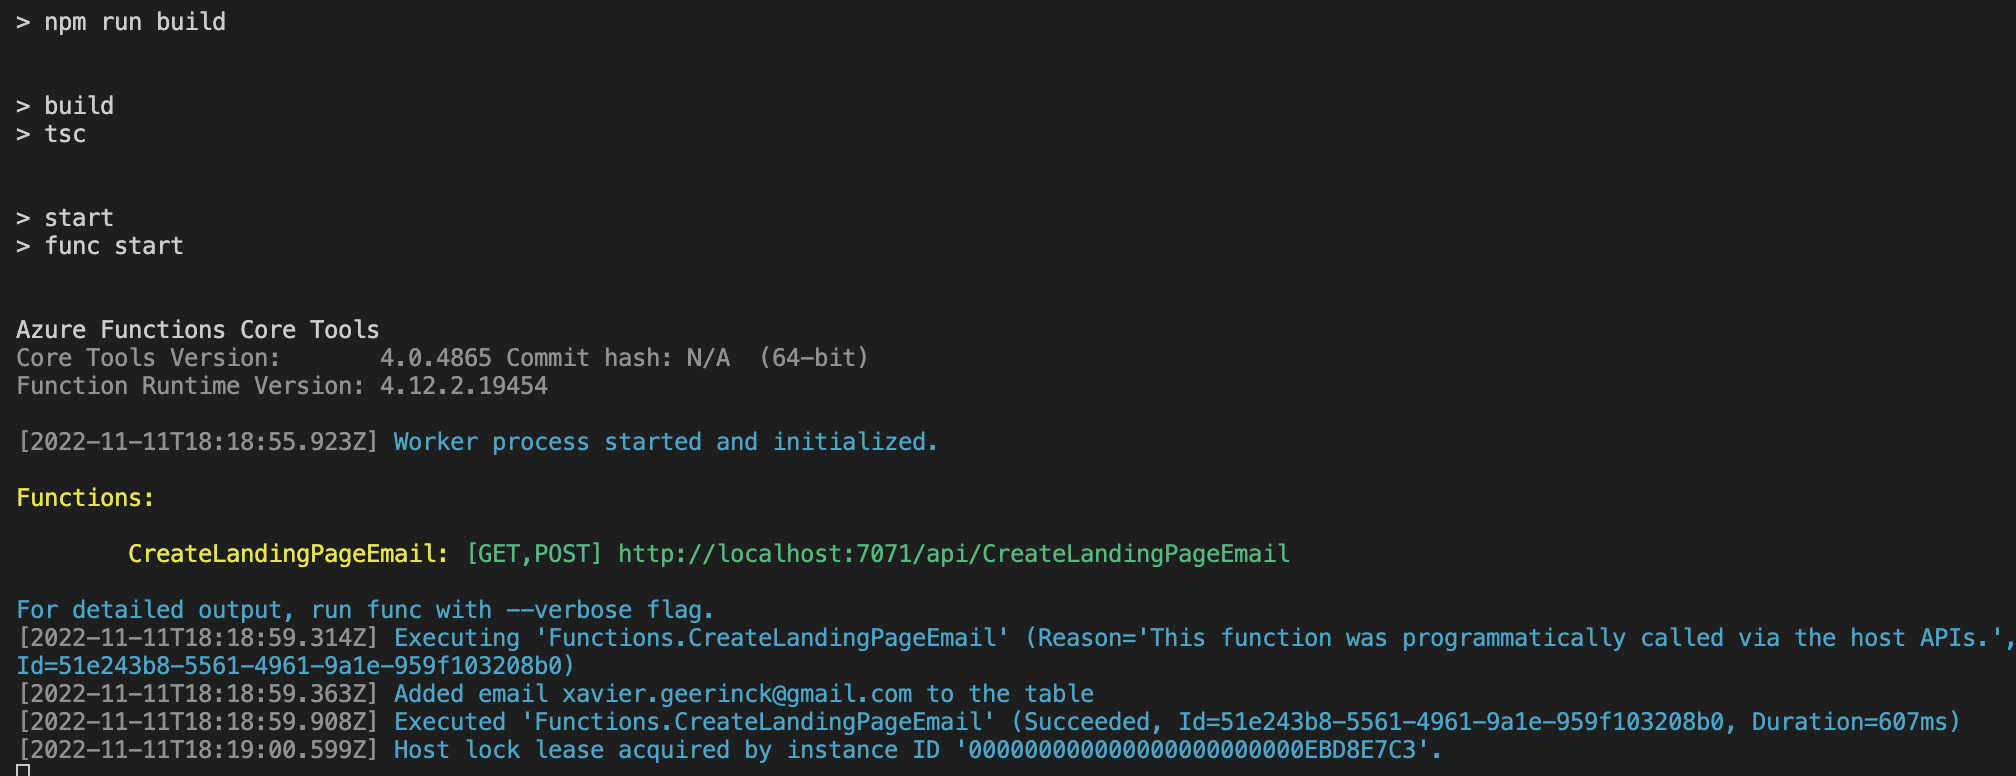
To test we run npm run start to start up the local execution environment
We can then deploy this function to our function app by creating a file named deploy-function.sh and adding:
#!/bin/bash
cd functions-node
AZURE_FUNCTIONAPP_NAME=YOUR_FUNCTION_APP_NAME
# Deploy by building locally instead of using the remote builder this prevents issues with the remote builder
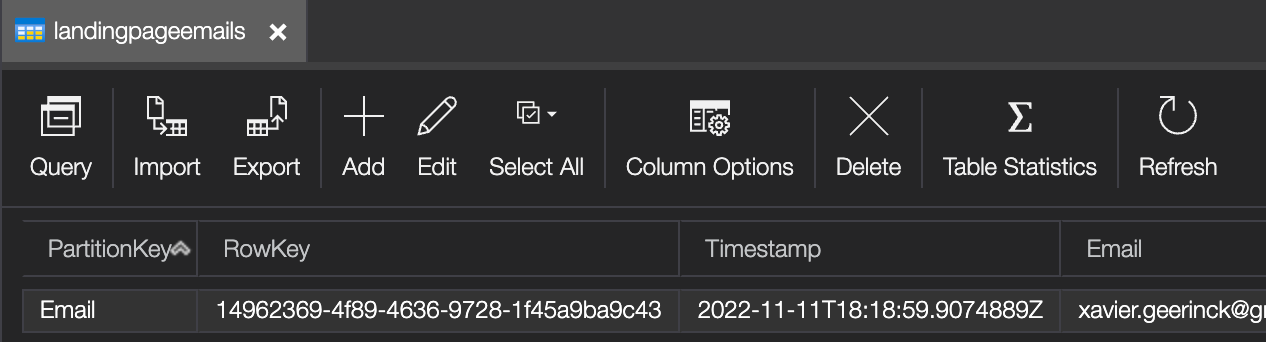
func azure functionapp publish $AZURE_FUNCTIONAPP_NAMEA simple chmod +x deploy-function.sh and ./deploy-function.sh is sufficient to deploy our function now each time we change it. So go ahead and run it, allowing us to create our first user by calling:
http://your-function-app.azurewebsites.net/api/[email protected]Validating this by looking into our table storage will show that we now have a record for the provided user:
Frontend
Initializing Frontend with Next.js 13 and Tailwindcss
Initialize our frontend with:
# Install Next.js 13
# docs: https://beta.nextjs.org/docs/installation
pnpm create next-app frontend/ --ts --eslint --experimental-app

# Install Tailwind
pnpm i -D tailwindcss postcss autoprefixer
npx tailwindcss init -p
And open the tailwind.config.js file to add:
/** @type {import('tailwindcss').Config} */
module.exports = {
  content: [
    "./app/**/*.{js,ts,jsx,tsx}", // Note the addition of the `app` directory.
    "./pages/**/*.{js,ts,jsx,tsx}",
    "./components/**/*.{js,ts,jsx,tsx}",
  ],
  theme: {
    extend: {},
  },
  plugins: [],
}
Then in your app/ only keep the head.tsx, layout.tsx, page.tsx files and create a tailwind.css file. In the tailwind.css file add the following
@tailwind base;
@tailwind components;
@tailwind utilities;

/*
NextJS 13 adds data-nextjs-scroll-focus-boundary as a resolution so it is able to inject pages correctly
By utilizing display: contents; we will let us ignore those nodes layout-wise
*/
[data-nextjs-scroll-focus-boundary] {
  display: contents;
}
Which will configure Next.js to utilize tailwindcss and fix the div tags they introduced.
In our page.tsx file we fill in the following content to create a landing page:
export default function Home() {
  return (
    <div className="h-screen w-screen bg-primary flex flex-col items-center justify-center p-8 md:p-0">
      <h1 className="text-3xl font-extrabold text-accent">Coming soon!</h1>
      <h2 className="mt-2 text-lg text-white">Sign up to be notified</h2>

      <div className="mt-10 sm:mt-12">
        <form action="#" className="sm:mx-auto sm:max-w-xl lg:mx-0">
          <div className="sm:flex">
            <div className="min-w-0 flex-1">
              <label className="sr-only">Email address</label>
              <input
                id="email"
                type="email"
                placeholder="Enter your email"
                className="block w-full rounded-md border-0 px-4 py-3 text-base text-gray-900 placeholder-gray-500 focus:outline-none focus:ring-2 focus:ring-cyan-400 focus:ring-offset-2 focus:ring-offset-gray-900"
              />
            </div>
            <div className="mt-3 sm:mt-0 sm:ml-3">
              <button
                type="submit"
                className="block w-full rounded-md py-3 px-4 font-medium text-white shadow bg-accent focus:outline-none focus:ring-2 focus:ring-accent focus:ring-offset-2 focus:ring-offset-gray-900"
              >
                Sign Up
              </button>
            </div>
          </div>

          <p className="mt-3 text-sm text-gray-300 sm:mt-4">
            By providing your email and signing up, you agree to our{" "}
            <a href="#" className="font-medium text-white">
              terms of service
            </a>
            to be notified as soon as we launch.
          </p>
        </form>
      </div>
    </div>
  );
}
To preview the landing page run npm run dev --turbo to launch your site.
We can now deploy this to our production platform by simply pushing to the repository. So create a deploy-landingpage.sh file with:
docker build -t YOUR_REPO.azurecr.io/frontend .
docker push YOUR_REPO.azurecr.io/frontend
Summary
And by following this post, you have an entire landing page up and running in just a couple of minutes! Normally this would take us a couple of hours to get everything automated and running, but I hope that by sharing this example you got a speedbump!


Comments ()