
Parking Garage Sensor implementation using Dapr Actors
The reworked Dapr Javascript SDK has been released a couple of weeks ago! Together with a brand new and easier to use SDK, we have been thinking in the community of reworking the documentation to simplify the examples, more specifically the Actors examples.
After some brainstorming together, we decided to follow a scenario that was explained by Mark Russinovich detailing how you can create your own Parking Garage Spot Monitoring System!
Scenario
Microsoft is growing to 1.000.000 employees. To accomodate for this, they have parking garages to hold the cars of these employees. For simplicity reasons of the demonstration, we take into account 2 parking garages that can hold each 500.000 employee cars and each have their own sensor monitoring the spot. If a car drives into a spot, an event is sent that updates the value of the sensor itself. Each of the sensors is using Azure Sphere.
Actors
Now we could implement this with a dedicated application for each of the sensors, bake in the application and let it have its own state management system. An easier system however is to have the sensor send out a packet that we can ingest and process. Since each sensor is "standalone" this should have its own isolated set of actions and state! Which fits the description of an "Actor".
Approach
To implement this parking garage example, we need to do the following:
- Create an actor that represents the latest state of a sensor at any given time
- Create a database made for holding historical data (
influxdb) - Create a dashboard that shows our points with color codes on a map (
grafana)
Implementation
Let's start by implementing this! First we should define the actions our actor can take, in the case of a Parking Garage with sensors, we will have 2 methods: carEnter and carLeave to define the state of the sensor. So let's draw up the interface for this:
Defining the Actor Methods
export default interface ParkingSensorInterface {
  carEnter(): Promise<void>;
  carLeave(): Promise<void>;
}
Defining the Actor Implementation
Once the interface has been created, we need to implement the actual logic of our actor. For this actor, we thus implement the interface described above and we add some extra helper methods.
Outline:
- We create an
onActivatemethod which acts as the constructor when the actor is created. This will initialize the mock location of our sensor in a parking garage (latitude and longitude) through thegenerateRandomPointmethod. - We implement the actor interface methods
carEnterandcarLeave
carEnter: Will set our state totruedefining that a car is parkedcarLeave: Will set our state tofalsedefining that a spot is free
- We add binding calls to
influxdbthat when a state changes also sends the state toinfluxdbfor visualization purposes.
Note: the power of Dapr is exactly that of the above, we implement actors and need to sink a point to a database, rather than having to implement and configure yet another API we can simply call the client with the binding and that will take care of it for us!
Code:
import { AbstractActor } from "dapr-client";
import ParkingSensorInterface from "./ParkingSensorInterface";

const STATE_NAME_PARKING_SENSOR_VALUE = "parking-sensor-value";
const STATE_NAME_PARKING_SENSOR_LOCATION_LAT = "parking-sensor-location-lat";
const STATE_NAME_PARKING_SENSOR_LOCATION_LNG = "parking-sensor-location-lng";

// Coordinates pool to pick from as center of the radius circle
// we take multiple so we can distribute points more
// this is the Microsoft Garage Building 99
// 47.64174525422637, -122.14032265575015
const COORDINATES = [
  {
    lat: 47.64167040541433, lng: -122.1398701709982
  },
  {
    lat: 47.64177786440955, lng: -122.14077604924732
  }
]

export default class ParkingSensorImpl extends AbstractActor implements ParkingSensorInterface {
  async carEnter(): Promise<void> {
    await this.getStateManager().setState(STATE_NAME_PARKING_SENSOR_VALUE, true);

    const sensorLocationLat = await this.getStateManager().getState(STATE_NAME_PARKING_SENSOR_LOCATION_LAT);
    const sensorLocationLng = await this.getStateManager().getState(STATE_NAME_PARKING_SENSOR_LOCATION_LNG);

    await this.getDaprClient().binding.send("binding-influxdb", "create", {
      measurement: "sensor-states",
      tags: `sensor=${this.getId().getId()}`,
      values: `lat=${sensorLocationLat},lng=${sensorLocationLng},isParked=1`
    });
  }

  async carLeave(): Promise<void> {
    await this.getStateManager().setState(STATE_NAME_PARKING_SENSOR_VALUE, true);

    const sensorLocationLat = await this.getStateManager().getState(STATE_NAME_PARKING_SENSOR_LOCATION_LAT);
    const sensorLocationLng = await this.getStateManager().getState(STATE_NAME_PARKING_SENSOR_LOCATION_LNG);

    await this.getDaprClient().binding.send("binding-influxdb", "create", {
      measurement: "sensor-states",
      tags: `sensor=${this.getId().getId()}`,
      values: `lat=${sensorLocationLat},lng=${sensorLocationLng},isParked=0`
    });
  }

  async getInfo(): Promise<object> {
    const sensorValue = await this.getStateManager().getState(STATE_NAME_PARKING_SENSOR_VALUE);
    const sensorLocationLat = await this.getStateManager().getState(STATE_NAME_PARKING_SENSOR_LOCATION_LAT);
    const sensorLocationLng = await this.getStateManager().getState(STATE_NAME_PARKING_SENSOR_LOCATION_LNG);

    return {
      sensorValue,
      sensorLocationLat,
      sensorLocationLng
    }
  }

  async onActivate(): Promise<void> {
    const coordIdx = Math.floor(Math.random() * COORDINATES.length);
    const lat = COORDINATES[coordIdx]["lat"];
    const lng = COORDINATES[coordIdx]["lng"];
    const spotLocation = this.generateRandomPoint({ lat, lng }, 20);

    await this.getStateManager().setState(STATE_NAME_PARKING_SENSOR_VALUE, false);
    await this.getStateManager().setState(STATE_NAME_PARKING_SENSOR_LOCATION_LAT, spotLocation.lat);
    await this.getStateManager().setState(STATE_NAME_PARKING_SENSOR_LOCATION_LNG, spotLocation.lng);
  }

  generateRandomPoint(center: { lat: number, lng: number }, radius: number) {
    var x0 = center.lng;
    var y0 = center.lat;

    // Convert Radius from meters to degrees.
    var rd = radius / 111300;

    var u = Math.random();
    var v = Math.random();

    var w = rd * Math.sqrt(u);
    var t = 2 * Math.PI * v;
    var x = w * Math.cos(t);
    var y = w * Math.sin(t);

    var xp = x / Math.cos(y0);

    // Resulting point.
    return { 'lat': y + y0, 'lng': xp + x0 };
  }
}
Creating our Application
We now have the actor implemented and created but we still need to call it to represent our sensors! So let's create a simple implementation that:
- Starts a server with our Actor registered
- Create X amount of actors representing Parking Spot Sensors
- Set the Parking Spot Sensor randomly to active or inactive every
5s
Note: In a real-world scenario, we would call this actor based on a pub/sub that receives an event from the sensors. Thus completely separating logic from hardware.
import { DaprServer, DaprClient } from "dapr-client";
import ParkingSensorImpl from "./ParkingSensorImpl";

const daprHost = "127.0.0.1";
const daprPort = "50000"; // Dapr Sidecar Port of this Example Server
const serverHost = "127.0.0.1"; // App Host of this Example Server
const serverPort = "50001"; // App Port of this Example Server

async function sleep(ms: number): Promise<void> {
  return new Promise(resolve => setTimeout(resolve, ms));
}

async function start() {
  const server = new DaprServer(serverHost, serverPort, daprHost, daprPort);
  const client = new DaprClient(daprHost, daprPort);

  console.log("===============================================================");
  console.log("SERVER INITIALIZING")
  console.log("===============================================================");
  await server.actor.init(); // Let the server know we need actors
  server.actor.registerActor(ParkingSensorImpl); // Register the actor
  await server.startServer(); // Start the server

  console.log("===============================================================");
  console.log("CLIENT EXECUTION");
  console.log("===============================================================");
  const amount = 100;
  console.log(`Creating ${amount} Actors`);
  for (let i = 0; i < amount; i++) {
    await client.actor.invoke("GET", ParkingSensorImpl.name, `parking-sensor-${i}`, "getInfo");
  }

  console.log("===============================================================");
  console.log("CHANGING STATE OF SENSORS");
  console.log("===============================================================");
  console.log("Waiting 10 seconds before starting");
  await sleep(10000);

  while (true) {
    console.log("Simulating cars entering and leaving for 5% of the population");

    const populationSize = Math.floor(amount * 0.05);

    // Randomly put 10 on parked
    for (let i = 0; i < populationSize; i++) {
      const id = Math.floor(Math.random() * amount);
      await client.actor.invoke("PUT", ParkingSensorImpl.name, `parking-sensor-${id}`, "carEnter");
    }

    // Randomly put 10 on empty
    for (let i = 0; i < populationSize; i++) {
      const id = Math.floor(Math.random() * amount);
      await client.actor.invoke("PUT", ParkingSensorImpl.name, `parking-sensor-${id}`, "carLeave");
    }

    await sleep(5000);
  }
}

start().catch((e) => {
  console.error(e);
  process.exit(1);
});
Visualization
Creating the Containers
For our visualization we will create an influxdb and a grafana instance! To quickly boot up these containers in a non-persistent way, we can utilize the commands below:
# Run InfluxDB
# Note: it auto removes after shutdown
# Note: non-persistent volume, add "-v influxdb2:/var/lib/influxdb2" to make it persistent
docker run --rm -it -d \
    -e DOCKER_INFLUXDB_INIT_MODE=setup \
    -e DOCKER_INFLUXDB_INIT_USERNAME=admin \
    -e DOCKER_INFLUXDB_INIT_PASSWORD=MyAdmin@123! \
    -e DOCKER_INFLUXDB_INIT_ADMIN_TOKEN=my-token \
    -e DOCKER_INFLUXDB_INIT_ORG=my-parking-garage \
    -e DOCKER_INFLUXDB_INIT_BUCKET=my-sensors \
    --net=host \
    --name influxdb \
    influxdb:2.0

# Run Telegraf
docker run --rm -it -d \
    --net=host \
    --name=telegraf \
    telegraf

# Run Grafana
# Note: non-persistent volume, add "-v influxdb2:/var/lib/influxdb2" to make it persistent
docker run --rm -it -d \
    --name=grafana \
    --net=host \
    grafana/grafana
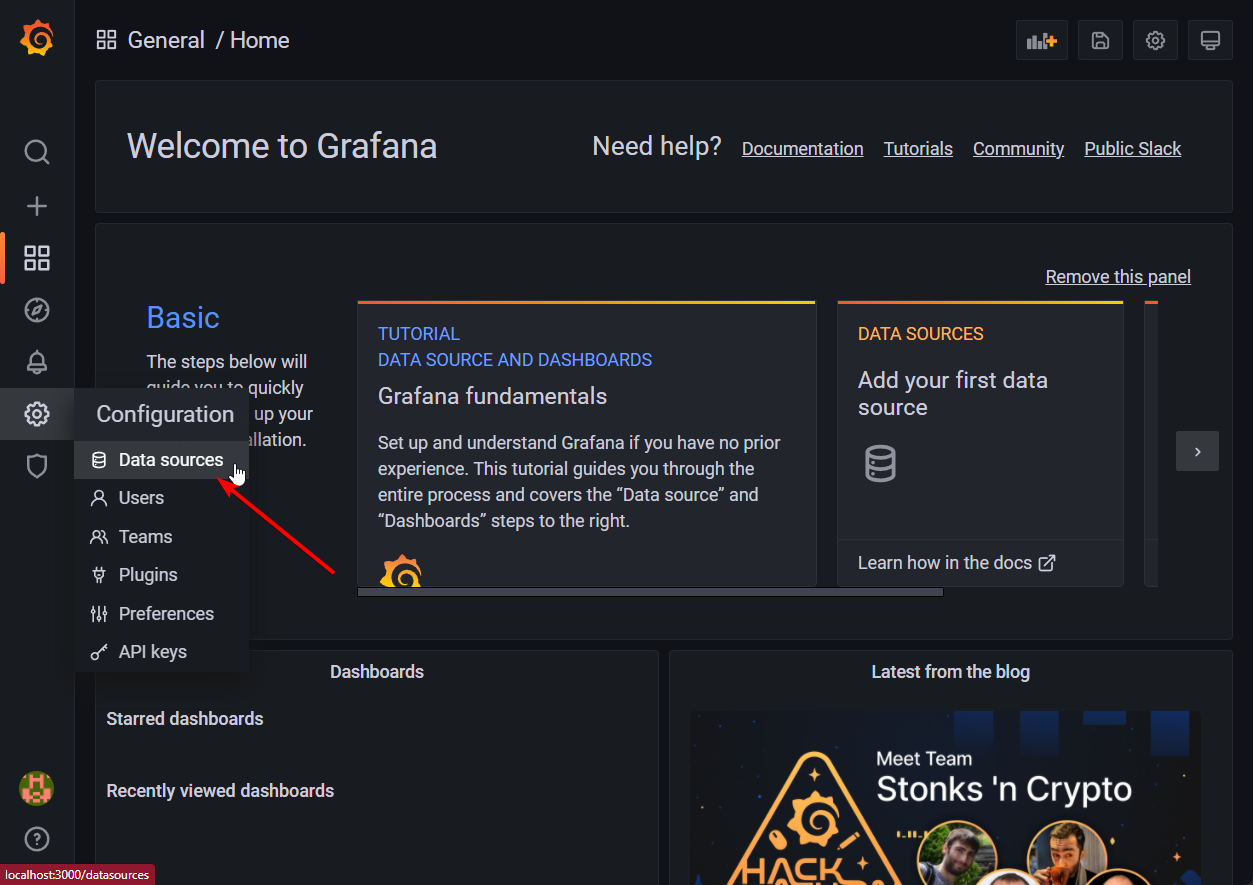
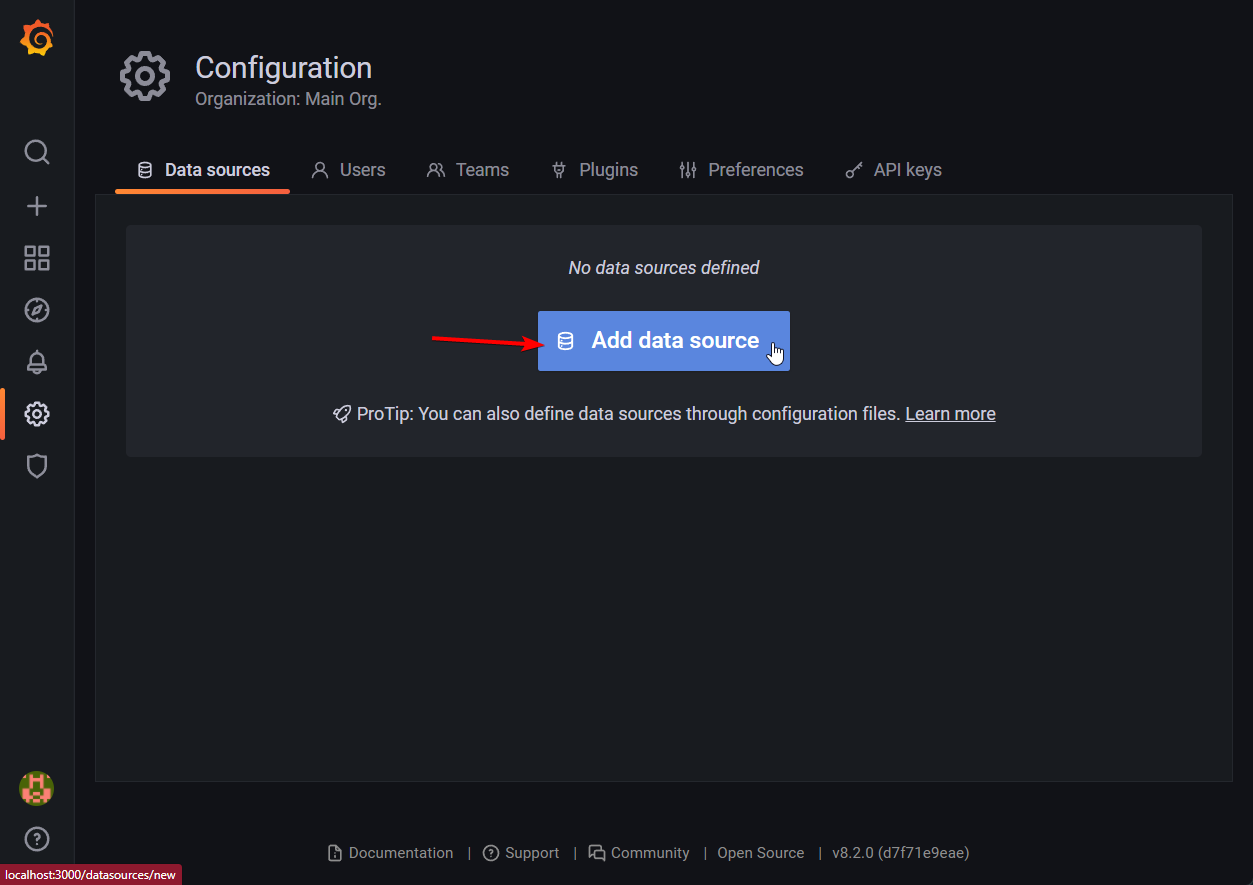
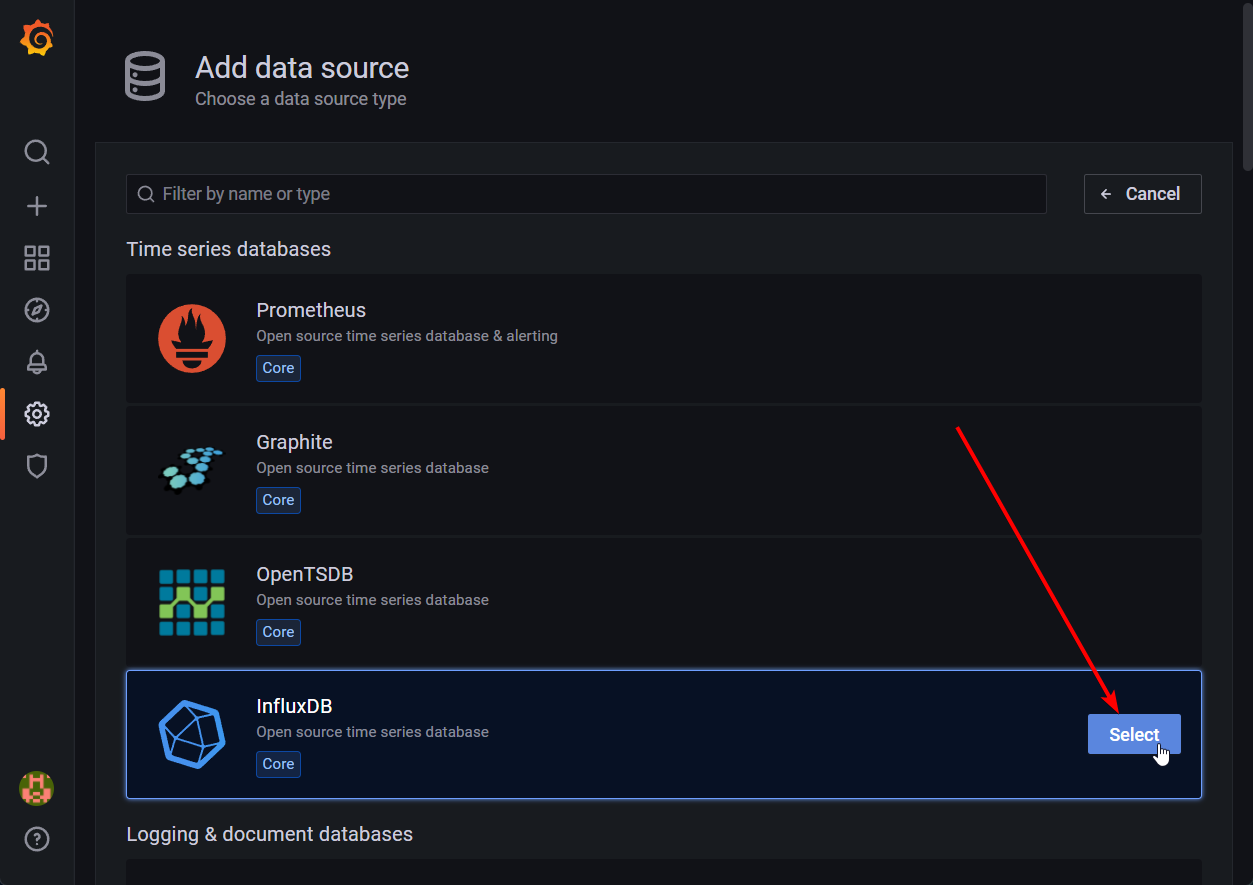
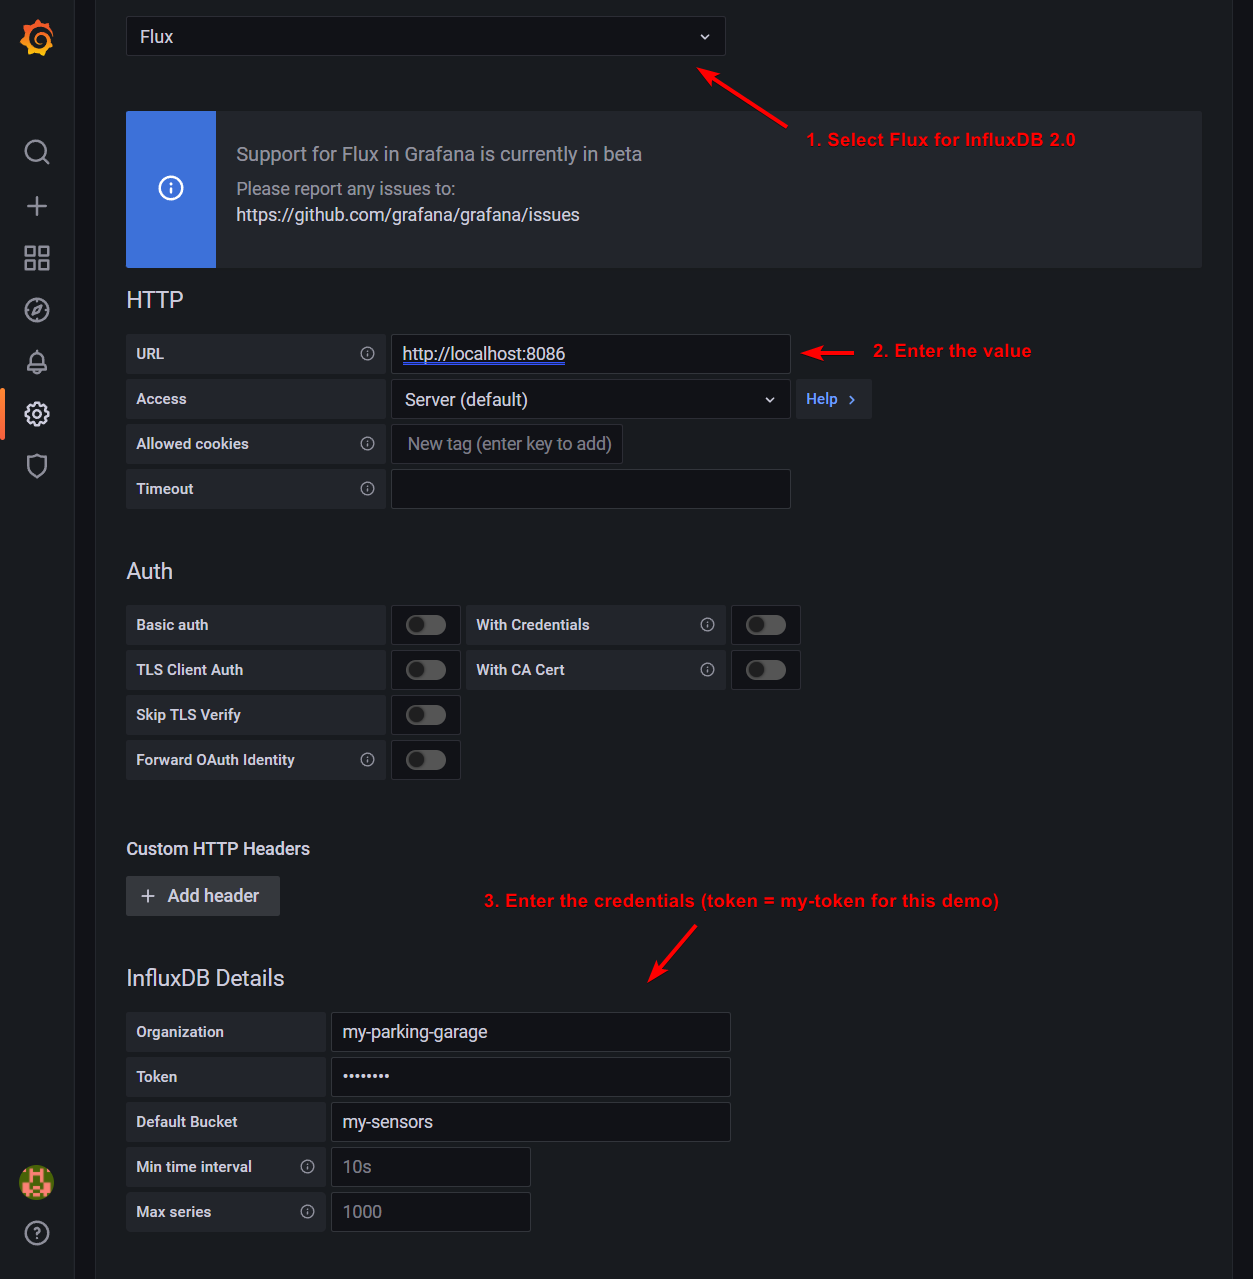
⚠️ the above is not-persistent, add volume binds and remove --rm to make them persistent.Configuring the Data Source
Now open up http://localhost:3000 in your browser to open up Grafana. Here we need to configure a datasource:

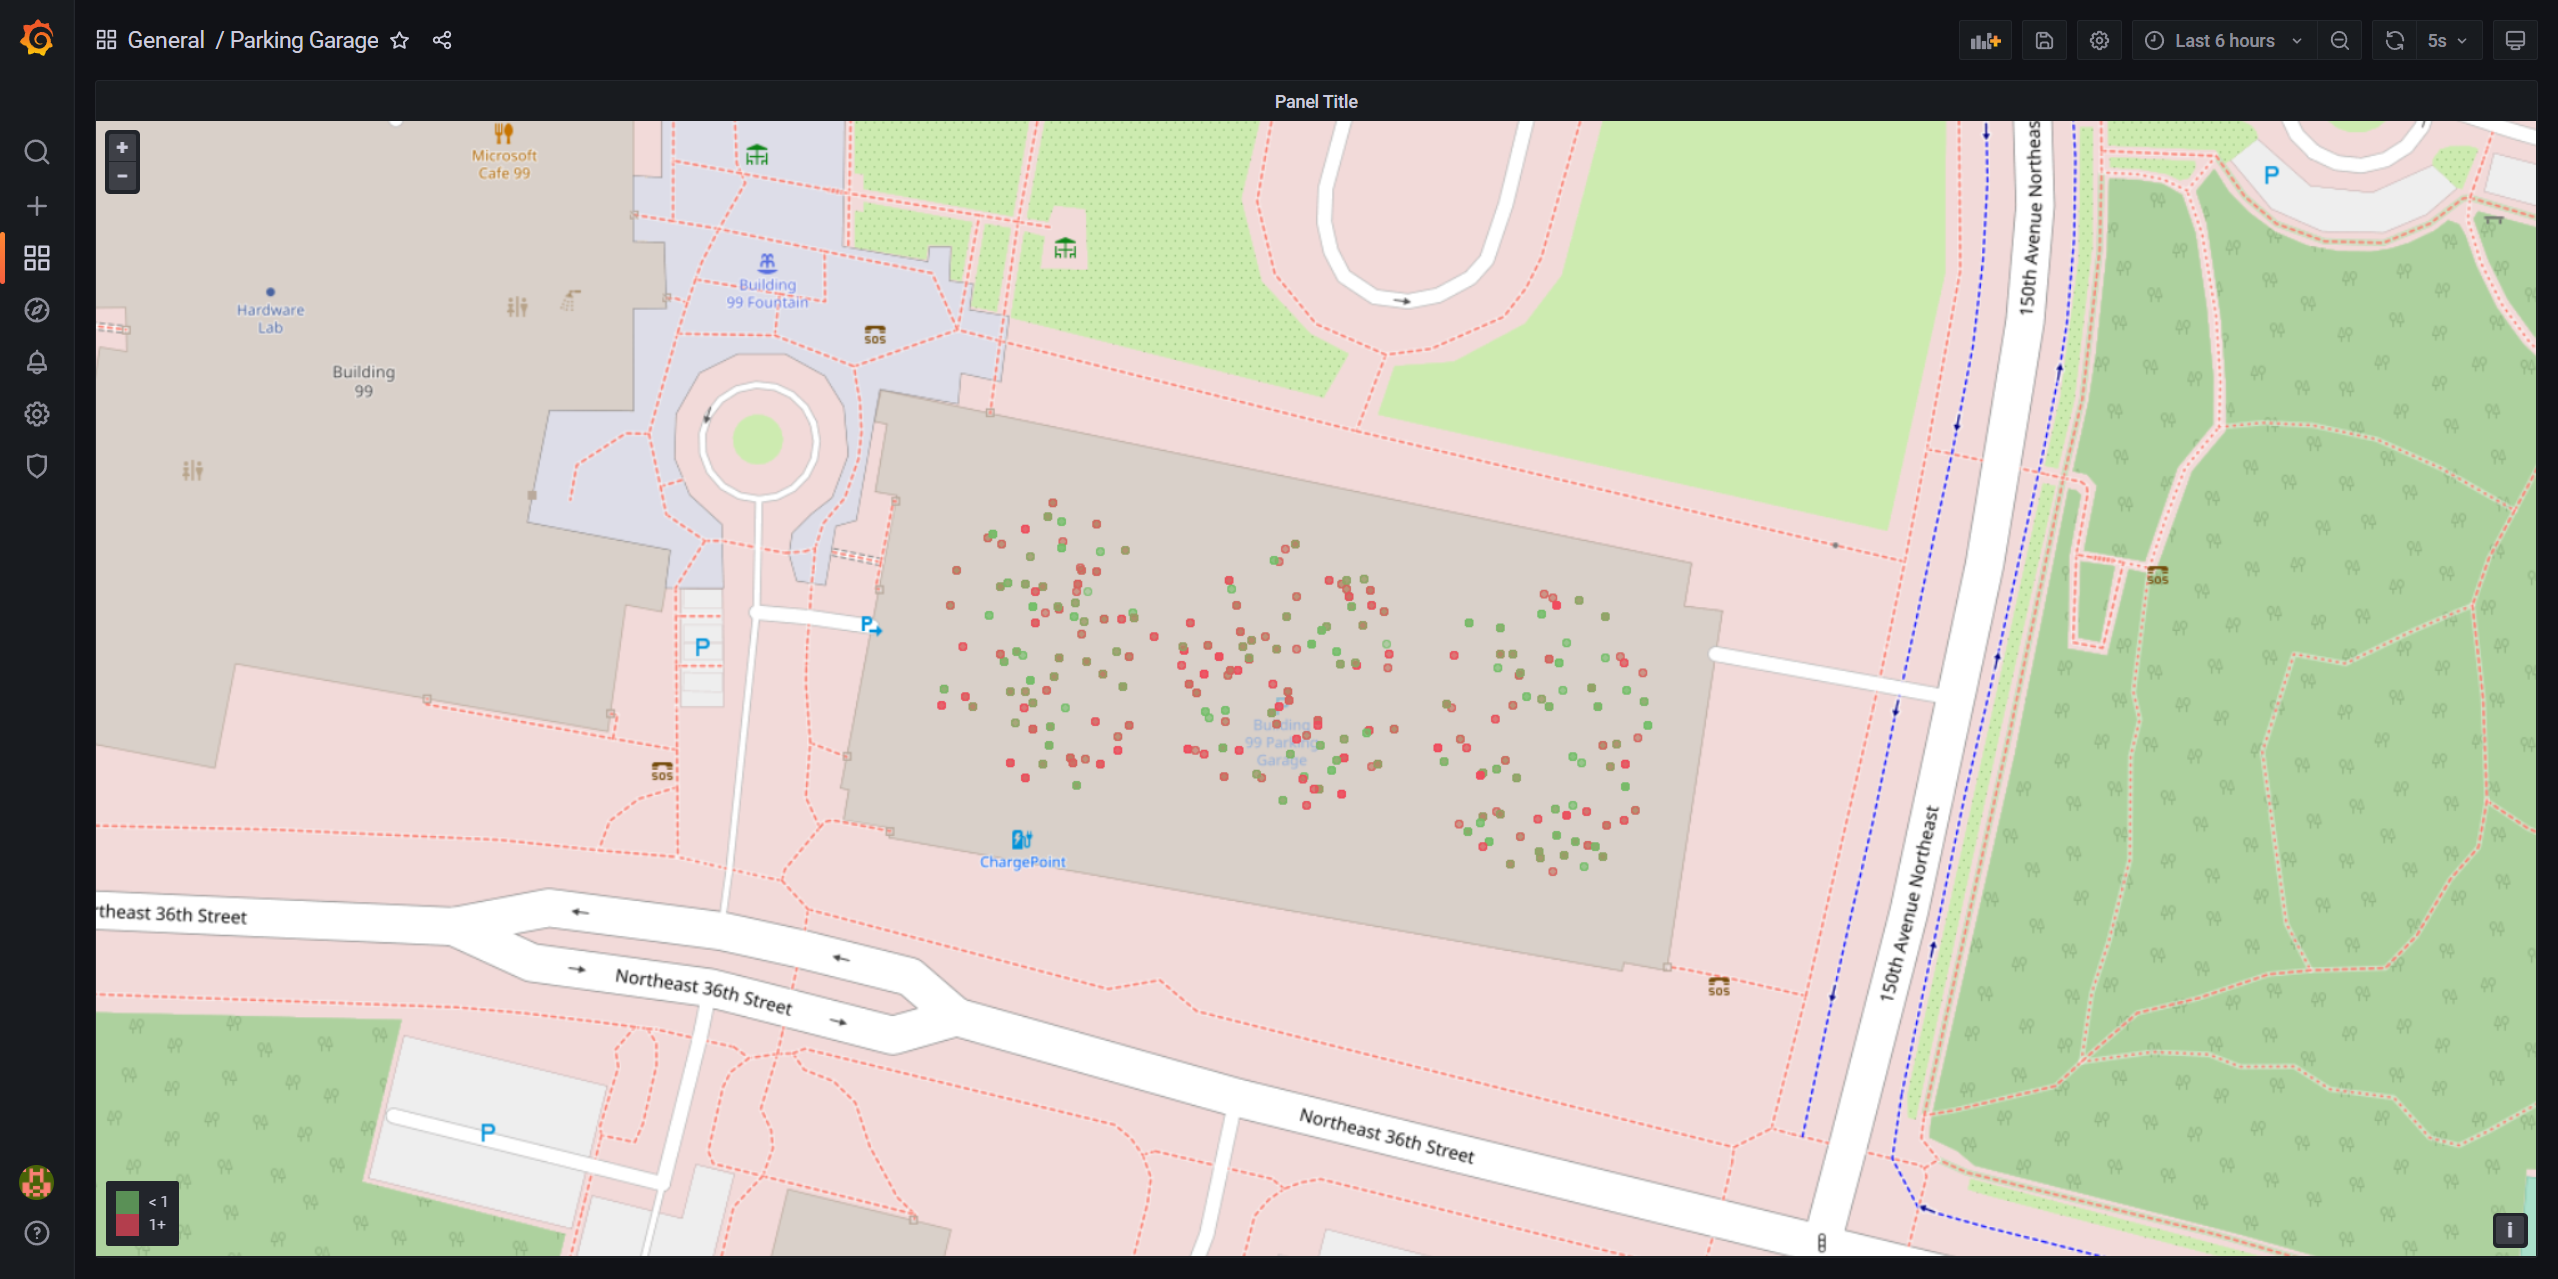
Creating the Dashboard
Above, we configured the data source, so let's now create our visualization for it! To keep this easy I have preconfigured the dashboard before that we can import into Grafana.
{
  "annotations": {
    "list": [
      {
        "builtIn": 1,
        "datasource": "-- Grafana --",
        "enable": true,
        "hide": true,
        "iconColor": "rgba(0, 211, 255, 1)",
        "name": "Annotations & Alerts",
        "target": {
          "limit": 100,
          "matchAny": false,
          "tags": [],
          "type": "dashboard"
        },
        "type": "dashboard"
      }
    ]
  },
  "editable": true,
  "fiscalYearStartMonth": 0,
  "gnetId": null,
  "graphTooltip": 0,
  "id": 1,
  "links": [],
  "liveNow": false,
  "panels": [
    {
      "datasource": null,
      "fieldConfig": {
        "defaults": {
          "color": {
            "mode": "thresholds"
          },
          "mappings": [],
          "thresholds": {
            "mode": "absolute",
            "steps": [
              {
                "color": "green",
                "value": null
              },
              {
                "color": "red",
                "value": 1
              }
            ]
          }
        },
        "overrides": []
      },
      "gridPos": {
        "h": 25,
        "w": 24,
        "x": 0,
        "y": 0
      },
      "id": 2,
      "options": {
        "basemap": {
          "config": {},
          "type": "osm-standard"
        },
        "controls": {
          "mouseWheelZoom": true,
          "showAttribution": true,
          "showDebug": false,
          "showScale": false,
          "showZoom": true
        },
        "layers": [
          {
            "config": {
              "color": {
                "field": "isParked",
                "fixed": "dark-green"
              },
              "fillOpacity": 0.4,
              "shape": "circle",
              "showLegend": true,
              "size": {
                "fixed": 3,
                "max": 15,
                "min": 2
              }
            },
            "location": {
              "mode": "auto"
            },
            "type": "markers"
          }
        ],
        "view": {
          "id": "coords",
          "lat": 47.641728,
          "lon": -122.140278,
          "zoom": 19.24
        }
      },
      "targets": [
        {
          "query": "from(bucket: \"my-sensors\")\r\n  |> range(start: v.timeRangeStart, stop: v.timeRangeStop)\r\n  |> filter(fn: (r) => r[\"_measurement\"] == \"sensor-states\")\r\n  |> pivot(columnKey: [\"_field\"], rowKey: [\"_time\"], valueColumn: \"_value\")\r\n  |> group()\r\n  |> yield(name: \"last\")",
          "refId": "A"
        }
      ],
      "title": "Panel Title",
      "type": "geomap"
    }
  ],
  "refresh": "5s",
  "schemaVersion": 31,
  "style": "dark",
  "tags": [],
  "templating": {
    "list": []
  },
  "time": {
    "from": "now-6h",
    "to": "now"
  },
  "timepicker": {},
  "timezone": "",
  "title": "Parking Garage",
  "uid": "Px36rBv7z",
  "version": 5
}
For illustration purposes, this is the query that is used to create the visualization:
from(bucket: "my-sensors")
  |> range(start: v.timeRangeStart, stop: v.timeRangeStop)
  |> filter(fn: (r) => r["_measurement"] == "sensor-states")
  |> pivot(columnKey: ["_field"], rowKey: ["_time"], valueColumn: "_value")
  |> group()
  |> yield(name: "last")
Running
Everything has been implemented! So let's start up the demo! For that, simply follow these steps:
- Run
npm run start:dapron your application to start the application 2.open the folder to the example and run:npm run start:daprwhich will boot up the demo. Finally, open up the dashboard and see the demo running.
Conclusion
By using Dapr we can easily create an implementation of a Parking Garage using its Actor Framework. Without having to worry about certain pesky configurations or coding that we otherwise would have to do.


Comments ()