
Automatically Provision an IoT Device with DPS
Once you get further in the world of the Internet of Things (IoT) you will notice that you have to setup devices in bulk rather than device-per-device. This is where Azure helps you through a service named Device Provisioning Service.
Requirements
- Azure IoT Hub (Standard Tier or higher)
- A device with Ubuntu installed
The Device Provisioning Process
Before we get started with creating and configuring DPS, let's go through the basics of how Device Provisioning works.
Device Provisioning is the process of getting a device ready for hand-off to an end-user (i.e. the device is ready for bootup and usage)
In the case of provisioning a device with DPS we have 2 main steps:
- The creation of the device with a bare OS
- The configuration of the OS to connect to cloud
While step 1 is trivial, step 2 is considerably more complex as a lot of security aspects have to be taken into account. The diagram below explains how Step 2 is handled through DPS:
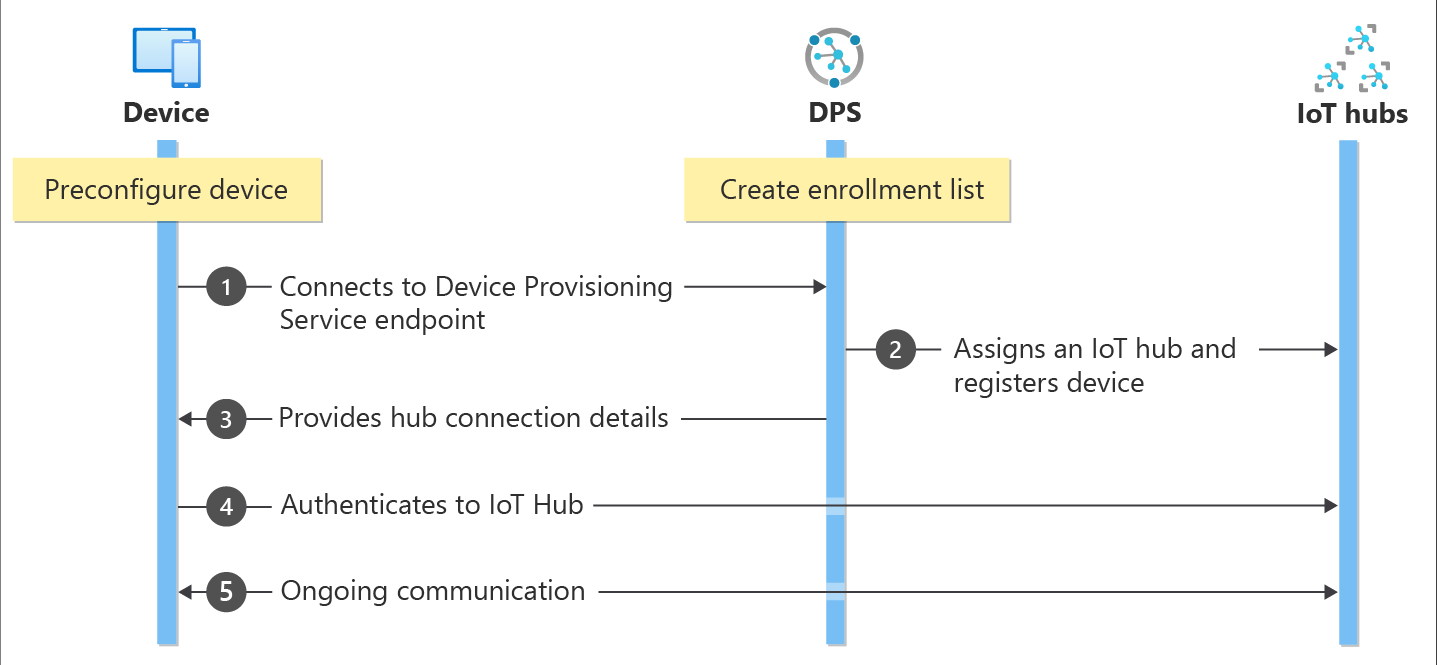
- Device manufacturer adds the device registration information to the enrollment list in the Azure portal.
- Device contacts the DPS endpoint set at the factory. The device passes the identifying information to DPS to prove its identity.
- DPS validates the identity of the device by validating the registration ID and key against the enrollment list entry using either a nonce challenge (Trusted Platform Module) or standard X.509 verification (X.509).
- DPS registers the device with an IoT hub and populates the device's desired twin state.
- The IoT hub returns device ID information to DPS.
- DPS returns the IoT hub connection information to the device. The device can now start sending data directly to the IoT hub.
- The device connects to IoT hub.
- The device gets the desired state from its device twin in IoT hub.
Creating and Configuring DPS
Creating DPS and Linking IoT Hub
Now we know how device provisioning works, let's create and configure our DPS.
To get started we need to create and configure the Device Provisioning Service (DPS). To do this, open up the Azure Portal, search for "Device Provisioning Service" and create one.

Once the Device Provisioning Service has been created, we need to link our IoT Hub to it. So open it up and navigate to "Linked IoT Hubs" and add the created IoT Hub from the requirements.

Creating a Device Enrollment
We now have an IoT Hub linked to the DPS and are able to get started on creating an Enrollment for our device. Open up the Azure Portal under DPS and navigate towards "Manage Enrollments"

Here we can pick Individual Enrollment or Group Enrollment:
- Individual Enrollment: This is for a single device
- Group Enrollment: This is for a group of devices sharing a common attestation (i.e. how will the devices confirm their identity)
Personally I find it more interesting to cover Group Enrollments as this is what we would typically see in production environments. So let's continue with this one.
Head over to Add Enrollment Group and select the configuration you want to use. Here I used the configuration to pick an Edge Device, Symmetric Keys and give it a specific Name.

⚠️ Finally, don't click save yet, but configure the Initial Device Twin State to contain a tag. In our case I picked: "deviceType": "nvidia-cluster"
We will utilize this tag later to let IoT Hub know which modules should be provisioned to which set of devices. DPS will help us connect the device to the correct IoT Hub with the correct initial state, but IoT Hub will add our modules.

Configuring our IoT Edge Modules to be Deployed
Ok, so let's recap. We now have:
- Created a DPS
- Configured it to link to our IoT Hub
- Created an enrollment for a group of devices based on an attestation
- Configured it so the devices provisioned get a specific Twin State with them
If we would connect a device now, we will see that it will get provisioned with the tag we provided earlier ("deviceType": "nvidia-cluster"). Now we have to use this tag to let IoT Hub know which modules should get deployed on this set of devices.
Open up your IoT Hub and go towards IoT Edge and click Add Deployment in the IoT Edge Deployments tab.

For the initial name, feel free to pick something unique for yourself.

The next step is the first of the 2 most important steps. Here we will define which modules should get deploy. So open up the "Add" pane and add an "IoT Edge Module"
Note: here you can also configure Azure Container Registry credentials if you need those.

In our case we want a simple simulation, so add the public Simulation device from the Docker Hub
- Image URI:
mcr.microsoft.com/azureiotedge-simulated-temperature-sensor:1.0

Afterwards, we specify the routes (send everything upstream)

Now the second most important part comes: specifying the target devices. Here we specify which devices should get these modules. In our case we will thus configure tags.deviceType = 'nvidia-cluster' as we defined before (remember where we put the initial twin state to have "tags": { "deviceType": "nvidia-cluster" })

Finally, validate the deployment and you will get redirect back to your IoT Hub and see your deployment standing (but with 0 devices for now!)


Configuring our Devices
As a last step, we need to configure our devices to know where they should connect to and fetch their information. We could do this manually for each device, but for production workloads this is a long cumbersome task. Therefore, we will utilize the iot-edge-config tool that will make our lives so much easier!
Note: since we are using a group enrollment key, we have to derive a new key from it
Open up your device and run the following commands:
# DPS Enrollment Group Key
DPS_GROUP_ENROLLMENT_KEY=<YOUR_GROUP_ENROLLMENT_KEY>
DPS_SCOPE_ID=<YOUR_DPS_SCOPE_ID>

# Get the MAC Address
MAC_ADDR=$(ifconfig eth0 | grep -o -E '([[:xdigit:]]{1,2}:){5}[[:xdigit:]]{1,2}' | sed -En "s/:/-/gp")

# Specify the Registration ID
# Note: in our case we utilize the Mac Address
REG_ID=$MAC_ADDR

# Compute a Derived key
keybytes=$(echo $DPS_GROUP_ENROLLMENT_KEY | base64 --decode | xxd -p -u -c 1000)
DERIVED_KEY=$(echo -n $REG_ID | openssl sha256 -mac HMAC -macopt hexkey:$keybytes -binary | base64)

# Configure
wget https://github.com/Azure/iot-edge-config/releases/latest/download/azure-iot-edge-installer.sh -O azure-iot-edge-installer.sh
chmod +x azure-iot-edge-installer.sh
sudo -H ./azure-iot-edge-installer.sh -s $DPS_SCOPE_ID -r $MAC_ADDR -k $DERIVED_KEY
rm -rf azure-iot-edge-installer.sh

We can now check the status by running sudo iotedge system logs which should not show any errors. If we then open our DPS and go to Enrollment Group Details -> Registration Records we can see our device being registered.

Finally, open up IoT Hub and go to IoT Edge devices. There you will now see your device automatically being provisioned! After a couple of minutes, the modules should as well be available on it.

Seeing that we configured a simulated sensor to be deployed, we can open up our VSCode, go to the IoT Hub Extension and listen for incoming messages to view our messages.
Note: The simulated sensor module sends 1 message every 5 seconds and automatically stops after 500 to preserve your quota. It could be that you have to restart the container if it stops.


Comments ()