
Part 4 - Creating a Automated Machine Learning model based on our Car Simulation Data

This is Part 4 in the IoT Edge series, view the main article or go the part 3 to view the previous article.
Recap and next steps
We just built our 2 simulators that will produce the data that we want to filter. Before we can create our modules to do this, we will first train an AI model that works on top of this data.
What is this AI model going to do? Well for car data there are a lot of use cases we can have, examples are: location prediction, distance detection, pothole detection, …
In this case we will go for speed prediction, which has a couple of benefits for us:
- We can have a regression use case (prediction)
- We have a real-world example: speed detection can be used to make sure that we are slowing down, or what the adaptation would be for future cycles.
- We can have real-time data coming in for the future cycles (prediction data) that we can send to cloud to enable future use cases (e.g. stream processing, …)
Let's get started!
Initial Setup
Configuration
For our creation of this module, we will use the following settings:
- Path:
/home/xavier/iot-edge - Solution: EdgeSolutionCarFilter
- Module Template: C# Module
- Module Name: ModuleFilterCar
- Docker Repository:
xavierregistry.azurecr.io/module-filter-car
Coding
Solution Analysis
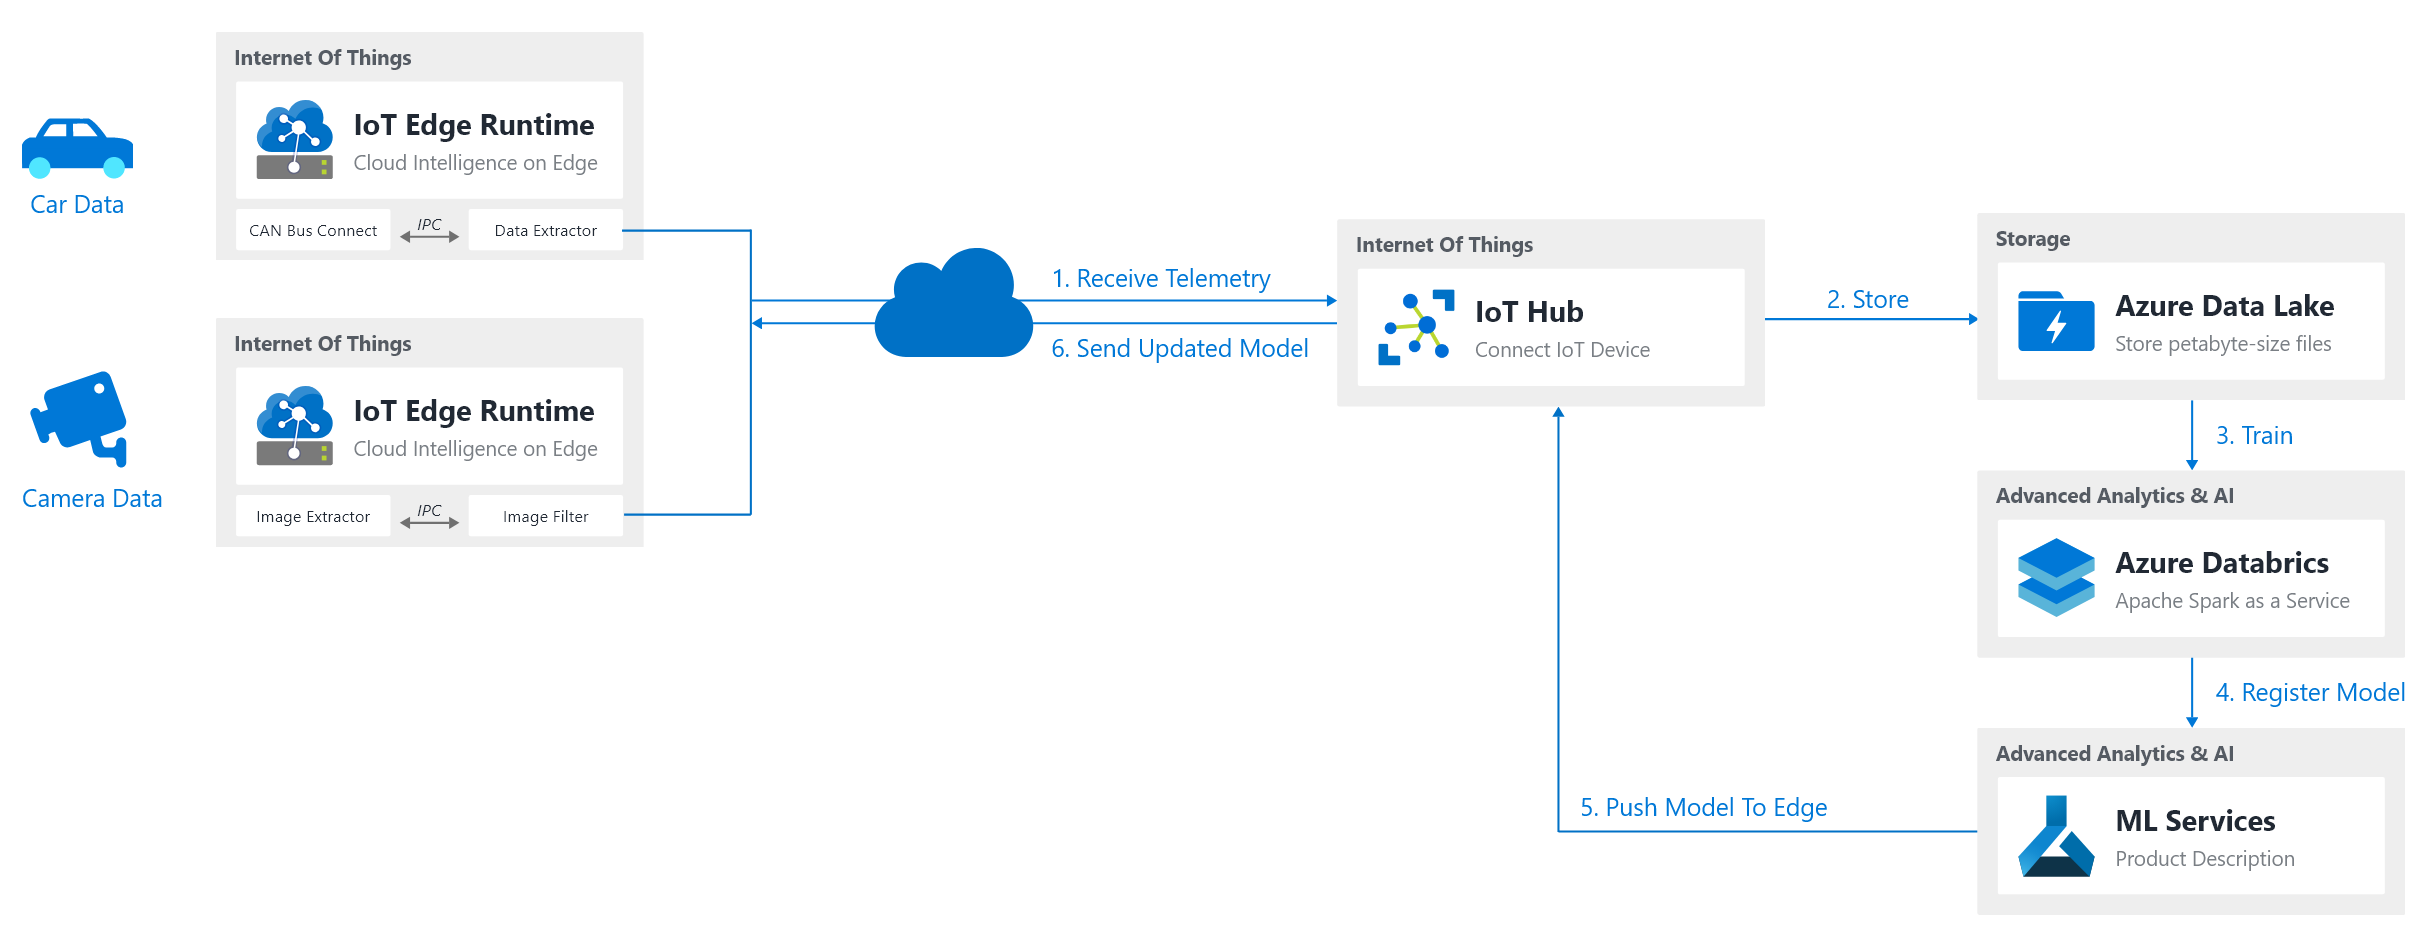
Remembering our simulator code for our car data, this was replaying points from a csv and sending them to our device hub. How would this work in a real-world use case? If we think about this, we can define the following steps that should be followed for our IoT Edge device to utilize a nice working AI model:
- Gather data
- Train our AI model
- Deploy our AI model on edge
- Predict values of our Edge device based on the AI model
- Repeat
For the sake of simplicity of this article, we will first focus on creating everything manually so that in a later article we can talk about automating all these steps.
Step 1. Gathering Data
Since for this article we are sending everything from a CSV file that already contains this gathered data, we can state that step 1. has been finished, so up to step 2!
Step 2. Training our AI model
We will predict the speed of our car depending on some parameters from the CSV file. Choosing these parameters is critical to have a good working model. In our case we will go for the following as input parameters:
- Throttle Position
- Engine RPM
- Acceleration GS
With our output parameter being:
- Speed MPH
Now how will we train this model? For that we will use ML.NET which allows us to do this quite easily. Let's get started (for an introduction, feel free to check: Predicting Instagram with ML.NET)
Note: The reason we are utilizing ML.NET is because it's quite simple to use, plus it allows us to export our model as a ONNX format which is the open standard for ML Models.Step 2.1. Creating our ML Project (ML.NET Setup)
We first start by creating a new .NET solution and adding the Microsoft.ML dependency to it.
# Create a new .NET solution
# dotnet new <type> -o <outDir>
dotnet new console -o MLCarFilter

# Add Microsoft.ML as a reference
# dotnet add <solution> package <packageName>
dotnet add MLCarFilter package Microsoft.ML
After this is done, we copy over the car.csv file to our project root. Now we can start writing our prediction code.
Step 2.2. Adding our ML code
For our prediction, we can base ourselves on the material from the ML.NET. After searching a bit, I came on the following repository that explains how to utilize a regression algorithm in ML.NET (which is what we want to use): Regression_TaxiFarePrediction.
Before we start adapting it, first rename car.csv to car-train.csv and copy some of the lines to a new file called car-test.csv, this file will be our testing data for the regression training.
Note: We will just be creating a project here to deploy on edge, so we won't go to deep into our ML code. For the full code, feel free to check GitHub
We can now create the following to create a Model.zip in our root folder.
Program.cs
// USING statements
namespace MLCarFilter
{
    class Program
    {
        private static string trainingFilePath = "./car-train.csv";
        private static string testFilePath = "./car-test.csv";
        private static string modelOutputPath = "./Model.zip";

        static void Main(string[] args)
        {
            TrainModel();
            TestModel();
        }

        public static void TrainModel()
        {
            // Create ML Context with seed for repeteable/deterministic results
            MLContext mlContext = new MLContext(seed: 0);

            // STEP 1: Common data loading configuration
            IDataView trainingDataView = mlContext.Data.LoadFromTextFile<CarPoint>(trainingFilePath, hasHeader: true, separatorChar: ',');
            IDataView testDataView = mlContext.Data.LoadFromTextFile<CarPoint>(testFilePath, hasHeader: true, separatorChar: ',');

            // STEP 2: Common data process configuration with pipeline data transformations
            var dataProcessPipeline = mlContext.Transforms.CopyColumns(outputColumnName: "Label", inputColumnName: nameof(CarPoint.Speed_MPH))
                .Append(mlContext.Transforms.NormalizeMeanVariance(outputColumnName: "ThrottlePosition_Normalized", inputColumnName: nameof(CarPoint.ThrottlePosition)))
                .Append(mlContext.Transforms.NormalizeMeanVariance(outputColumnName: "Engine_RPM_Normalized", inputColumnName: nameof(CarPoint.Engine_RPM)))
                .Append(mlContext.Transforms.NormalizeMeanVariance(outputColumnName: "Acceleration_Gs_Normalized", inputColumnName: nameof(CarPoint.Acceleration_Gs)))
                .Append(mlContext.Transforms.Concatenate("Features", "ThrottlePosition_Normalized", "Engine_RPM_Normalized", "Acceleration_Gs_Normalized"));

            Console.WriteLine("================= Labels & Features ==================");
            Console.WriteLine($"Label:\n\t{nameof(CarPoint.Speed_MPH)}");
            Console.WriteLine($"Features: \n\t[V1] {nameof(CarPoint.ThrottlePosition)} \n\t[V2] {nameof(CarPoint.Engine_RPM)} \n\t[V3] {nameof(CarPoint.Acceleration_Gs)}");

            // STEP 3: Set the training algorithm, then create and config the modelBuilder - Selected Trainer (SDCA Regression algorithm)
            var trainer = mlContext.Regression.Trainers.Sdca(labelColumnName: "Label", featureColumnName: "Features");
            var trainingPipeline = dataProcessPipeline.Append(trainer);

            // STEP 4: Train the model fitting to the DataSet
            //The pipeline is trained on the dataset that has been loaded and transformed.
            Console.WriteLine("================= Training the model =================");
            var trainedModel = trainingPipeline.Fit(trainingDataView);

            // STEP 5: Evaluate the model and show accuracy stats
            Console.WriteLine("===== Evaluating Model's accuracy with Test data =====");

            IDataView predictions = trainedModel.Transform(testDataView);
            var metrics = mlContext.Regression.Evaluate(predictions, labelColumnName: "Label", scoreColumnName: "Score");

            // Common.ConsoleHelper.PrintRegressionMetrics(trainer.ToString(), metrics);

            // STEP 6: Save/persist the trained model to a .ZIP file
            mlContext.Model.Save(trainedModel, trainingDataView.Schema, modelOutputPath);

            Console.WriteLine("======================================================");
            Console.WriteLine("The model is saved to {0}", modelOutputPath);
        }

        public static void TestModel()
        {
            // Create ML Context with seed for repeteable/deterministic results
            MLContext mlContext = new MLContext(seed: 0);

            // Common.ConsoleHelper.PrintRegressionMetrics(trainer.ToString(), metrics);

            var carPointSample = new CarPoint()
            {
                Time = "2018-04-08 10:32:55.390684",
                Seconds = 772.693372F,
                Latitude_Y_Degrees = 30.321299F,
                Longitude_X_Degrees = -97.75582299999999F,
                Distance_Miles = 7.96F,
                Speed_MPH = 30.647F,
                SteeringAngle = -0.9F,
                ThrottlePosition = 2F,
                Engine_RPM = 1624F,
                Lateral_Gs = -0.01F,
                Acceleration_Gs = -0.05F
            };

            ITransformer trainedModel;
            using (var stream = new FileStream(modelOutputPath, FileMode.Open, FileAccess.Read, FileShare.Read))
            {
                trainedModel = mlContext.Model.Load(stream, out var modelInputSchema);
            }

            // Create prediction engine related to the loaded trained model
            var predEngine = mlContext.Model.CreatePredictionEngine<CarPoint, CarPointSpeedPrediction>(trainedModel);

            //Score
            var resultprediction = predEngine.Predict(carPointSample);

            Console.WriteLine("======================================================");
            Console.WriteLine($"Predicted speed: {resultprediction.Speed_MPH:0.####}, actual speed: 30.647");
            Console.WriteLine("======================================================");
        }
    }
}
Step 3. Deploying our AI model on Edge
Once our Model.zip was created, we can now put that on our Edge module. In our case we will do this by manual inclusion for this blog post, so just copy it over to the EdgeSolutionCarFilter project into the ModuleFilterCar/model/ folder.
Important!
To make sure that this model gets copied to our output directory, we have to adapt our .csproj file to do this. For this add the following piece of code:
<ItemGroup>
    <ProjectCapability Include="AzureIoTEdgeModule"/>
    <Content Include="model\**">
        <CopyToOutputDirectory>PreserveNewest</CopyToOutputDirectory>
    </Content>
</ItemGroup>
Step 4. Predicting values of our Edge Device based on the deployed AI model
The final step is to incorporate the usage of our trained model in the Edge module. To do this, we will first add Microsoft.ML to the dependencies of the .NET project with dotnet add ModuleFilterCar package Microsoft.ML and add the following code for Program.cs, which will utilize the model that we just built and send the predictions to IoT Hub.
ModuleCarSimulator/Program.cs
Change the SendEventAsync call to ioTHubModuleClient.SendEventAsync("input-simulator-car", message);
Program.cs
In our Init() method, we will first make sure that we can process values that were received from the EdgeHub, so change the following line:
await ioTHubModuleClient.SetInputMessageHandlerAsync("input1", PipeMessage, ioTHubModuleClient);
Towards:
await ioTHubModuleClient.SetInputMessageHandlerAsync("input-simulator-car", ProcessSimulatorCarMessages, ioTHubModuleClient);
Note: We can test thisinput-simulator-carby the following curl request:curl --header "Content-Type: application/json" --request POST --data '{"inputName": "input-simulator-car","data":"2018-04-08 10:31:56.690670,713.9933580000001,30.32343,-97.756062,7.75,35.313,-7.6,2,1861,0.05,-0.16"}' http://localhost:53000/api/v1/messages
Now add a method called ProcessSimulatorCarMessages as a Task type as follows:
/// <summary>
/// This method is called whenever the module is sent a message from the EdgeHub.
/// It just pipe the messages without any change.
/// It prints all the incoming messages.
/// </summary>
static async Task<MessageResponse> ProcessSimulatorCarMessages(Message message, object userContext)
{
    int counterValue = Interlocked.Increment(ref counter);

    var moduleClient = userContext as ModuleClient;
    if (moduleClient == null)
    {
        throw new InvalidOperationException("UserContext doesn't contain " + "expected values");
    }

    byte[] messageBytes = message.GetBytes();
    string messageString = Encoding.UTF8.GetString(messageBytes);
    Console.WriteLine($"[Message #{counterValue}] {messageString}");

    // If our message is not empty, parse it and send back the prediction to IoT Hub.
    if (!string.IsNullOrEmpty(messageString))
    {
        // Predict the speed
        var splittedMessage = messageString.Split(",");
        var predictedCarSpeed = PredictValue(float.Parse(splittedMessage[7]), float.Parse(splittedMessage[8]), float.Parse(splittedMessage[10]));
        var messageResult = new Message(Encoding.UTF8.GetBytes("" + predictedCarSpeed));

        // Print on Console
        var now = DateTime.Now.ToString("g");
        System.Console.WriteLine($"[Simulator][{now}] Sending Prediction: {predictedCarSpeed}, Actual Speed: {splittedMessage[5]}");

        // Send to IoT Hub
        await moduleClient.SendEventAsync("output-filter-car", messageResult);
    }

    return MessageResponse.Completed;
}
That will use the PredictValue method:
public static float PredictValue(float ThrottlePosition, float Engine_RPM, float Acceleration_GS)
{
    // Create ML Context with seed for repeteable/deterministic results
    MLContext mlContext = new MLContext(seed: 0);

    var carPointSample = new CarPoint()
    {
        ThrottlePosition = ThrottlePosition,
        Engine_RPM = Engine_RPM,
        Acceleration_Gs = Acceleration_GS
    };

    ITransformer trainedModel;
    using (var stream = new FileStream(modelOutputPath, FileMode.Open, FileAccess.Read, FileShare.Read))
    {
        trainedModel = mlContext.Model.Load(stream, out var modelInputSchema);
    }

    // Create prediction engine related to the loaded trained model
    var predEngine = mlContext.Model.CreatePredictionEngine<CarPoint, CarPointSpeedPrediction>(trainedModel);

    // Score
    var resultprediction = predEngine.Predict(carPointSample);

    return resultprediction.Speed_MPH;
}
Step 5. Hooking our Simulator to the Filter Module
A last thing we will do is to create our deployment with our deployment.template.json file. Here we will however connect the simulator to the filter and the filter to our cloud. We do this like this:
"$edgeHub": {
    "properties.desired": {
    "schemaVersion": "1.0",
    "routes": {
        "ModuleSimulatorCarToIoTHub": "FROM /messages/modules/ModuleSimulatorCar/outputs/output-simulator-car INTO BrokeredEndpoint(\"/modules/ModuleFilterCar/inputs/input-simulator-car\")",
        "ModuleFilterCarToIoTHub": "FROM /messages/modules/ModuleFilterCar/outputs/* INTO $upstream"
    },
    "storeAndForwardConfiguration": {
        "timeToLiveSecs": 7200
    }
    }
}
Now everything should be working once you deploy, and you will see the following:
IoT Hub module client initialized.
[Filter][08/23/2019 16:21][Message #1] 2018-04-08 10:32:17.919074,735.221761,30.322184999999998,-97.75674599999999,7.85,29.375,2.2,14,1774,-0.03,0.02
[Filter][08/23/2019 16:21] Sending Prediction: 33.95982, Actual Speed: 29.375
[Filter][08/23/2019 16:21][Message #2] 2018-04-08 10:32:17.990676,735.293363,30.322177000000003,-97.756744,7.86,29.42,2.0,13,1748,-0.02,0.02
[Filter][08/23/2019 16:21] Sending Prediction: 33.32725, Actual Speed: 29.42
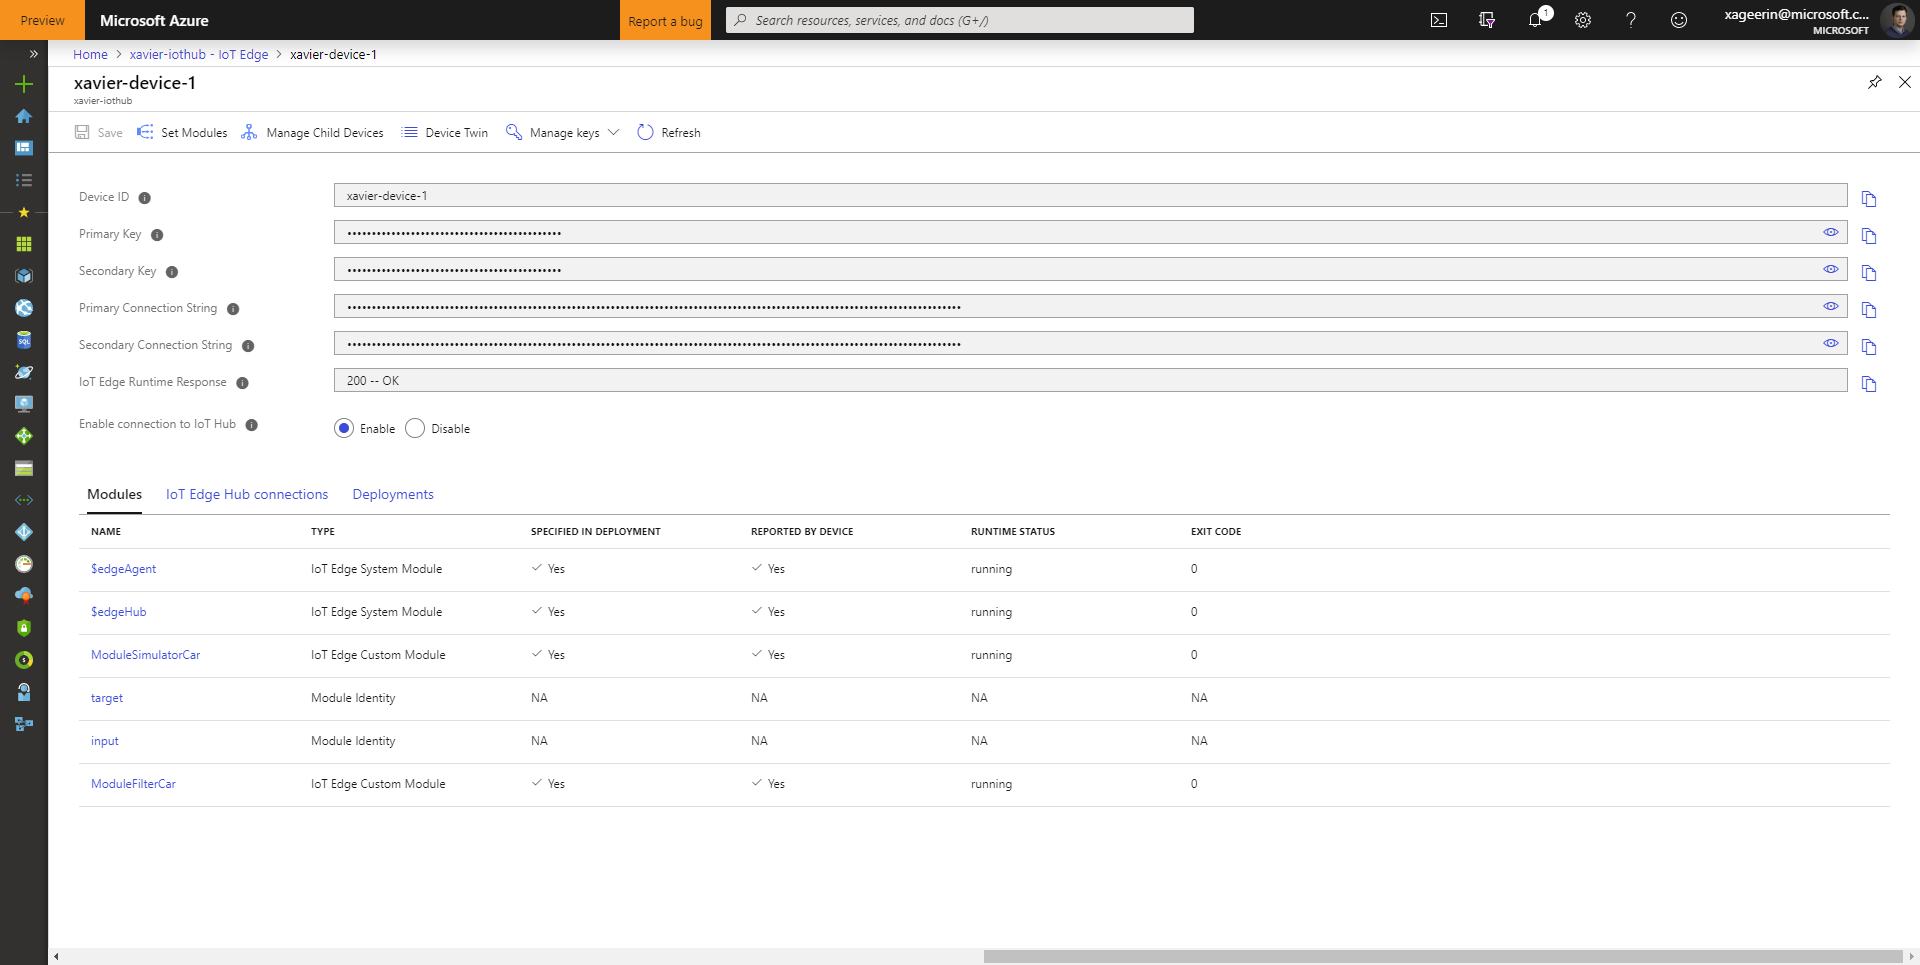
within our IoT Hub overview on the device, the following modules activated:
Conclusion
We just created our filter method with a few simple steps that created a small .NET application that utilized ML.NET to train our AI model. Further steps would now be to create an automated pipeline that does this on top of batch data and updates the AI model on edge with it (by creating a deployment at scale). This however is not in the scope of this series but might be something I cover later on.


Comments ()