
Part 2 - Creating a Car Data simulator in IoT Edge

This is Part 2 in the Iot Edge series, view the main article or go the part 1 to view the previous article.
Recap and next steps
In part 1 we created our cloud infrastructure, our initial device connected to it and afterwards wrote a simulator module that we pushed to the edge device, that will send us the time every 30 seconds
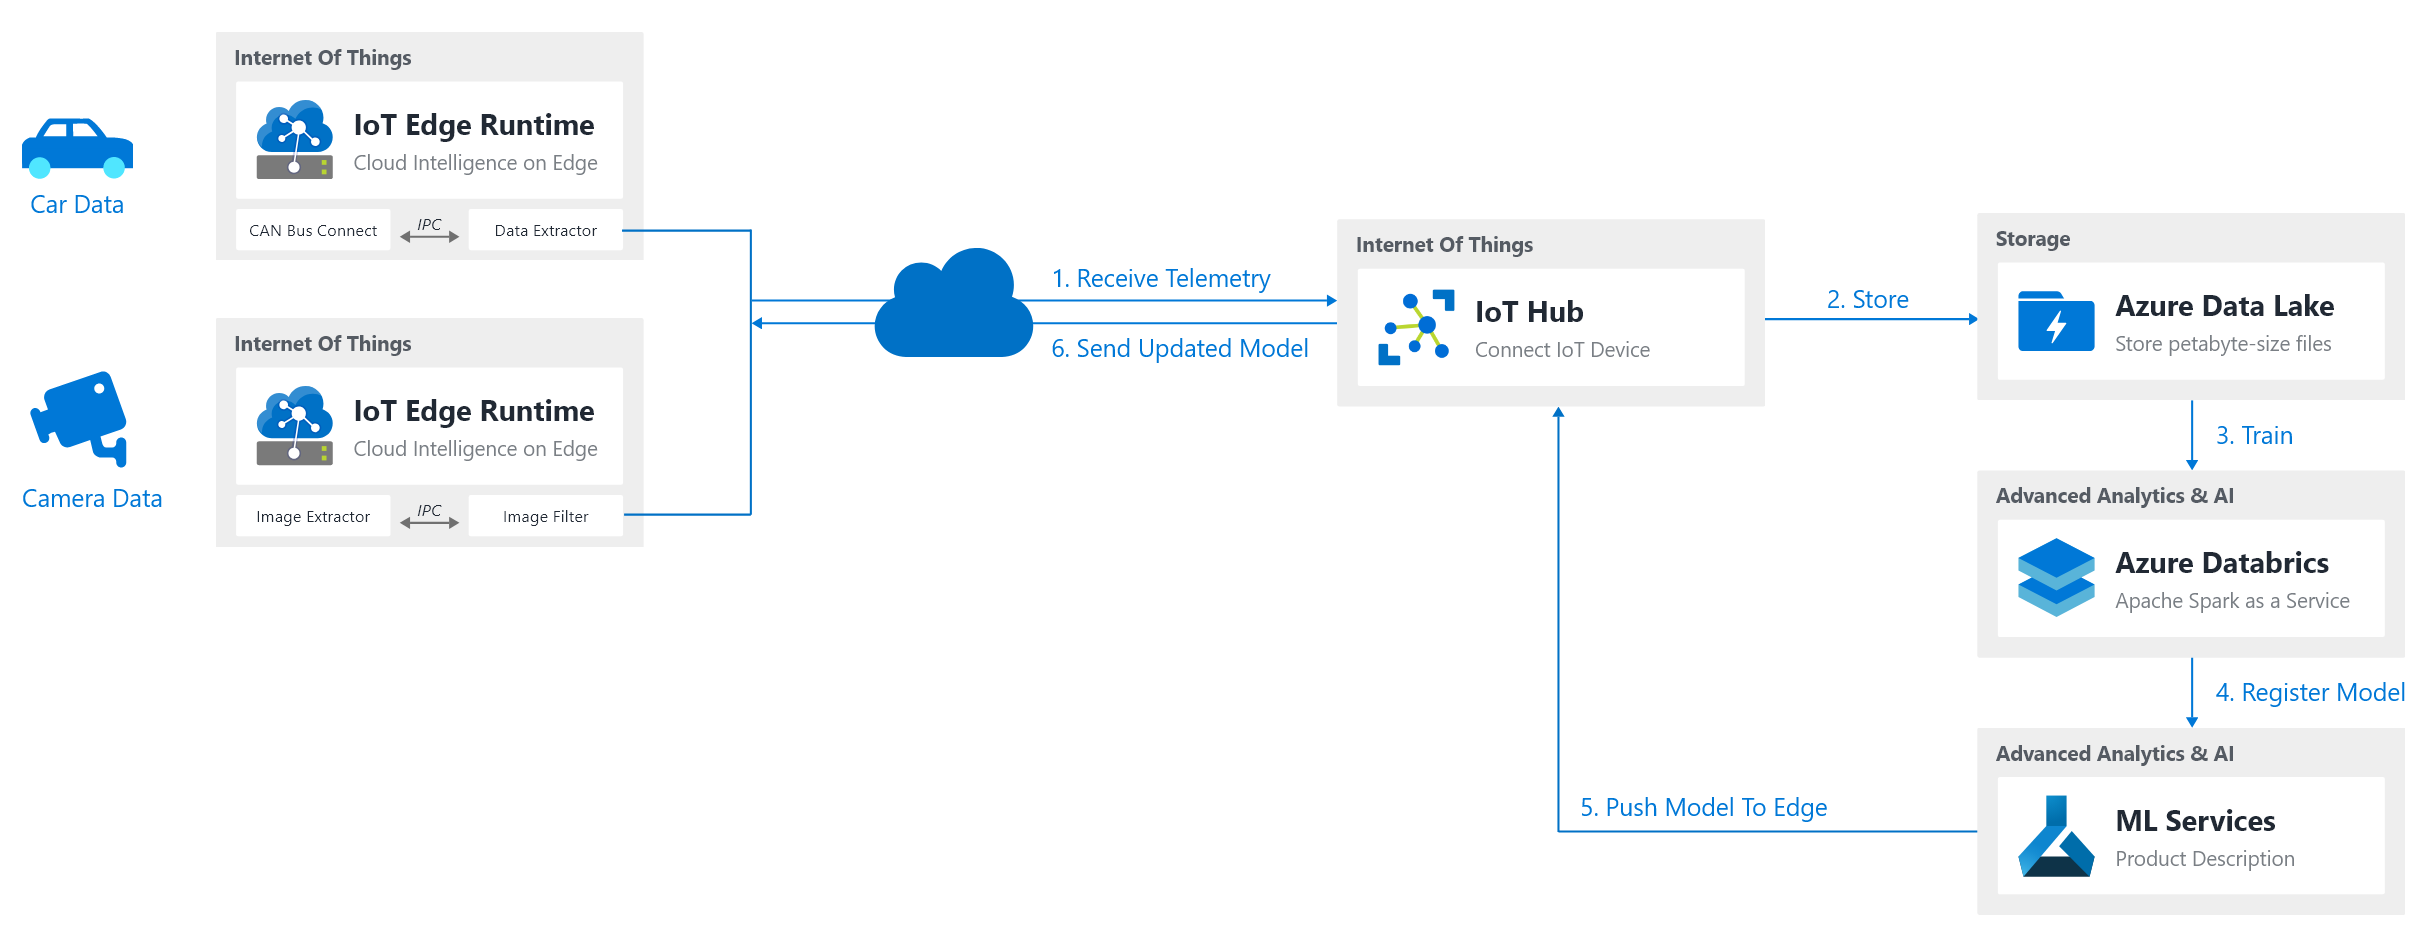
What we want to do now is that we want to create 2 solutions as shown in our architecture that will simulate car data and video data. So let's get started!
Initial Setup
Configuration
As we learned in part 1 we set up a new IoT Edge solution with the following parameters:
- Path:
/home/xavier/iot-edge - Solution: EdgeSolutionCarFilter
- Module Template: C# Module
- Module Name: ModuleSimulatorCar
- Docker Repository:
xavierregistry.azurecr.io/module-simulator-car
Data Gathering
We start off with finding a dataset of points that we want our simulator to use. We will then send off each of these datapoints every second as our simulation.
Note: In real-life you would not use a simulator but just use a module to capture your Video Feed/CAN Dongle/USB/… connected to the device
Luckily an excellent repository exist on GitHub that contains an interesting dataset for car datapoints that are comparable to a CAN bus: https://github.com/cloudpose/smartphonedrivingdataset
This dataset (dataset_car.csv) has the following fields:
- Time
- Seconds
- Latitude / Y Position (Degrees)
- Longitude / X Position (Degrees)
- Distance (Miles)
- Speed (MPH)
- Steering Angle
- Throttle Position
- Engine RPM
- Lateral Gs
- Acceleration Gs
Coding our Simulator
Program.cs
Start off by creating a new file called car.csv in a new data folder under your module (this is where Program.cs is located - e.g. EdgeSolutionCarFilter/modules/ModuleSimulatorCar/data/car.csv)
Once this is done, adapt your Program.cs file to look like this for the Init():
static async Task Init()
{
    MqttTransportSettings mqttSetting = new MqttTransportSettings(TransportType.Mqtt_Tcp_Only);
    ITransportSettings[] settings = { mqttSetting };

    // Open a connection to the Edge runtime
    ModuleClient ioTHubModuleClient = await ModuleClient.CreateFromEnvironmentAsync(settings);
    await ioTHubModuleClient.OpenAsync();
    Console.WriteLine("IoT Hub module client initialized.");

    // Start our simulator
    // Note: this is not async, we can run on the main thread
    StartSimulator(ioTHubModuleClient, "data/car.csv");
}
The above will open our IoT Edge Hub connection through the MQTT transport layer, whereafter we start our simulator.
Note: This opens a connection to theIoT Edge Hub! Which is still locally running and not to cloud. It's this Hub that will act as our kind of service bus and send the events toIoT Hubon Azure.
With the Simulator code looking like:
static void StartSimulator(ModuleClient ioTHubModuleClient, string filePath)
{
    int lineCount = 0;
    string line;

    System.IO.StreamReader file = new System.IO.StreamReader(filePath);

    while ((line = file.ReadLine()) != null)
    {
        // Skip the first line -> it's the header
        if (lineCount == 0) {
            lineCount++;
            continue;
        }

        // Send message
        var now = DateTime.Now.ToString("g");
        System.Console.WriteLine($"[Simulator][{now}] {line}");
        var message = new Message(Encoding.UTF8.GetBytes(line));
        ioTHubModuleClient.SendEventAsync("output", message);

        // Sleep for a second and go to the next line
        lineCount++;
        System.Threading.Thread.Sleep(1000);
    }

    file.Close();

    // Loop infinitely
    System.Console.WriteLine("[Simulator] Reached end of CSV file, restarting");
    StartSimulator(ioTHubModuleClient, filePath);
}
This is a quite trivial simulator, just reading our CSV line by line and sending the lines to the IoT Edge Device Hub on the "output" channel. See the following link for the method doing this: https://docs.microsoft.com/en-us/dotnet/api/microsoft.azure.devices.client.moduleclient.sendeventasync?view=azure-dotnet
When now testing this module, we see:
xavier@PersonalVM:~/iot-edge/EdgeSolutionCarFilter/modules/ModuleSimulatorCar$ env $(sudo iotedgehubdev modulecred | xargs) dotnet run
IoT Hub module client initialized.
[Simulator][8/10/19 10:46 AM] 2018-04-08 10:31:37.005628,694.308316,30.327355999999998,-97.75596800000001,7.47,61.563,-0.3,13,2146,-0.0,-0.02
[Simulator][8/10/19 10:46 AM] 2018-04-08 10:31:37.090666,694.393353,30.327336,-97.755969,7.47,61.51,-0.3,13,2145,-0.0,-0.02
[Simulator][8/10/19 10:46 AM] 2018-04-08 10:31:37.190665,694.4933530000001,30.327312,-97.755969,7.48,61.448,-0.3,13,2144,-0.0,-0.02
[Simulator][8/10/19 10:46 AM] 2018-04-08 10:31:37.247328,694.550016,30.327298,-97.755969,7.48,61.412,-0.3,13,2144,-0.0,-0.02
Deploying our Simulator
So we can deploy this to our container registry as learned in the first part with the following deployment.template.json file:
{
  "$schema-template": "1.0.0",
  "modulesContent": {
    "$edgeAgent": {
      "properties.desired": {
        "schemaVersion": "1.0",
        "runtime": {
          "type": "docker",
          "settings": {
            "minDockerVersion": "v1.25",
            "loggingOptions": "",
            "registryCredentials": {
              "xavierregistry": {
                "username": "$CONTAINER_REGISTRY_USERNAME_xavierregistry",
                "password": "$CONTAINER_REGISTRY_PASSWORD_xavierregistry",
                "address": "xavierregistry.azurecr.io"
              }
            }
          }
        },
        "systemModules": {
          "edgeAgent": {
            "type": "docker",
            "settings": {
              "image": "mcr.microsoft.com/azureiotedge-agent:1.0",
              "createOptions": {}
            }
          },
          "edgeHub": {
            "type": "docker",
            "status": "running",
            "restartPolicy": "always",
            "settings": {
              "image": "mcr.microsoft.com/azureiotedge-hub:1.0",
              "createOptions": {
                "HostConfig": {
                  "PortBindings": {
                    "5671/tcp": [
                      {
                        "HostPort": "5671"
                      }
                    ],
                    "8883/tcp": [
                      {
                        "HostPort": "8883"
                      }
                    ],
                    "443/tcp": [
                      {
                        "HostPort": "443"
                      }
                    ]
                  }
                }
              }
            }
          }
        },
        "modules": {
          "ModuleSimulatorCar": {
            "version": "1.0",
            "type": "docker",
            "status": "running",
            "restartPolicy": "always",
            "settings": {
              "image": "${MODULES.ModuleSimulatorCar}",
              "createOptions": {}
            }
          }
        }
      }
    },
    "$edgeHub": {
      "properties.desired": {
        "schemaVersion": "1.0",
        "routes": {
          "ModuleSimulatorCarToIoTHub": "FROM /messages/modules/ModuleSimulatorCar/outputs/* INTO $upstream"
        },
        "storeAndForwardConfiguration": {
          "timeToLiveSecs": 7200
        }
      }
    }
  }
}
Now we can:
Note: Make sure that you set the configuration in your.envfile for the container registry (seeregistryCredentialsindeployment.amd64.jsonfor the required keys)
- Login to our container repository:
sudo docker login -u <USERNAME> -p <PASSWORD> <LOGIN_SERVER> - Right click on
deployment.template.jsonand:Build and Push IoT Edge Solutionwhich will initiate adocker build --rm -f "/home/xavier/iot-edge/EdgeSolutionCarFilter/modules/ModuleSimulatorCar/Dockerfile.amd64" -t xavierregistry.azurecr.io/module-simulator-car:0.0.1-amd64 "/home/xavier/iot-edge/EdgeSolutionCarFilter/modules/ModuleSimulatorCar" && docker push xavierregistry.azurecr.io/module-simulator-car:0.0.1-amd64command. - Right click on our device in the Azure IoT Hub Extension and click
Create Deployment for Single Deviceand navigate to the path of our solution config deployment. E.g./EdgeSolutionCarFilter/config/deployment.amd64.json
When all of this is done, when we now open a demo reader for IoT Hub (see My PublicProjects for an example) we see:
[IoTHubMonitor] Start monitoring message arrived in built-in endpoint for device [xavier-device-1] ...
[IoTHubMonitor] Created partition receiver [0] for consumerGroup [$Default]
[IoTHubMonitor] Created partition receiver [1] for consumerGroup [$Default]
[IoTHubMonitor] [11:40:29 AM] Message received from [xavier-device-1/ModuleSimulatorCar]:
"2018-04-08 10:31:38.515609,695.818296,30.326990000000002,-97.755974,7.5,60.625,-0.4,0,2119,-0.01,-0.04"
Note: In case you don't see this, you should go and debug the solution. A good starting point here is to logon on your device and check thedocker logsof theedgeAgentthroughsudo docker logs edgeAgent.
Congratulations, our Car Simulator is now finished!, you can now go to Part 3: Building the simulator for the Camera


Comments ()