
Setting up Kubernetes with Mac M1 and NVIDIA Xavier Nodes
Build your own local AI cluster with ease. Learn to create an Azure Arc-managed AI cluster for Edge AI and GDPR compliance. Suitable for businesses, data scientists, and developers. Start now!

Artificial Intelligence is rapidly changing the way we live and work. With the increasing demand for AI solutions, having your own local AI cluster has become a necessity for many businesses and organizations for several reasons.
Having a local AI cluster enables you to tackle the rising amount of Edge AI use cases where computational power must be close to the customer. Typically utilizing the cluster for inferencing tasks. Another reason is the rising compliancy requirements where AI should be processed on the edge to be compliant with GDPR use cases that do not allow sensitive data to be processed outside a sensor scope.
In this article, we will explore the process of building a local AI cluster from scratch, but that is managed through Azure Arc. Allowing us to manage a device remotely through a central control plane and have the models running on edge.
So, whether you are a business owner, a data scientist, or a developer, this blog will provide you with the information you need to build your own local AI cluster with ease.
Our Nodes
We will be setting up a High-Available cluster that load balances to the available control nodes with HAProxy. The nodes I will be using are:
- [Master Nodes] 2x Mac M1 Mini units with Asahi Linux installed on them
- [Worker Nodes] 4x NVIDIA Xavier modules (AI Workers)
Prerequisites
Before we get started, let's configure our nodes first. For this, we will be utilizing the amazing Kubekey tool to setup our Kubernetes cluster.
In summary, we will set up:
- Time: We need to ensure our nodes are in sync
- Containerd: Our container runtime as Kubernetes dropped docker support. Normally Kubekey configures this for us, but we want some custom parts to it.
Configuring Time Synchronization
sudo timedatectl set-ntp true
sudo timedatectl set-timezone Europe/Brussels
sudo timedatectl status
Configuring Systemd Resolved
# Configure Systemd with our nameservers
sudo bash -c 'cat << EOF > /etc/systemd/resolved.conf.d/base.conf
nameserver 1.1.1.1
nameserver 1.0.0.1
EOF'

# Add host entry
sudo bash -c 'echo "127.0.0.1 localhost" >> /etc/hosts'

# Restart
sudo systemctl restart systemd-resolved
Configuring Containerd
⚠️ Ensure that you follow the below correctly, or refer to the documentation as you need to install Containerd, Runc and CNI
sudo pacman -S wget

# Installing the latest containerd release
# https://github.com/containerd/containerd/releases
VERSION=1.6.16
ARCH=arm64
wget https://github.com/containerd/containerd/releases/download/v$VERSION/containerd-$VERSION-linux-$ARCH.tar.gz
sudo tar Czxvf /usr/local containerd-$VERSION-linux-$ARCH.tar.gz

wget https://raw.githubusercontent.com/containerd/containerd/main/containerd.service
sudo mv containerd.service /usr/lib/systemd/system/

# Installing Runc
# https://github.com/opencontainers/runc/releases
VERSION_RUNC=1.1.4
wget https://github.com/opencontainers/runc/releases/download/v$VERSION_RUNC/runc.$ARCH
sudo install -m 755 runc.$ARCH /usr/local/sbin/runc

# Installing CNI
# https://github.com/containernetworking/plugins/releases
VERSION_CNI=1.2.0
wget https://github.com/containernetworking/plugins/releases/download/v$VERSION_CNI/cni-plugins-linux-$ARCH-v$VERSION_CNI.tgz

sudo mkdir -p /opt/cni/bin
sudo tar Cxzvf /opt/cni/bin cni-plugins-linux-$ARCH-v$VERSION_CNI.tgz

# Use Containerd Sock
sudo bash -c "cat << EOF > /etc/crictl.yaml
runtime-endpoint: unix:///run/containerd/containerd.sock
image-endpoint: unix:///run/containerd/containerd.sock
timeout: 10
debug: false
EOF"

# Configure to use systemd cgroup driver
# both in kubelet and config.toml
sudo mkdir -p /etc/systemd/system/kubelet.service.d
sudo bash -c 'cat << EOF > /etc/systemd/system/kubelet.service.d/containerd.conf
[Service]
Environment="KUBELET_EXTRA_ARGS=--runtime-request-timeout=15m --image-service-endpoint=unix:///run/containerd/containerd.sock  --cgroup-driver=systemd"
EOF'

# Configure Containerd
sudo mkdir -p /etc/containerd/
containerd config default | sudo tee /etc/containerd/config.toml

# Enable Systemd Cgroups
sudo sed -i 's/SystemdCgroup \= false/SystemdCgroup \= true/g' /etc/containerd/config.toml

# Start containerd
sudo systemctl daemon-reload
sudo systemctl enable --now containerd
sudo systemctl restart --now containerd
sudo systemctl status containerd
NVIDIA Xavier Specific
Replacing NetworkManager with systemd-networkd
We replace the NetworkManager with systemd-networkd as it's the default these days and NetworkManager interfers with a custom 127.0.0.53 address which conflicts with Kubernetes.
sudo systemctl stop NetworkManager
sudo systemctl disable NetworkManager
sudo systemctl enable systemd-networkd

# Enable caching DNS server
# this puts reoslv.conf under /run/systemd
sudo systemctl enable systemd-resolved
sudo systemctl start systemd-resolved

# Relink the resolv.conf
sudo rm /etc/resolv.conf
sudo ln -s /run/systemd/resolve/resolv.conf /etc/resolv.conf
We can confirm that /etc/resolv.conf is now correctly configured through cat /etc/resolv.conf.
Setting NVIDIA as the default docker runtime
For the NVIDIA Xavier nodes we need to ensure that docker uses the runtime "nvidia" as default. Normally, with docker we would do this in the /etc/docker/daemon.json file, however, for our system we are using containerd. So we should adapt this in the /etc/containerd/config.toml file.
In this file, configure the following:
[plugins.linux] runtime = "nvidia-container-runtime"Installing Kubernetes with KubeKey
Ensure no local mDNS is running since it conflicts with etcdWe are now ready to start installing our Kubernetes cluster! To make things easier we can utilize the tool KubeKey which helps us set up all the nodes that we have and install KubeSphere to easily manage everything.
First install Kubekey with:
curl -sfL https://get-kk.kubesphere.io | VERSION=v3.0.2 sh -
chmod +x kk
Next, create a config file that will define how our nodes and how we can reach them:
./kk create config --with-kubernetes v1.25 --with-kubesphere v3.3.1Now a config-sample.yaml file will be created. We need to adapt this though to include our nodes so open it and change the IP addresses. E.g.,:
apiVersion: kubekey.kubesphere.io/v1alpha2
kind: Cluster
metadata:
  name: sample
spec:
  hosts:
  - {name: "mac-node-1", address: 192.168.1.25, internalAddress: 192.168.1.25, user: YOUR_USER, password: "YOUR_PASS", arch: arm64}
  - {name: "mac-node-2", address: 192.168.1.18, internalAddress: 192.168.1.18, user: YOUR_USER, password: "YOUR_PASS", arch: arm64}
  - {name: "nvidia-jetson-1", address: 192.168.1.34, internalAddress: 192.168.1.14, user: YOUR_USER, password: "YOUR_PASS", arch: arm64}
  - {name: "nvidia-jetson-2", address: 192.168.1.27, internalAddress: 192.168.1.44, user: YOUR_USER, password: "YOUR_PASS", arch: arm64}
  - {name: "nvidia-jetson-3", address: 192.168.1.37, internalAddress: 192.168.1.39, user: YOUR_USER, password: "YOUR_PASS", arch: arm64}
  - {name: "nvidia-jetson-4", address: 192.168.1.56, internalAddress: 192.168.1.13, user: YOUR_USER, password: "YOUR_PASS", arch: arm64}
  roleGroups:
    etcd:
    - mac-node-1
    - mac-node-2
    control-plane:
    - mac-node-1
    - mac-node-2
    worker:
    - nvidia-jetson-1
    - nvidia-jetson-2
    - nvidia-jetson-3
    - nvidia-jetson-4
Finally, we can start creating our Kubernetes cluster with Kubekey:
./kk create cluster -f config-sample.yaml --container-manager containerd⌚ This took around 5 minutes for me
As soon as the above finishes, we can view our pods with kubectl get nodes and should be able to see:
mac-node-1 Ready control-plane 28m v1.25.3
mac-node-2 Ready control-plane 27m v1.25.3
nvidia-jetson-1 Ready worker 27m v1.25.3
nvidia-jetson-2 Ready worker 27m v1.25.3
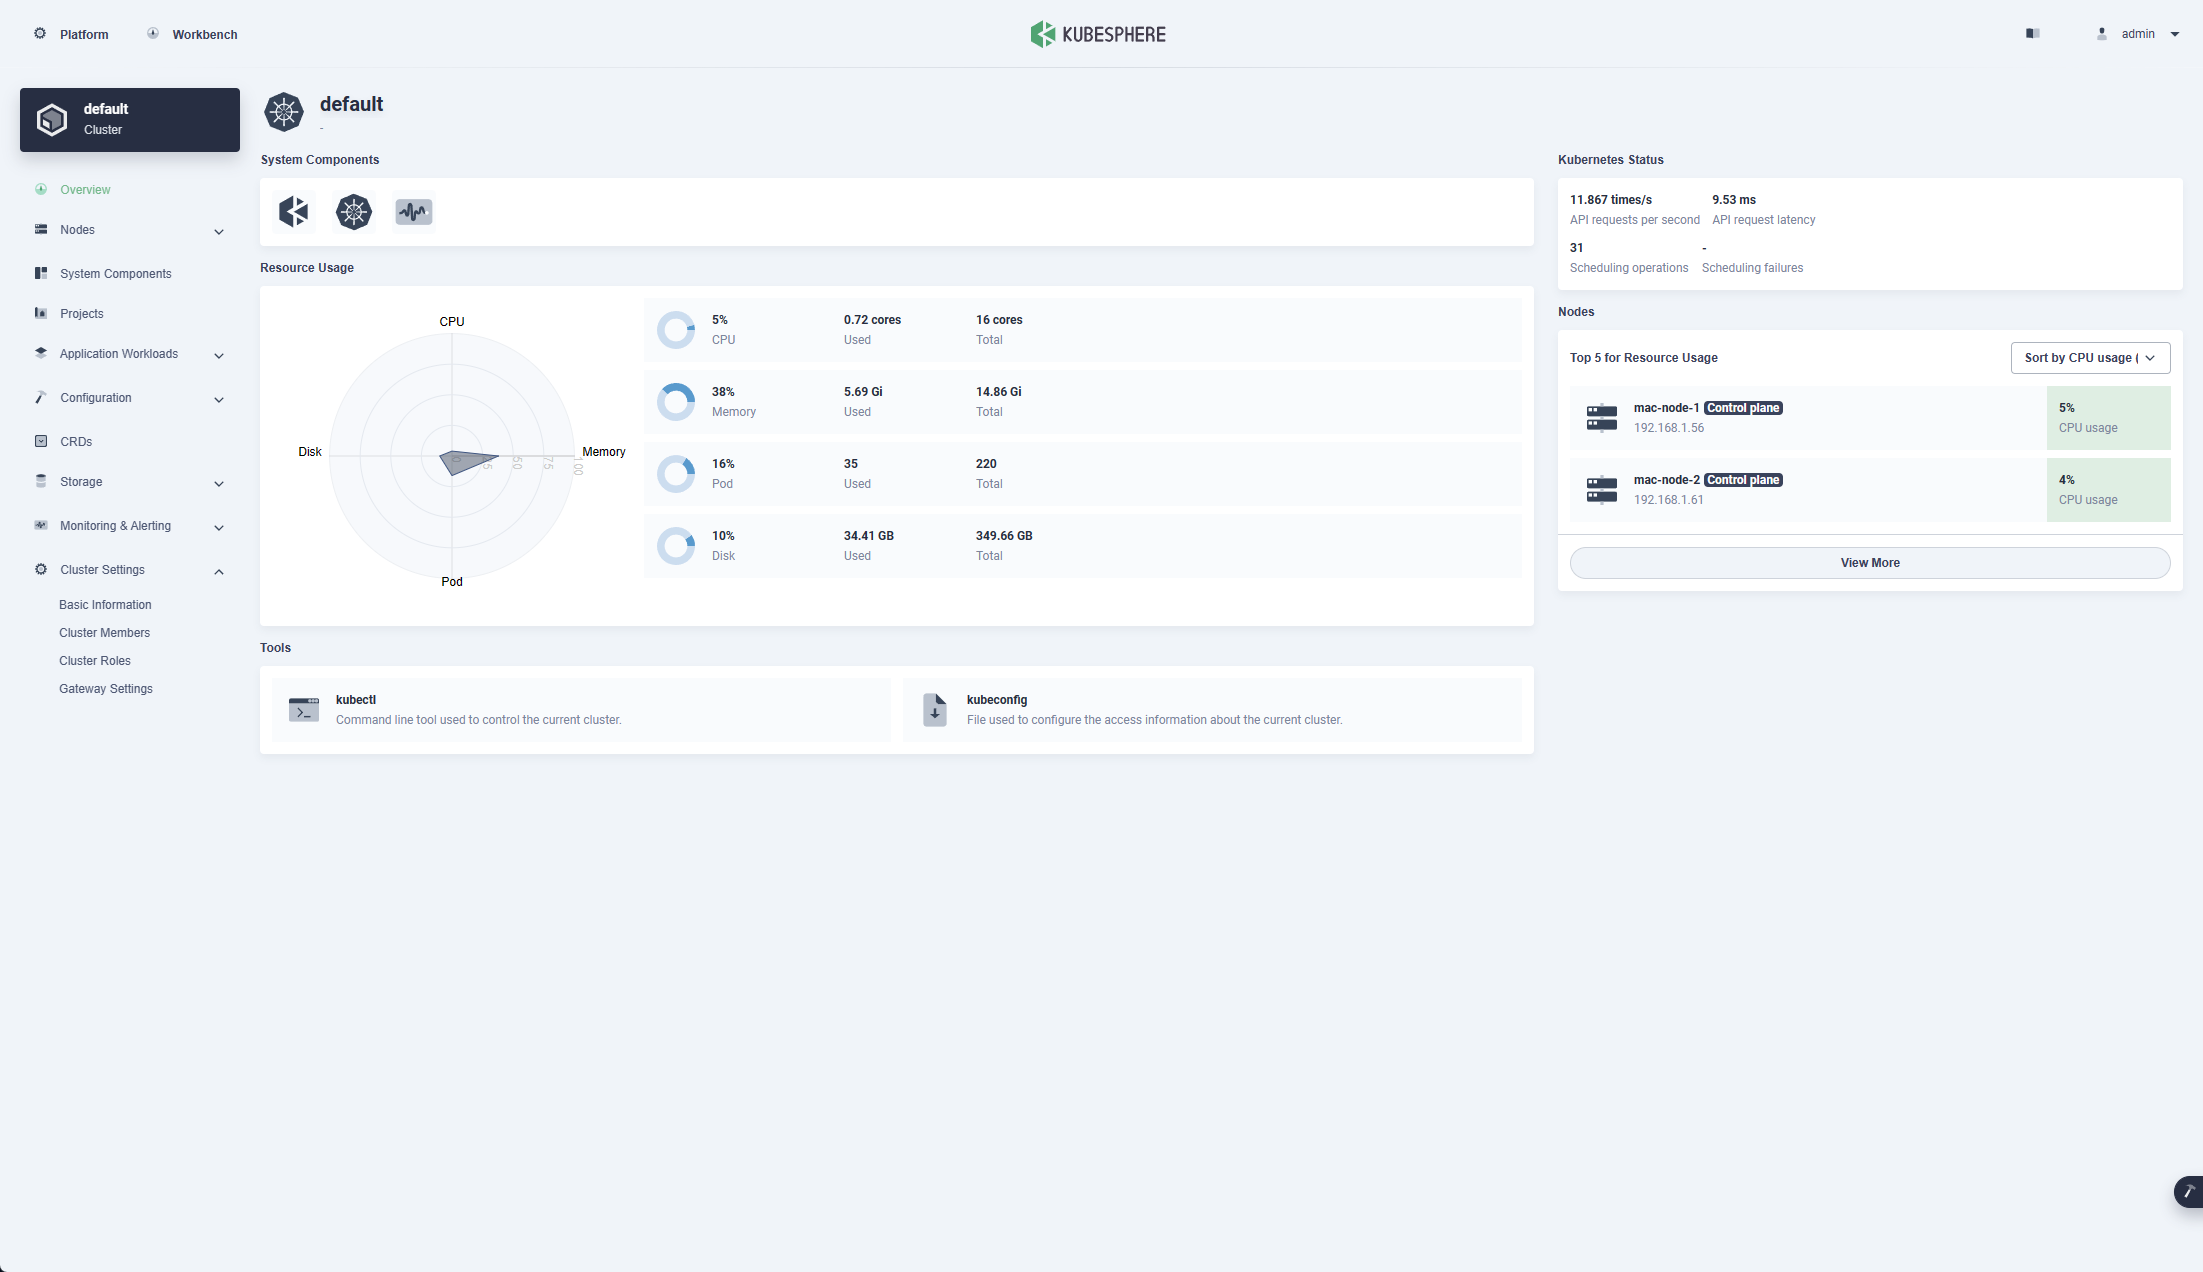
nvidia-jetson-3 Ready worker 27m v1.25.3Kubesphere should now be ready and KubeKey should spit out how you are able to access it:
#####################################################
###              Welcome to KubeSphere!           ###
#####################################################

Console: http://192.168.1.56:30880
Account: admin
Password: PASSWORD_MASKED
NOTES:
  1. After you log into the console, please check the
     monitoring status of service components in
     "Cluster Management". If any service is not
     ready, please wait patiently until all components
     are up and running.
  2. Please change the default password after login.

#####################################################
https://kubesphere.io             2023-02-14 08:55:43
#####################################################
You can always check the result with:
kubectl logs -n kubesphere-system $(kubectl get pod -n kubesphere-system -l 'app in (ks-install, ks-installer)' -o jsonpath='{.items[0].metadata.name}') -fIf you run into any trouble, feel free to check the Troubleshooting below.
Troubleshooting
While running the KubeKey installation process, I encountered A LOT of errors. Below I included some commands on what i did to resolve these. To start from scratch, run ./kk delete cluster -f config-sample.yaml and manually remove CNI with sudo rm -rf /etc/cni/net.d if that didn't work, add --all to the delete cluster command
ks-apiserver: Error: failed to connect to redis service, please check redis status, error: dial tcp: i/o timeout
This could be due to a DNS issue that does not allow pods to reach the DNS. Run the below to try to resolve this (more info):
# Install DNS Utils
kubectl apply -f https://k8s.io/examples/admin/dns/dnsutils.yaml

# Wait till it runs
kubectl get pods dnsutils

# Check DNS
kubectl exec -i -t dnsutils -- nslookup kubernetes.default

# View local resolv.conf
# this should have search default.svc.local, svc.cluster.local, ...
# if not, there is an issue
kubectl exec -ti dnsutils -- cat /etc/resolv.conf
coredns: read udp i/o timeout
When running kubectl logs --namespace=kube-system -l k8s-app=kube-dns the error read udp i/o timeout appears.
# Check if port 53 (DNS) is allowed
sudo iptables -L -n | grep 53/udp

# Add exception for port 53
sudo iptables -A INPUT -p udp --dport 53 -j ACCEPT

# Persist the IPTables rules
# note: you might need to switch to root with `sudo su`
sudo iptables-save /etc/iptables/rules.v4
nodelocaldns: Failed to add non-existent interface nodelocaldns: operation not supported
Ensure you configured systemd on all your nodes.
If the above didn't work, ensure that modprobe dummy works. If it doesn't check /lib/modules and see if modprobe is accessing the correct directory. Reboot to ensure that the modules are loaded
default-http-backend: KubeSphere default http backend is in error state
Normally you should be able to login on the KubeSphere portal already. When we navigate to the failing container (by filtering on default-http-backend* ) we can see that it is trying to pull the amd64 image.
To resolve this, open the YAML declaration (kubectl edit [resource] [UID] or kubectl get pods <pod> --namespace <namespace> -o yaml > pod.yaml) and save it to a file somewhere we can access. Then edit amd64 to arm64 and run kuebctl apply -f <your_file.yaml
The container will now start up successfully.
calico: Calico Node Not Starting - Health endpoint failed
When you get the error
2023-02-14T08:59:30.910549820+01:00 2023-02-14 07:59:30.910 [ERROR][68] felix/health.go 296: Health endpoint failed, trying to restart it... error=listen tcp: lookup localhost on 1.1.1.1:53: no such hostWe can resolve this by adding the localhost to the /etc/hosts file:
sudo bash -c 'echo "127.0.0.1 localhost" >> /etc/hosts'The calico node will now come into the Running state:
calico-node-87xlh               1/1     Running   8 (5m40s ago)   15m
calico-node-g7twl               1/1     Running   7 (5m45s ago)   15m
ETCD: rejected connection from "192.168.1.46:44192" (error "remote error: tls: bad certificate", ServerName "")
Check the log output, it will most likely state: "Using existing ca certificate authority" so we should clear the certificates and try again.
./kk delete cluster -f config-sample.yaml --all
sudo rm -rf /home/mac/.kube
sudo rm -rf /etc/cni/net.d

# Remove generated KubeKey files
# Remove all
rm -rf ./kubekey

# Only remove generated certs
rm -rf ./kubekey/pki
reason:NetworkPluginNotReady message:Network plugin returns error: cni plugin not initialized"
Ensure Containerd has been installed correctly. Check this amazing blog article for more information.
error execution phase addon/coredns: unable to create RBAC clusterrolebinding: Post "https://lb.kubesphere.local:6443/apis/rbac.authorization.k8s.io/v1/clusterrolebindings?timeout=10s": dial tcp 192.168.1.25:6443: connect: connection refused
Ensure that kubelet is working correctly
sudo systemctl status kubelet
sudo journalctl -xeu kubelet
netstat -a | grep 6443
sudo netstat -lnpt|grep kube
kubectl cluster-info
The CoreDNS pods keeps crashing
# Create /root/resolv/resolv.conf with the following content
nameserver 1.1.1.1
nameserver 1.0.0.1

# Replace resolveConf in /var/lib/kubelet/config.yaml to the below
resolvConf: /root/resolv/resolv.conf

# Restart
sudo systemctl daemon-reload
sudo systemctl restart kubelet
sudo reboot
Summary
Setting up Kubernetes is quite a difficult task when doing it the first time. KubeKey simplifies this for us, but we should ensure to still remove certain custom aspects. This article was written over the span of 1 week as I first tried setting it up with mDNS enabled for my local network. This however provided conflicts, resulting in me having to delete the entire cluster again. Afterwards, I was hitting a lot of docker pull limits so had to wait for those rate limits to be removed.
Now once everything is up and running, it's a wonderful system and Kubesphere definitely adds extra value allowing us to more easily control and monitor or system!.


Comments ()