
Installing Kubernetes on an Nvidia Jetson Cluster
We now have a beautiful cluster assembled and running, but no software running on it yet. So let's get started and provision Kubernetes on top of it so we can manage our nodes easier!
Introducing K3s
For our Kubernetes setup we want a lightweight Kubernetes installation seeing the required Edge computation. For this, we can utilize K3S which is a distribution built specifically to run on IoT & Edge devices.
Personally, the installation feels similar to how we installed and configured Docker Swarm before. Install it everywhere and join nodes to the master - quick and easy!
Installing K3s
Installing K3S is super trivial! There is however an easier way if you want to automate all of it, by utilizing the CLI and adding just 1 parameter.
Master Node Setup
To configure our Master Node, we execute the following command that will pass the secret we define:
curl -sfL https://get.k3s.io | sh -s server --cluster-init --token "XAVIER_HIS_SECRET_TOKEN" --write-kubeconfig-mode 644 --docker
💡 As you may have noticed, we are utilizing --write-kubeconfig-mode 644 to allow our cluster to be imported in rancher later.💡 --docker will enable us to use our host's Docker registry and use local imagesWorker Node Setup
Finally, we can add our Worker (or Agent) nodes by running the following line on each of the nodes:
curl -sfL https://get.k3s.io | sh -s agent --server https://MASTER_NODE_IP_ADDRESS:6443 --token "XAVIER_HIS_SECRET_TOKEN"
Verification
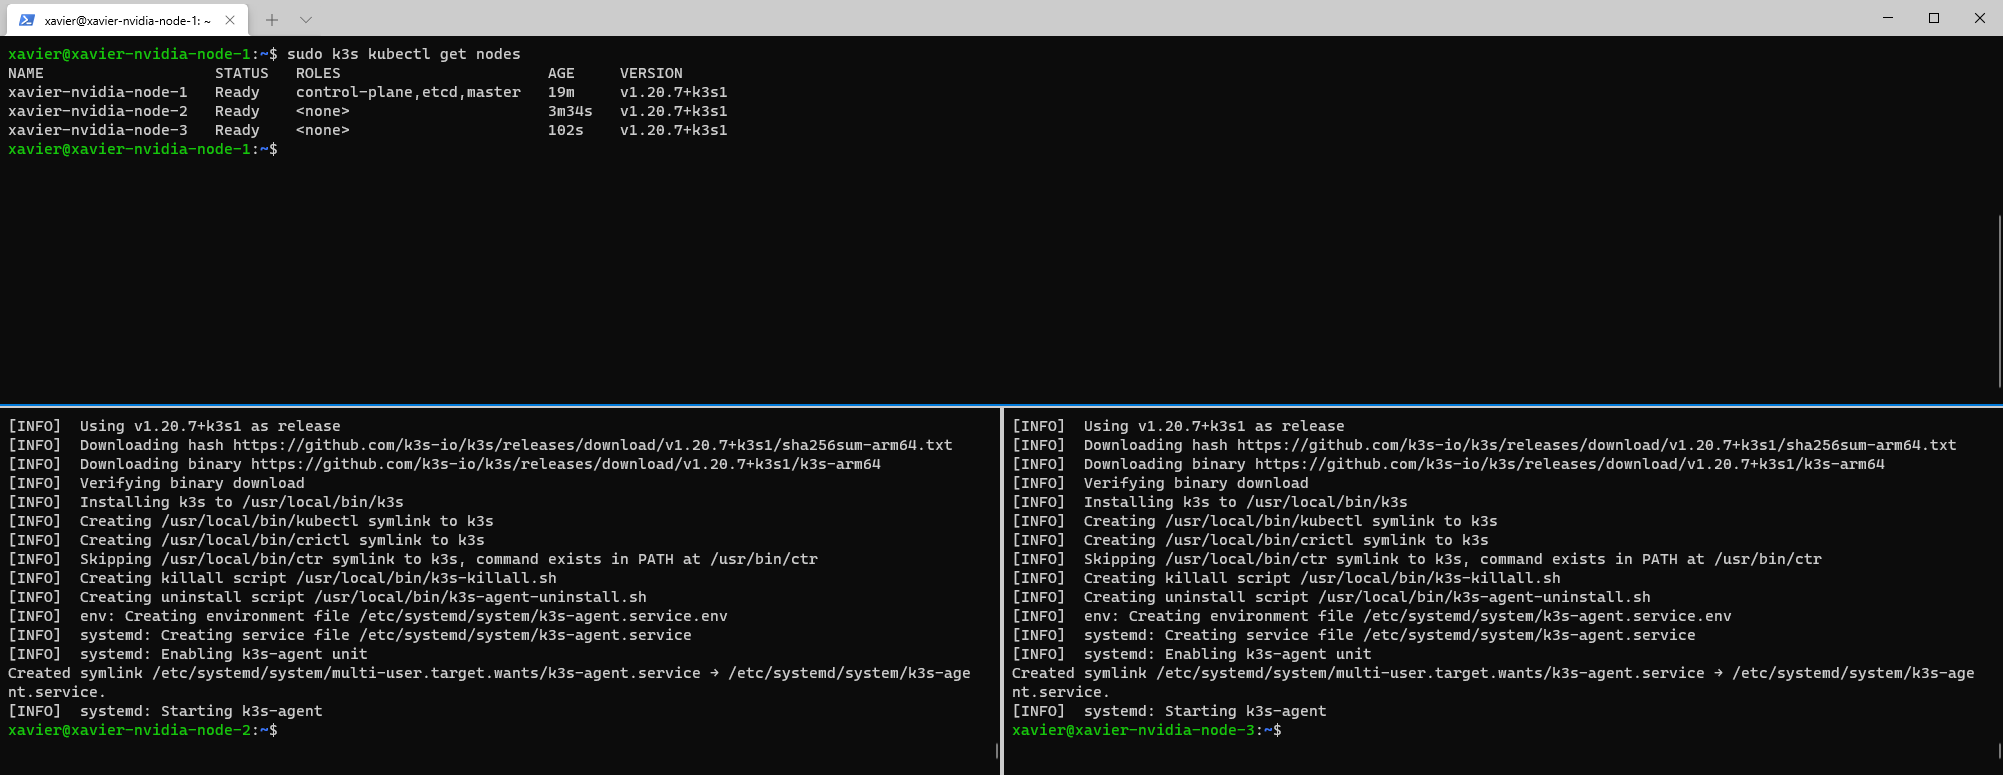
When we now execute sudo k3s kubectl get nodes -w on our master node, we will see our nodes appearing.
Installing and Configuring Kubectl
⚠ Execute this on your local machine! (WSL in this case)
Installing Kubectl
Since we now have a Kubernetes cluster running, it is time to configure it to run on our local system. For that I am utilizing the WSL or Windows Subsystem for Linux system as explained in a previous article.
To install WSL we execute the following:
# Download Kubectl
curl -LO "https://dl.k8s.io/release/$(curl -L -s https://dl.k8s.io/release/stable.txt)/bin/linux/amd64/kubectl"

# Install it
sudo install -o root -g root -m 0755 kubectl /usr/local/bin/kubectl

# Verify
kubectl version --client
Configuring Kubectl
Now this is installed, we can configure it towards our remote cluster:
# Copy over the Kubeconfig file to our local machine
scp [email protected]:/etc/rancher/k3s/k3s.yaml nvidia-node-1-config.yaml

# Replace localhost with the location of the master node
sed -ie s/127.0.0.1/xavier-nvidia-node-1.local/g nvidia-node-1-config.yaml

# Verify that it works
kubectl --kubeconfig nvidia-node-1-config.yaml get pods -A

# Then copy it over to kubectl directory and activate it
# we can now run kubectl get pods -A
cp nvidia-node-1-config.yaml ~/.kube/config
Troubleshooting
Agent does not want to join
Sometimes an agent does not want to join, in that case try utilizing the IP address directly.
Removing K3S
⚠ In case something happened, you can uninstall K3S with the following commands:
# Uninstall Server Node
/usr/local/bin/k3s-uninstall.sh

# Uninstall Agent Node
/usr/local/bin/k3s-agent-uninstall.sh
Conclusion
We have now set-up our Nvidia Jetson nodes and are running a Kubernetes cluster on it! To keep this article light, I have decided to move the demonstration to a new article where you will learn to run Dapr as your distributed application runtime as well as Grafana to monitor your nodes


Comments ()