
Autonomously Landing a Lunar Lander with an Xbox Controller Robotic Arm - Part 2
In Part 1 I explained you how you can create a Robot Arm that can be mounted on an Xbox controller. In OpenAI Lunar Lander I then continued to see how we are able to train a lunar lander environment to land a lunar lander all by itself with a continuous action space.
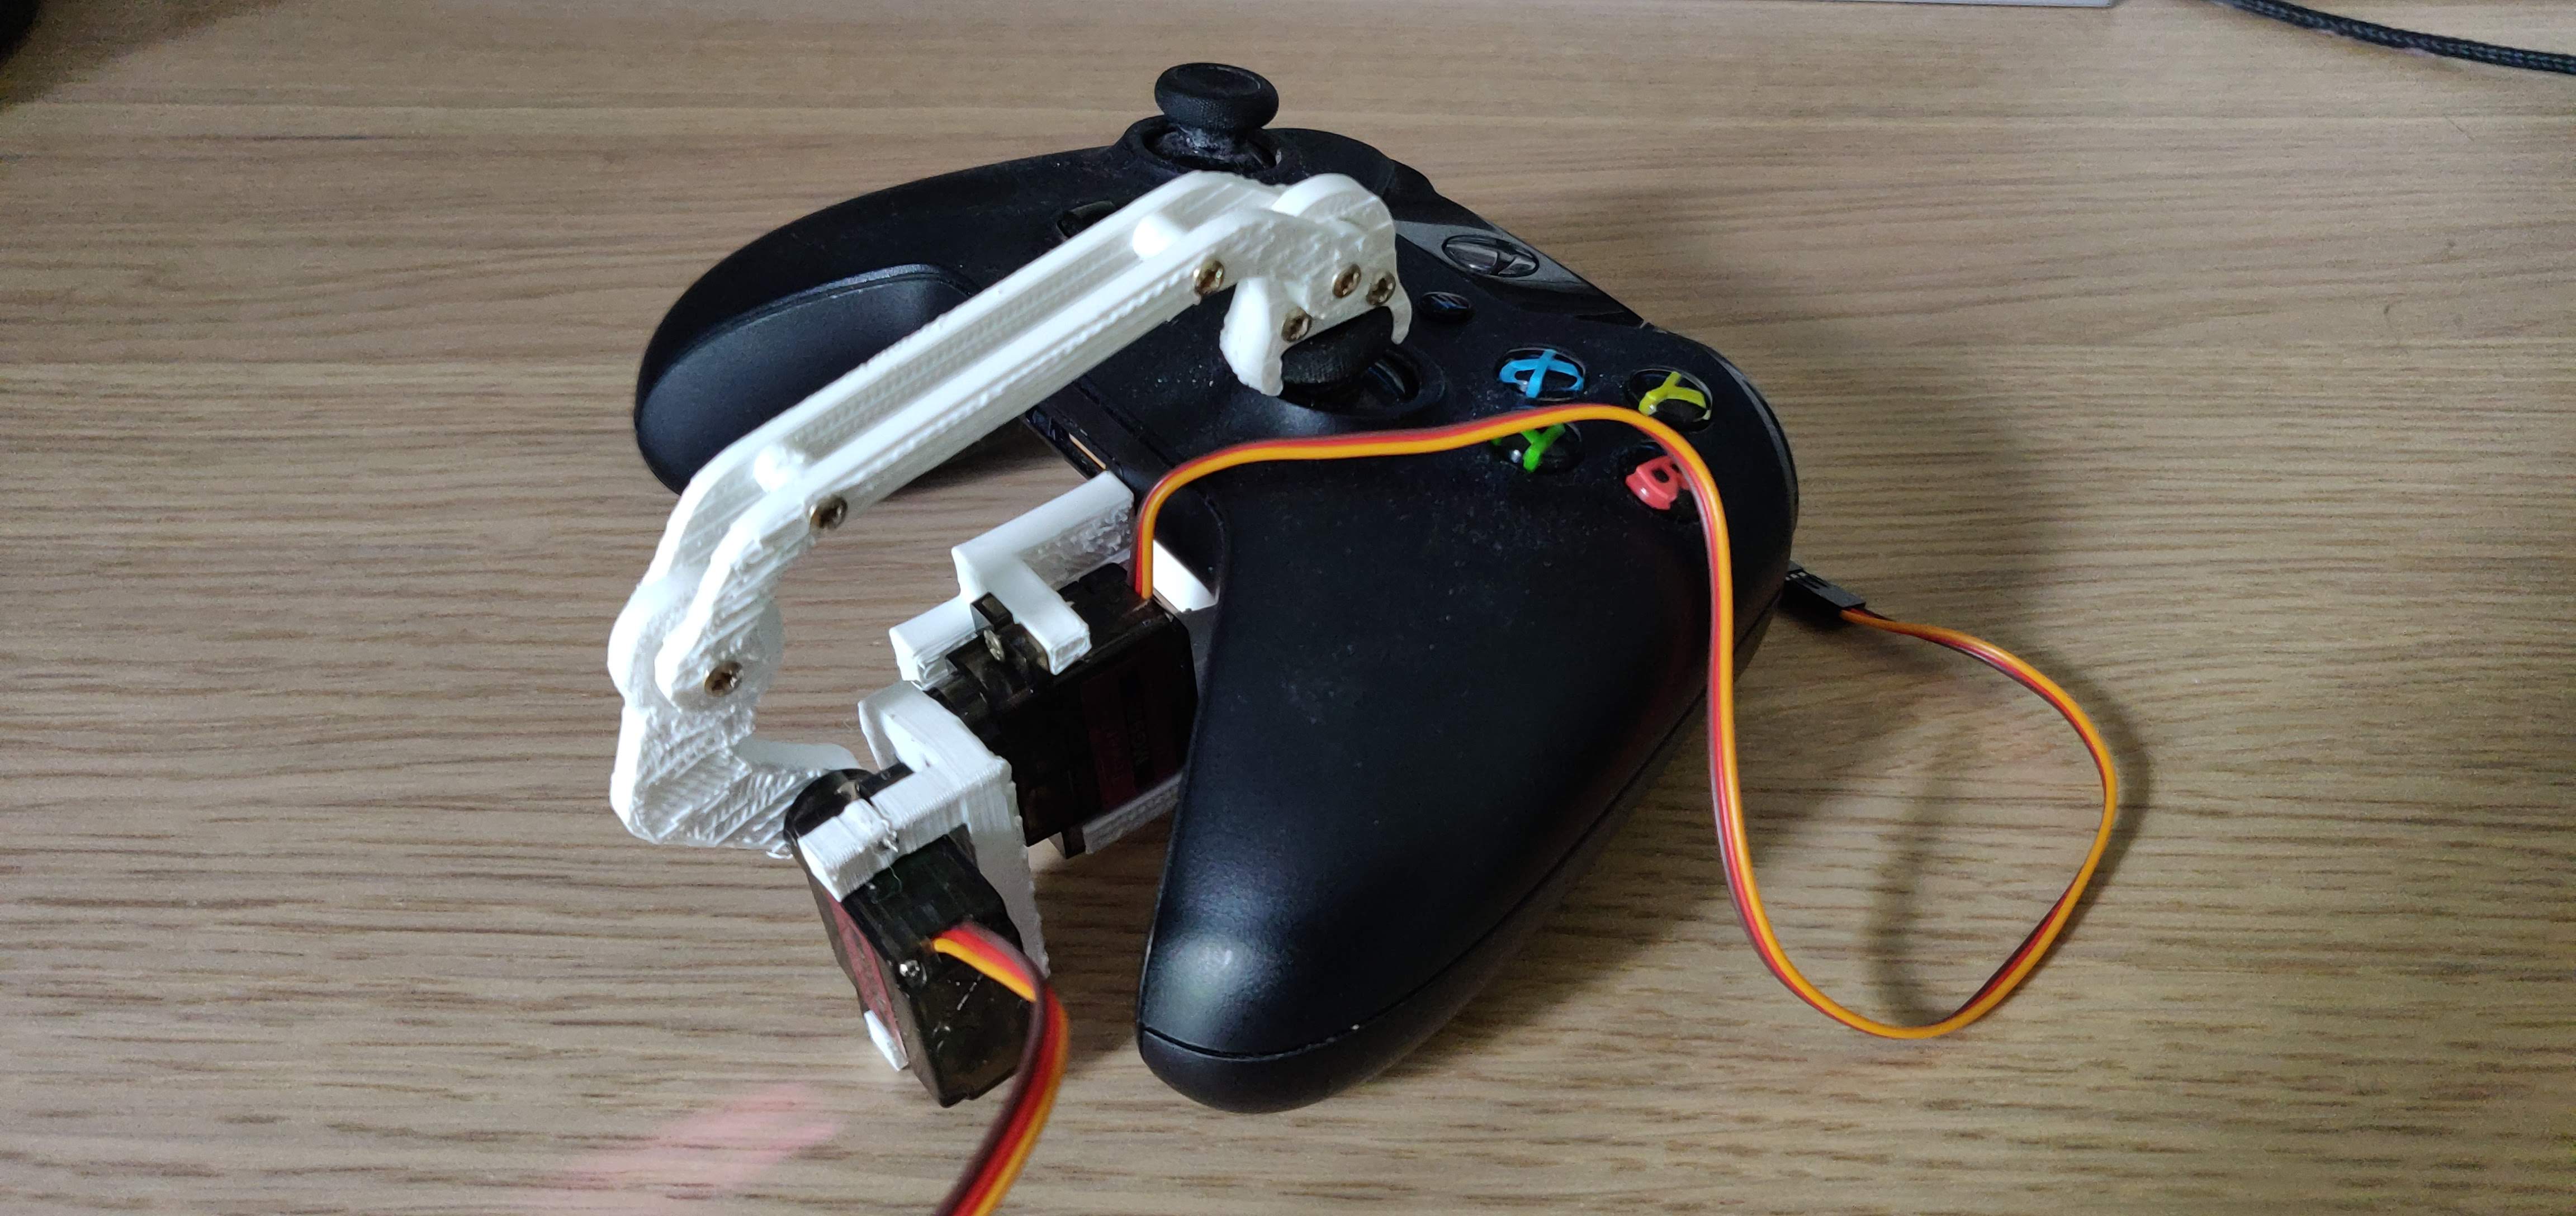
What we'll be making:
Now it's time to finalize our project and hook all of it up together, such that the Robotic Arm is representing the state that the environment is in. But I'll first introduce you to the architecture.
Note: I uploaded the source code here: https://github.com/Xaviergeerinck/xbox-robot-arm
Introduction
Architecture wise, we will thus have our Xbox controller taking actions to our Gym Environment, whereafter our model will take in a new observation and send out the actions to execute to our Arduino, which will then control the servos.
To illustrate this, I created the following diagram for you:

However as simple as it should be, it turns out that it never is 😅. This article definitely turned out more challenging than it should be due to the use of the OpenAI Gym environment as the "Game Engine" environment.
The OpenAI Gym environment utilizes pyglet to render changes, which sadly enough on my computer gives GLExceptions when rendering the environment. Therefore I have to utilize the WSL 2 environment - which is a full Linux Virtual Machine - to render my environment.
Note: To visualize this on windows, I refer to an earlier blog article that explained how you can render OpenAI Gym on windows. Instead oflocalhostthough, we utilize the IP of our Windows Machine (see:ipconfig)!
Now this of course brings another hurdle with it, seeing that it requires us to access the COM Port on windows correctly to get the Xbox input as well as control the Arduino. For this however, rather than fixing the exposure of the COM Port in the Linux environment, I decided to write an "HTTP" interface inbetween that takes care of controlling the hardware. All of this being described in the following diagram:

But enough for the introduction, let's actually get started on making this a reality!
Creating the Python Server (WSL - Ubuntu)
First we'll create the Python server. As illustrated in our diagram above, this server will take in endpoints from our Javascript program, which are the actions the controller took. These actions we should thus forward to the environment. Once these are executed on the environment, we get a new observation that we will take an action from through our RLLib agent. To summarize this in a few steps:
- Create server to take in actions from Javascript client running on Windows
- Execute actions on OpenAI Environment
- Get observation from OpenAI Environment
- Get new action from RLLib agent.
- Send action towards Javascript server.
Which we can code as follows:
import time

# Dependencies - RLLib
import gym
import ray
from ray.rllib.agents import ppo

# Dependencies - HTTP Server
import requests
from flask import Flask, request, jsonify

# Config
ARDUINO_SERVER = "http://192.168.1.5:3000"
SERVER_PORT = 3001
CHECKPOINT_DIR = "/mnt/e/Projects/roadwork-rl/output-server/lunar-lander-continuous-checkpoint"
CHECKPOINT_FILE = "checkpoint_99/checkpoint-99"

done = False
state = None
cumulative_reward = 0

env = gym.make("LunarLanderContinuous-v2")

# RLLIB
ray.init()
agent = ppo.PPOTrainer(env="LunarLanderContinuous-v2")
agent.restore(f"{CHECKPOINT_DIR}/{CHECKPOINT_FILE}")

# HTTP SERVER
app = Flask(__name__)
app.config['JSONIFY_PRETTYPRINT_REGULAR'] = False

@app.route('/init', methods=['GET'])
def env_init():
    state = env.reset()
    print("Reset environment")

     # Get the first action
    action = agent.compute_action(state)

    # We do not execute this action here, we send it to the controller
    # This will kick off the action taking, waits until the controller receives a change by arduino
    # Whereafter it will send the details to our Python HTTP Server above
    # It's the Python HTTP Server that will step
    new_time_step = str(int(time.time() * 1000))
    requests.post(f"{ARDUINO_SERVER}/action/{str(int(time.time() * 1000))}", json=action.tolist())
    print(f"Took first action: {action} ({new_time_step})")
    return jsonify({ "success": True })

# HTTP Route
@app.route('/action/<time_step>', methods=['POST'])
def env_step(time_step):
    """
    Receive an action from the Xbox Controller
    Parameters:
        - array: the actions to take
    Returns:
        - bool: isDone
    """

    # Get the action from our request body
    # Note: requires header Content-Type: application/json
    action = request.json

    # Now we can step!
    env.render() # Render the change
    state, reward, done, _ = env.step(action)
    # print(f"State: {state}, Reward: {reward}, Done: {done}")

    if done == True:
        print("We are done")
        env.close()
        return jsonify({ "success": True, "isDone": done })

    # Take new action
    new_time_step = str(int(time.time() * 1000))
    action = agent.compute_action(state)

    # Sending action to arduino
    requests.post(f"{ARDUINO_SERVER}/action/{new_time_step}", json=action.tolist())
    return jsonify({ "success": True, "isDone": done })

if __name__ == '__main__':
    print(f"Server Starting at http://localhost:{SERVER_PORT}")
    app.run(host="0.0.0.0", port=SERVER_PORT)
Creating the Javascript Server (Windows)
The next thing we have to do is the wrapper between our WSL and our Arduino controller.
Remembering that we needed it for the COM Port forwarding issue.
Our Node.js code will interface with the Arduino through the library we wrote in "Getting Xbox Controller inputs through Node.js". So on top of this, the only thing we have to do is write a server that will take in the action from our Python Client and forward it to the Arduino. Next to that we need to wait for events from our thumbsticks and send those to the Python server. Again summarizing:
- [Server] HTTP Post endpoint that gets actions and sends them to Arduino
- [Client] Polling for Thumbstick input that we then send to our Python Server.
Which results in:
const express = require('express');
const bodyParser = require('body-parser');
const EXPRESS_PORT = 3000;

const RobotArm = require('./lib/RobotArm');

let app = null;
let robotArm = null;

async function start() {
    console.log('[Server] Initializing RobotArm');
    robotArm = new RobotArm('COM3', "http://172.26.96.1:3001");
    await robotArm.init();

    console.log('[Server] HTTP Server Starting')
    await startServer();

    console.log(`[Server] Everything done, listening on http://localhost:${EXPRESS_PORT}`);
    await robotArm.start();
    console.log(`[Server] Triggered Action Server`)
}

async function startServer() {
    const app = express();

    // Middleware
    app.use(bodyParser.json())

    // Action Route, accepts [ ... ] for the actions
    app.post('/action/:time_step', async (req, res) => {
        if (!robotArm) {
            return res.send("ROBOT_ARM_NOT_INITIALIZED");
        }

        // We received message, send success back since python is blocking
        res.send("DONE");

        const action = req.body;

        // Send our action to the Robot Arm
        await robotArm.sendAction(action);

        // Tell the robot arm that we can process a message
        const { UP_DOWN, LEFT_RIGHT } = await robotArm.awaitThumbstickValues();

        // Then now relay the message
        await robotArm.relayMessage(UP_DOWN, LEFT_RIGHT);
    })

    return new Promise((resolve) => app.listen(EXPRESS_PORT, resolve));
}

start().catch((e) => console.log(e));
Which make it so we can now start our 2 programs and start seeing observations!
Conclusion
In something that took me a couple of months of learnings, adaptations and growth (due to the custom Roadwork-RL framework, Roadwork-IoT, getting the Xbox Controller input abstracted, mounting and waiting for the robot arm components). I must say this one of my most ambitious projects where I learned a lot from and which I would definitely do again!
What could improved is to train the lander a bit more. Currently it still "wastes" fuel when it's on the ground, which might be due to the reward not completely being optimized. So either I could train longer, or I could adapt the reward to give more negative reward on fuel consumption.
Did you like this project? How would you do it? Did you do it? I would love to hear from your experiences in the comments below! 😊


Comments ()