
Creating a Big Data cluster with SQL Server 2019

SQL Server 2019 came out in preview a while ago, and the new features announced are just wonderful! A one-to-go-tool for all your big data needs: Unstructured and Structured data that can be processed using just one tool!
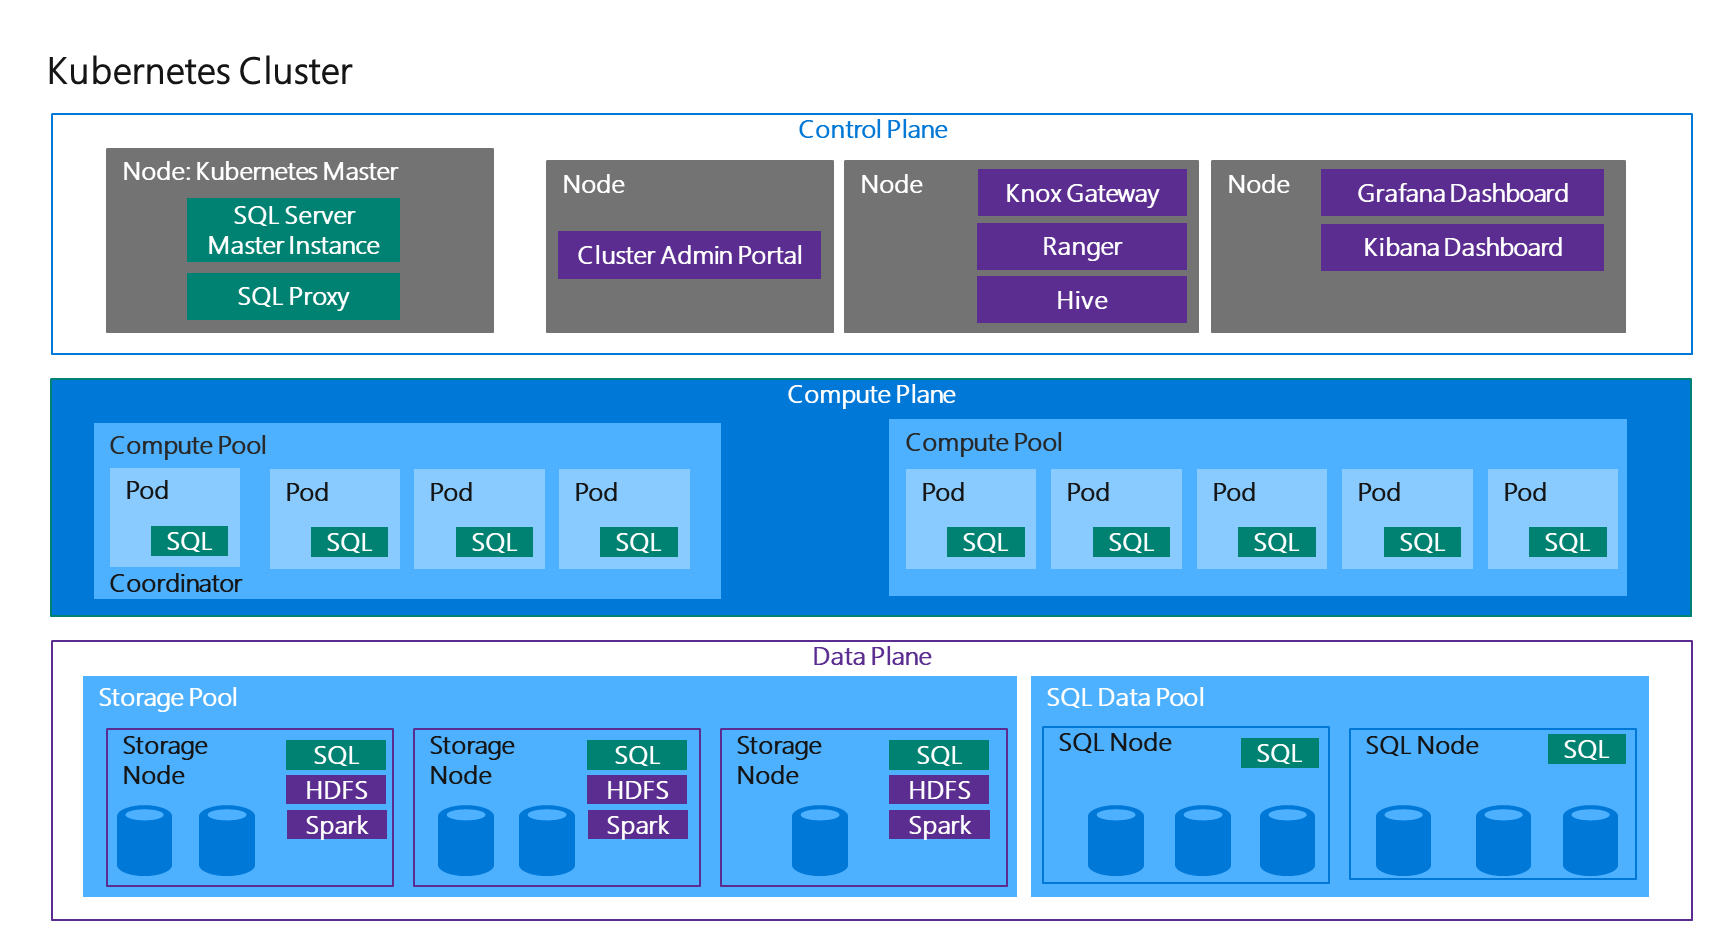
But the most wonderful feature of all in my opinion are the "Big Data Clusters", allowing you to spin up scalable clusters and deploy SQL Server, Spark and HDFS containers side-by-side. But how does it accomplish all of this? Well the architecture below shows us the magic:

So what will we do in this post? Well here we will do just that! Deploy our Big Data Cluster and start running our notebooks and SQL queries on it!
Note: There is documentation available that explains all of this, but I would like to present an easy to understand view for all developers out there. In any case feel free to check this documentation at: https://docs.microsoft.com/en-us/sql/big-data-cluster/quickstart-big-data-cluster-deploy
Big Note: This is a very large deployment and it's recommended to have a aks cluster size of 64GB RAM!
Prerequisites
Before we can get started, it's required to have mssqlctl and azure-cli installed and have an AKS cluster running.
AZ CLI
# Needed on WSL
sudo apt-get update
sudo apt-get install -y libssl-dev libffi-dev
sudo apt-get install -y python-dev

# Modify Sources
sudo apt-get install apt-transport-https lsb-release software-properties-common -y
AZ_REPO=$(lsb_release -cs)
echo "deb [arch=amd64] https://packages.microsoft.com/repos/azure-cli/ $AZ_REPO main" | \
    sudo tee /etc/apt/sources.list.d/azure-cli.list

# Microsoft Signing Key
sudo apt-key --keyring /etc/apt/trusted.gpg.d/Microsoft.gpg adv \
     --keyserver packages.microsoft.com \
     --recv-keys BC528686B50D79E339D3721CEB3E94ADBE1229CF

# Install
sudo apt-get update
sudo apt-get install azure-cli
mssqlctl
# Install Python
sudo apt-get update && /
sudo apt-get install -y python3 && /
sudo apt-get install -y python3-pip && /
sudo -H pip3 install --upgrade pip

# Install mssqlctl
pip3 install --index-url https://private-repo.microsoft.com/python/ctp-2.2 mssqlctl
AKS
Deploy an AKS instance quickly:
Note: We can get the node sizes easily through the command: az vm list-sizes -l <YOUR_LOCATION> --query "[?numberOfCores<=`16` && numberOfCores>=`8` && memoryInMb>=`16384`]" -o table --> see http://jmespath.org/examples.htmlNote 2: We can get our Kubernetes versions through az aks get-versions -l <YOUR_LOCATION> --query "orchestrators[].orchestratorVersion"# Set our Azure Context
az account set -s <SUBSCRIPTION_ID>
# Create our Resource Group (e.g. az group create -n Xavier-SQLBigData -l westeurope)
az group create -n <YOUR_NAME> -l <REGION>
# Create AKS in our resource group
# e.g. az aks create --name Xavier-SQLBigDataCluster --resource-group Xavier-SQLBigData --generate-ssh-keys --node-vm-size "Standard_D8_v3" --node-count 3 --kubernetes-version "1.11.5"
az aks create --name <CLUSTER_NAME> --resource-group <YOUR_NAME> --generate-ssh-keys --node-vm-size "Standard_D8_v3" --node-count 3 --kubernetes-version "1.11.5"
# Get the credentials
# e.g. az aks get-credentials --name Xavier-SQLBigDataCluster --resource-group Xavier-SQLBigData --admin
az aks get-credentials --name <CLUSTER_NAME> --resource-group <YOUR_NAME> --admin
# If needed, view the cluster with
# e.g. az aks browse --name Xavier-SQLBigDataCluster --resource-group Xavier-SQLBigData
az aks browse --name <CLUSTER_NAME> --resource-group <YOUR_NAME>
Create our SQL Server Big Data Cluster
# Create SQL Big Data Cluster
# e.g. mssqlctl create cluster sql-server-cluster
export ACCEPT_EULA=Y
export CLUSTER_PLATFORM="aks"

export CONTROLLER_USERNAME="admin" # change to what you want
export CONTROLLER_PASSWORD="Test123#" # change to what you want
export MSSQL_SA_PASSWORD="Test123#"
export KNOX_PASSWORD="Test123#"

export DOCKER_REGISTRY="private-repo.microsoft.com"
export DOCKER_REPOSITORY="mssql-private-preview"
export DOCKER_USERNAME="[email protected]"
export DOCKER_PASSWORD="docker-password"
export DOCKER_EMAIL="[email protected]"
export DOCKER_PRIVATE_REGISTRY="1"

mssqlctl create cluster <CLUSTER_NAME>
Let's start easy by creating our SQL Server Big Data Cluster, this will deploy the complete cluster on the AKS cluster we created earlier. It will look like this:
2019-01-16 09:30:35.0826 UTC | INFO | Creating cluster...
2019-01-16 09:30:37.0313 UTC | INFO | Deploying controller...
2019-01-16 09:30:39.0764 UTC | INFO | The service account token is ready for controller
2019-01-16 09:30:41.0613 UTC | INFO | Waiting for controller pod to be up...
... it takes a while ...
2019-01-16 09:39:40.0930 UTC | INFO | Waiting for controller pod to be up...
2019-01-16 09:39:46.0337 UTC | INFO | Controller pod is running.
2019-01-16 09:39:46.0542 UTC | INFO | Controller Endpoint: https://11.22.33.44:30080
2019-01-16 09:43:15.0898 UTC | INFO | Deployment progress can be tracked at Portal Endpoint: https://11.22.33.44:30777/portal/
2019-01-16 09:43:15.0905 UTC | INFO | Deploying cluster...
2019-01-16 09:43:16.0627 UTC | INFO | Cluster monitoring is ready.
2019-01-16 09:43:16.0627 UTC | INFO | Initiating cluster creation.
2019-01-16 09:43:16.0628 UTC | INFO | Creating cluster with name: sql-server-cluster
2019-01-16 09:56:14.0388 UTC | INFO | Control plane is ready.
2019-01-16 10:02:38.0710 UTC | INFO | Storage pool is ready.
2019-01-16 10:02:38.0711 UTC | INFO | Data pool is ready.
2019-01-16 10:03:06.0027 UTC | INFO | Master pool is ready.
2019-01-16 10:03:23.0044 UTC | INFO | Compute pool is ready.
2019-01-16 10:03:24.0355 UTC | INFO | Cluster state: Ready
2019-01-16 10:03:24.0355 UTC | INFO | Monitor and track your cluster at the Portal Endpoint: https://11.22.33.44:30777/portal/
2019-01-16 10:03:24.0356 UTC | INFO | Cluster deployed successfully.
Allowing you to login on the your cluster!
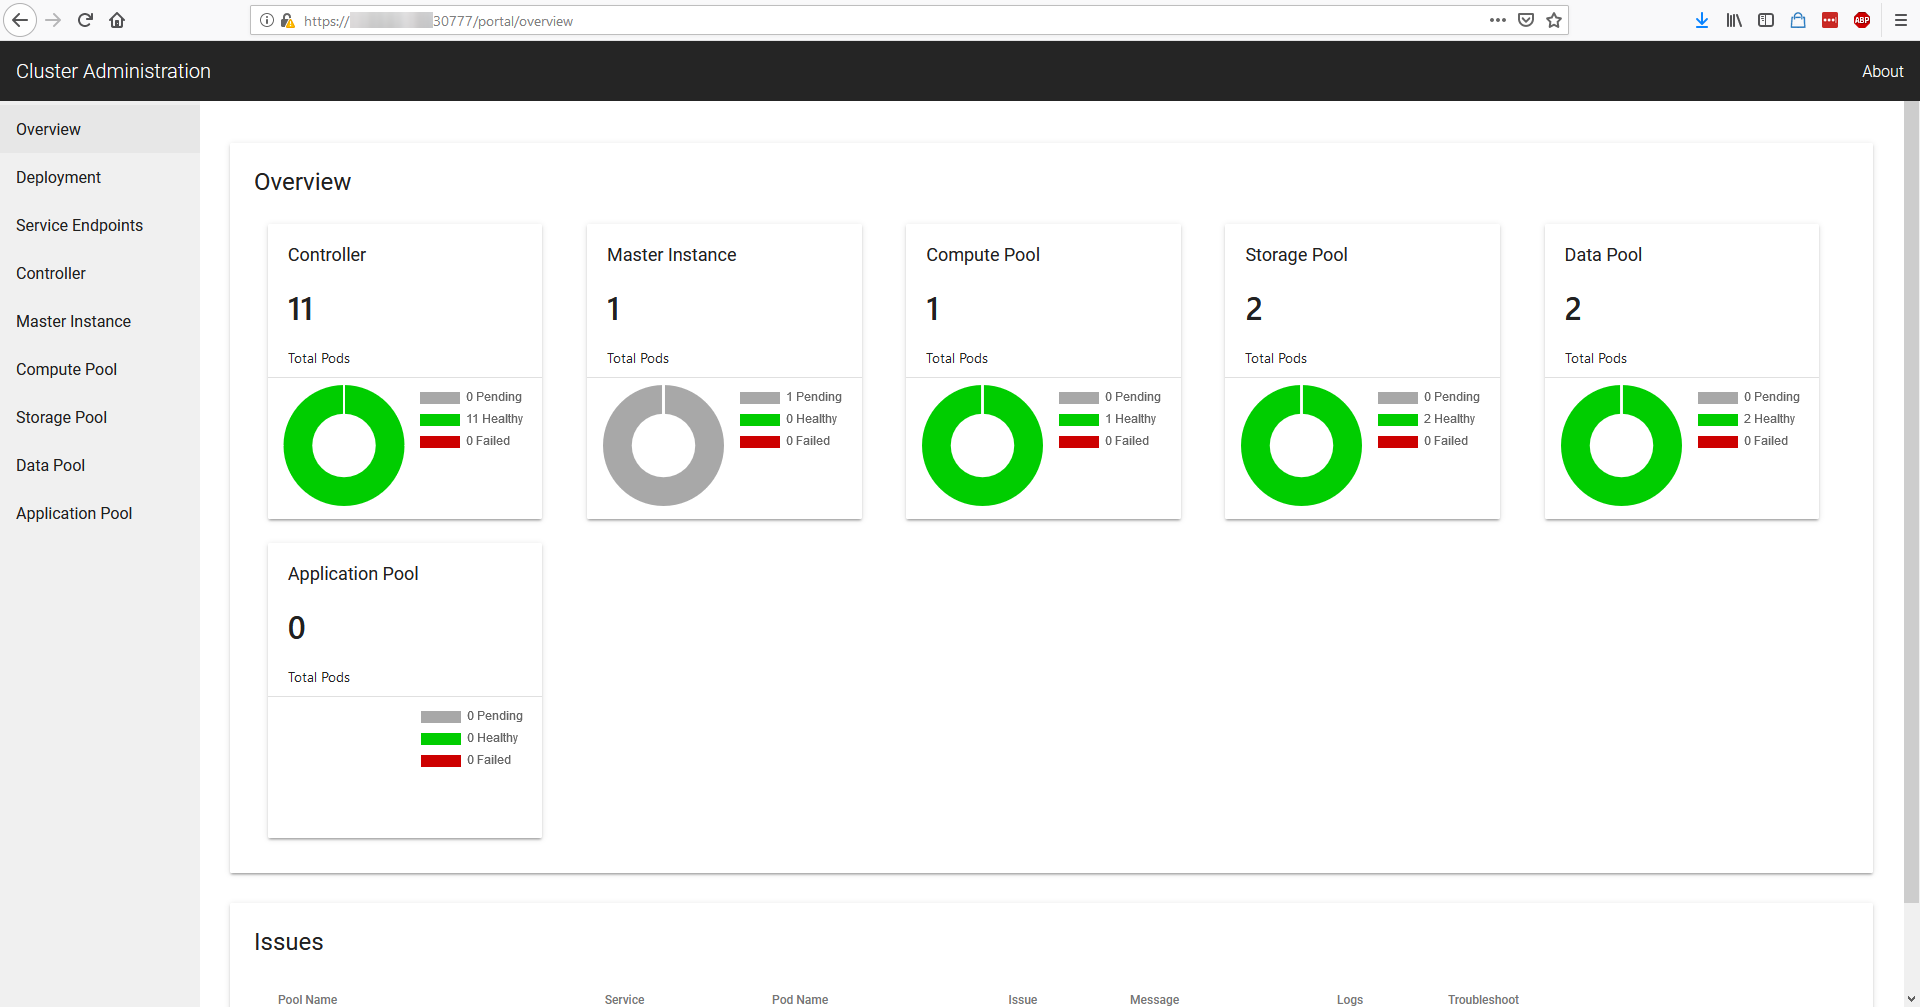
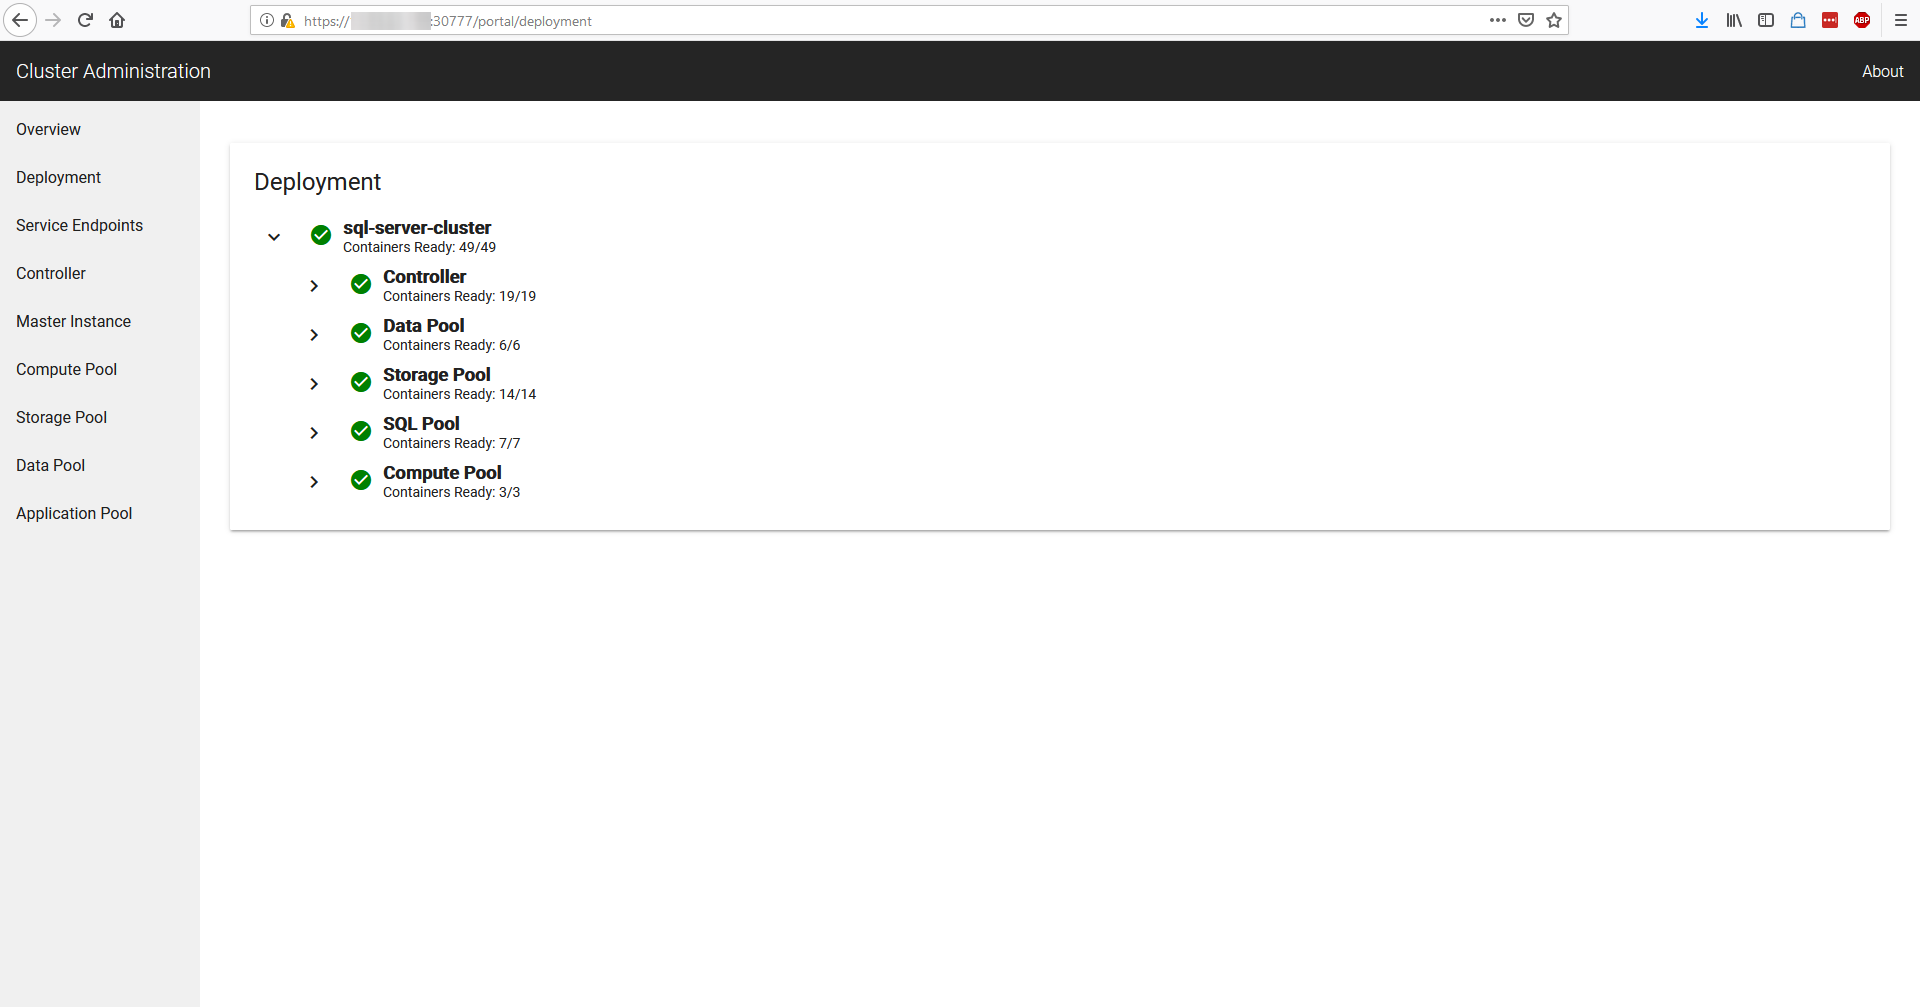
Display Information about our cluster
Let's see how we can get the information to login on our cluster through commands for automation:
# Note: view detailed info through `kubectl get service kubernetes -o json`

# Get endpoint-master-pool
# e.g. kubectl get svc endpoint-master-pool -n sql-server-cluster -o=custom-columns=""IP:.status.loadBalancer.ingress[0].ip,PORT:.spec.ports[0].port""
kubectl get service endpoint-master-pool -n <CLUSTER_NAME> -o=custom-columns=""IP:.status.loadBalancer.ingress[0].ip,PORT:.spec.ports[0].port""

# Get Service Security Loadbalancer
# e.g. kubectl get svc service-security-lb -n sql-server-cluster -o=custom-columns=""IP:.status.loadBalancer.ingress[0].ip,PORT:.spec.ports[0].port""
kubectl get service service-security-lb -n <CLUSTER_NAME> -o=custom-columns=""IP:status.loadBalancer.ingress[0].ip,PORT:.spec.ports[0].port""

# Cluster Admin Portal
# e.g. kubectl get svc service-proxy-lb -n sql-server-cluster -o=custom-columns=""IP:.status.loadBalancer.ingress[0].ip,PORT:.spec.ports[0].port""
kubectl get service service-proxy-lb -n <CLUSTER_NAME> -o=custom-columns=""IP:status.loadBalancer.ingress[0].ip,PORT:.spec.ports[0].port""
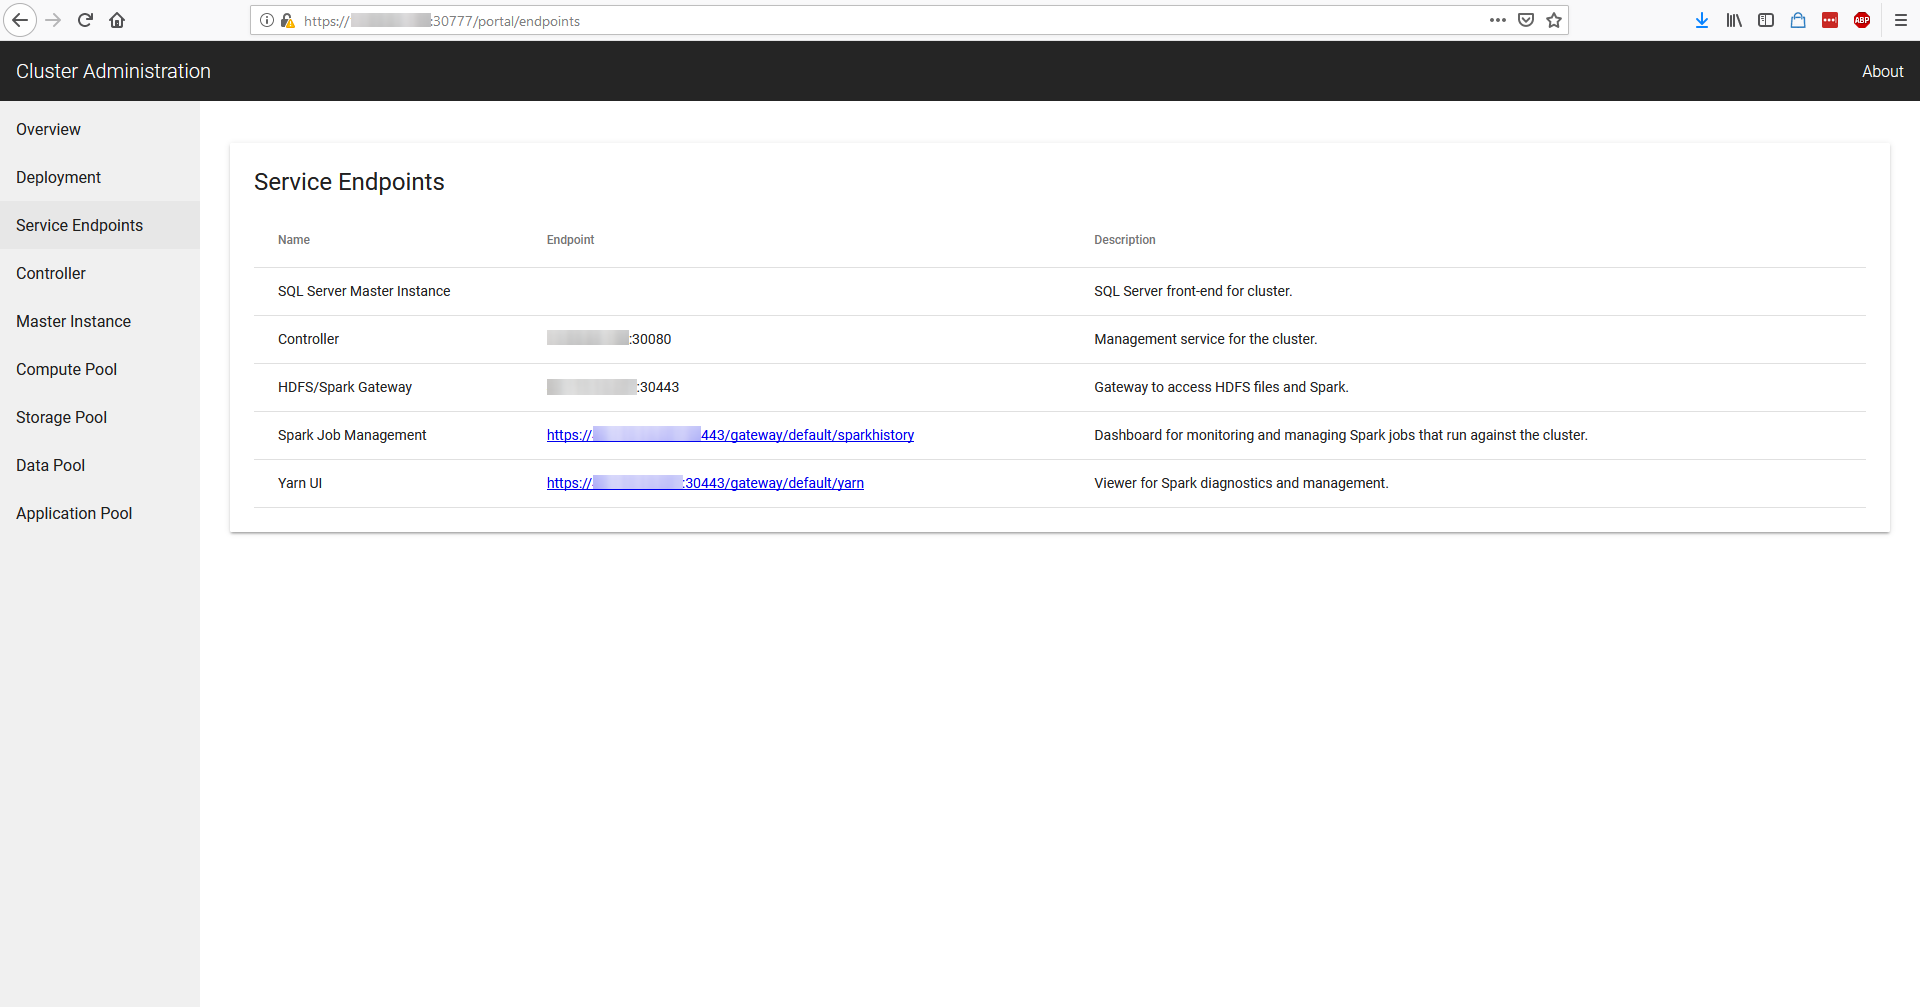
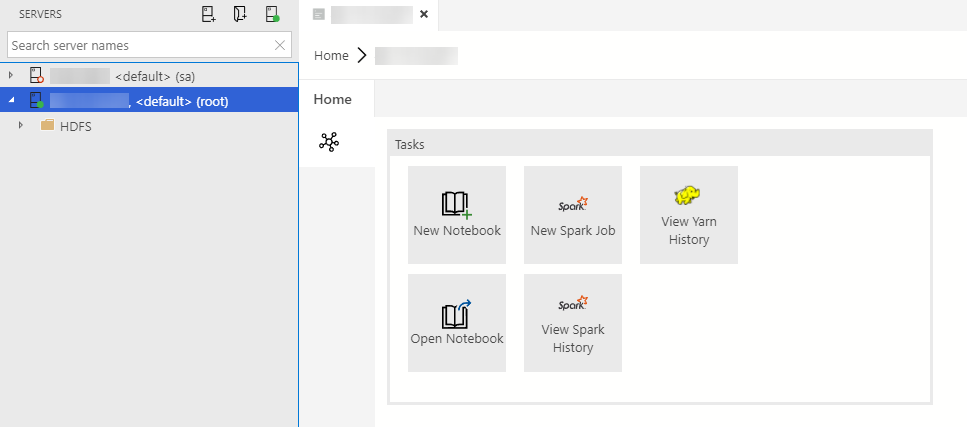
We can now open our Azure Data Studio and login on our clusters:
- SQL: IP and PORT received from
endpoint-master-pool(use<IP>,<PORT>format in Data Studio) - Spark/HDFS: IP received from
service-security-lb(no port required on connection)
Note: For Spark/HDFS we use username:root, password:<your_password>
Note: For SQL we use username:sa, password:<your_sa_password>

Comments ()