Automatically create an AI model for your dataset using Azure AutoML

An annoying part in working with classification, regression or other AI algorithms is that you always need to write a lot of code, prepare your data and do other steps before you are able to get results out of it.
Tools such as Azure ML Studio, … already allow you to drag & drop all your steps together, but it still is quite some work to get the results you want + it does not automatically tune the different hyperparameters nor does it run the different algorithm to identify which one is the best.
Now AutoML (Automated Machine Learning) released an interface that does all of this for us, while we just have to click a few things together! :D so let's try this and create a full End-To-End Scenario of creating our model as well as consuming the created model automatically through the AutoML API.
Use Case Definition
Of course before we can get started, we need a use-case. So let's take one from our big hat:
Summary:
- Use Case: In the Telecom industry, predict if a user will churn or not
- Dataset: https://www.kaggle.com/blastchar/telco-customer-churn
- Type: Classification (we either churn or we don't)
Creating our Azure AutoML Experiment
Now go to the Azure Portal and search after Machine Learning Workspaces and create your workspace. Once you go to this you will see something like this when you go to "Automated Machine Learning":

So create an experiment:

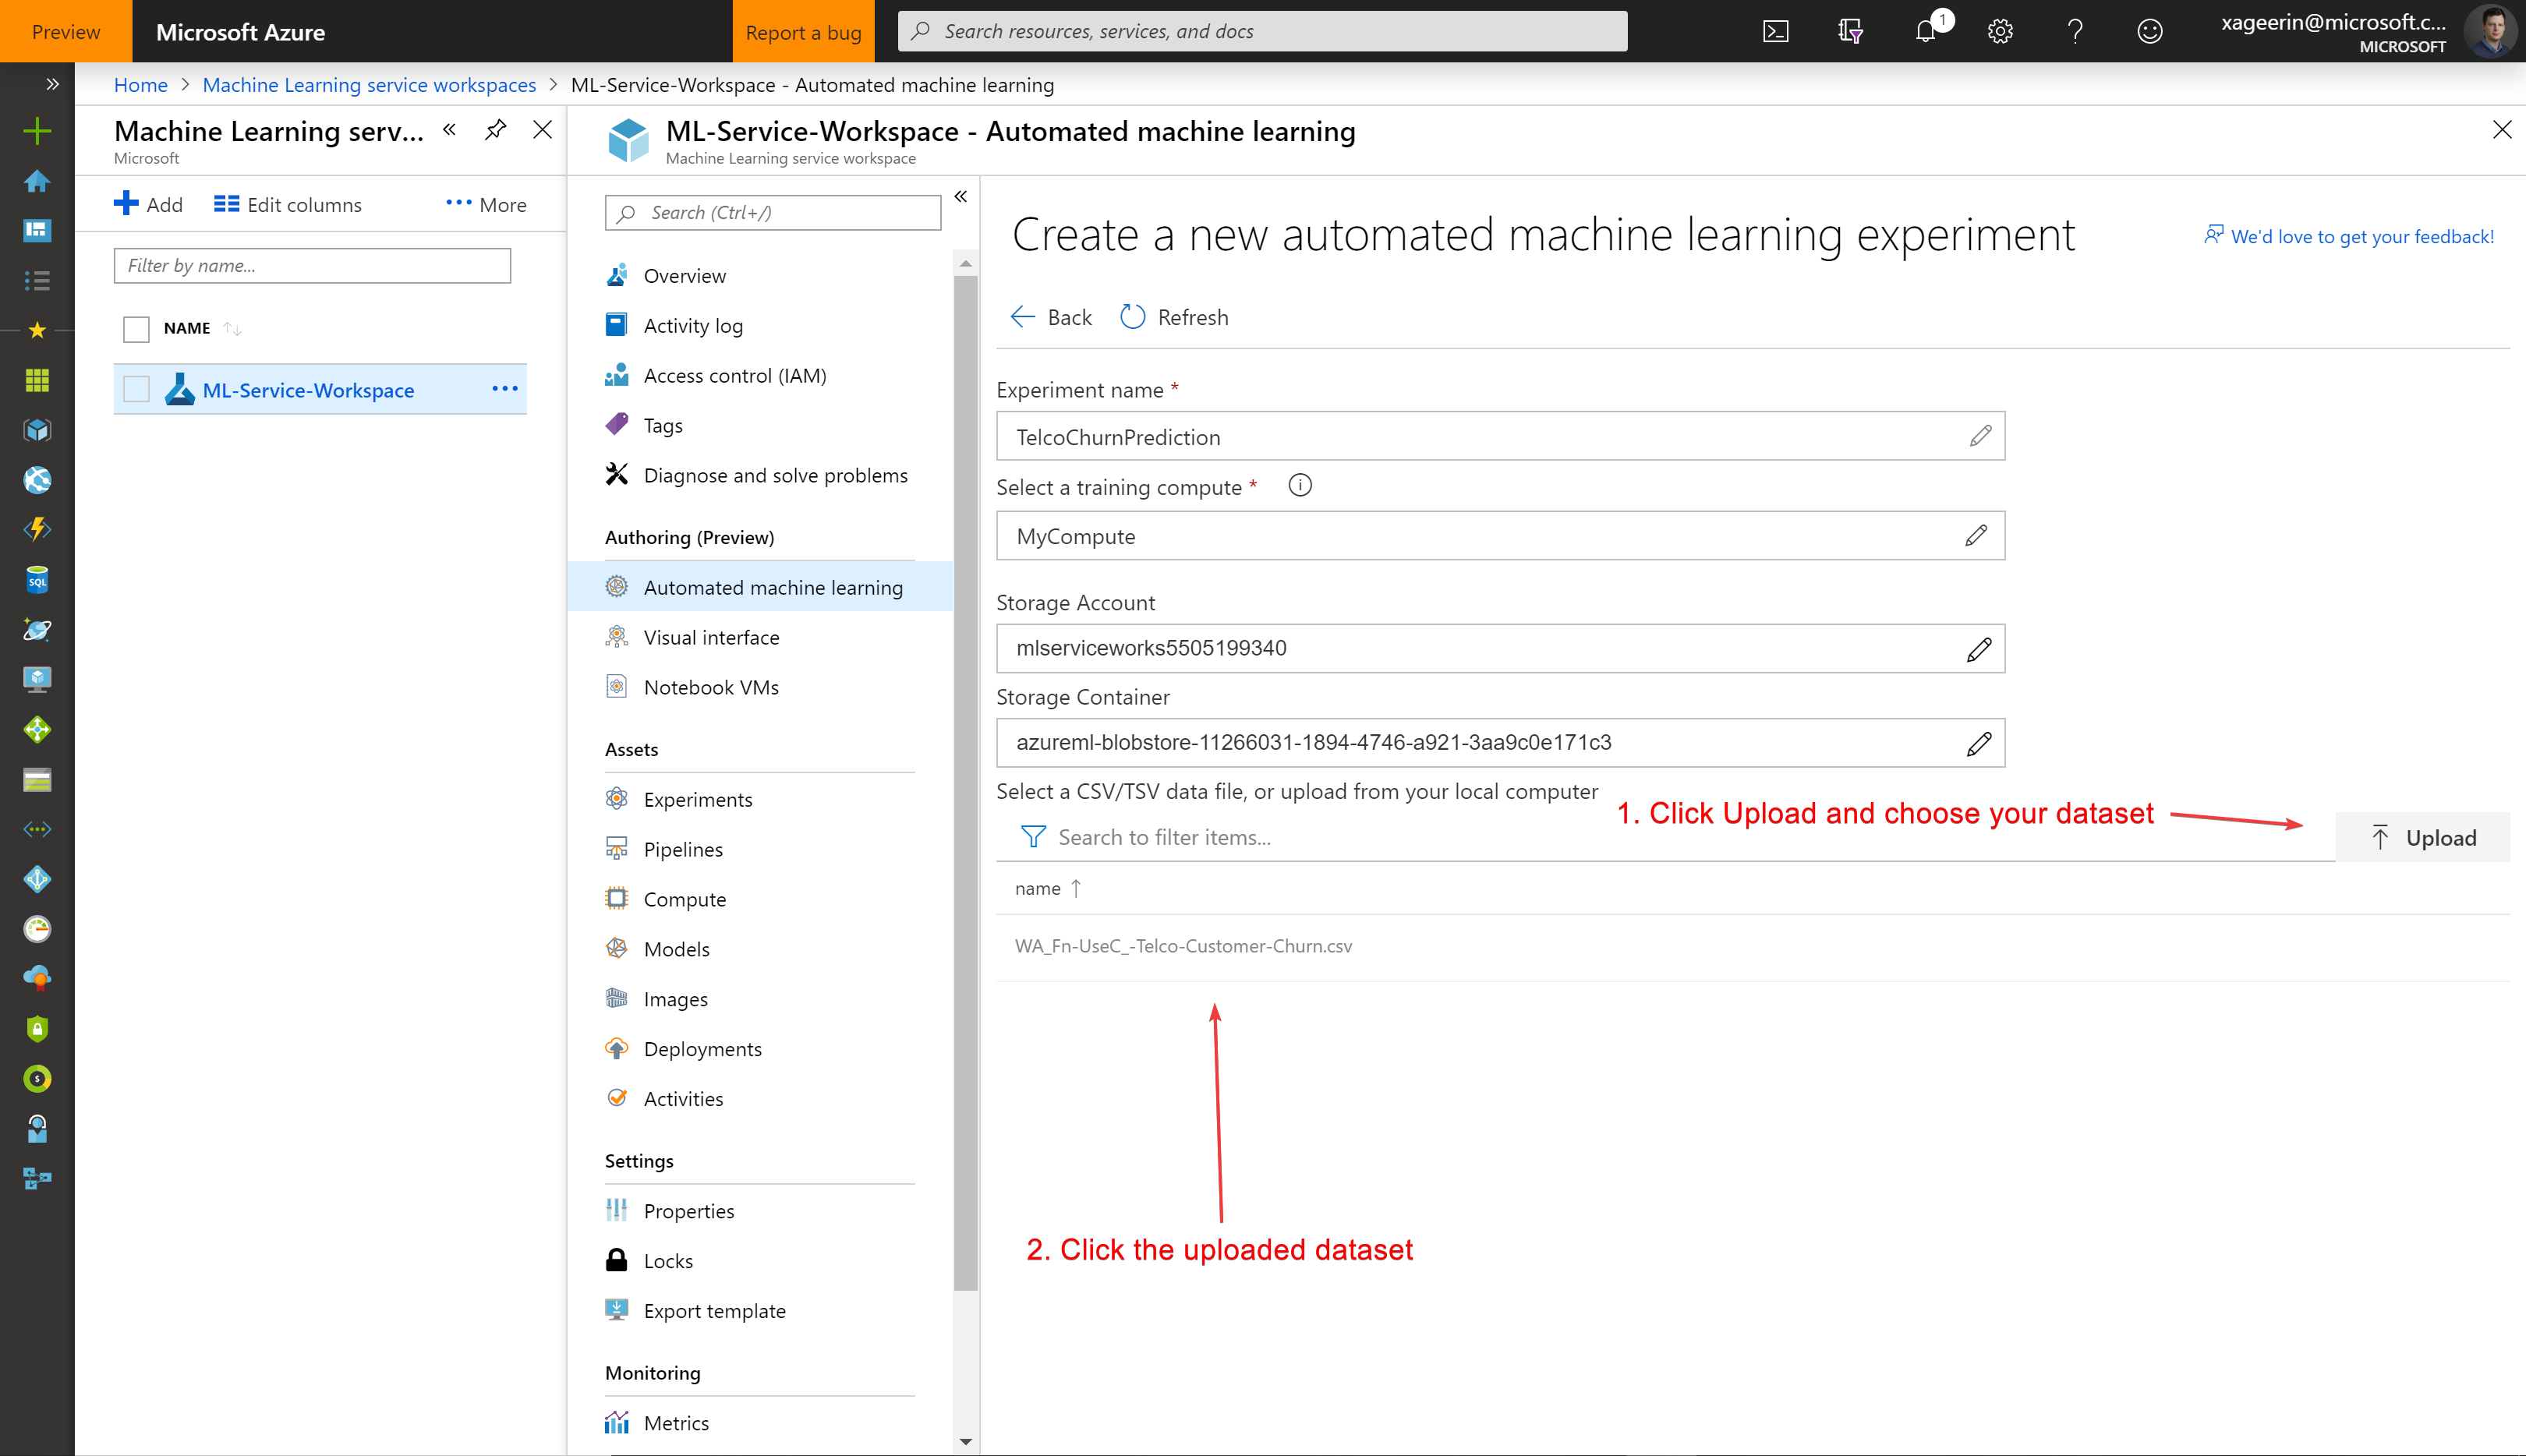
And upload your dataset and select it.
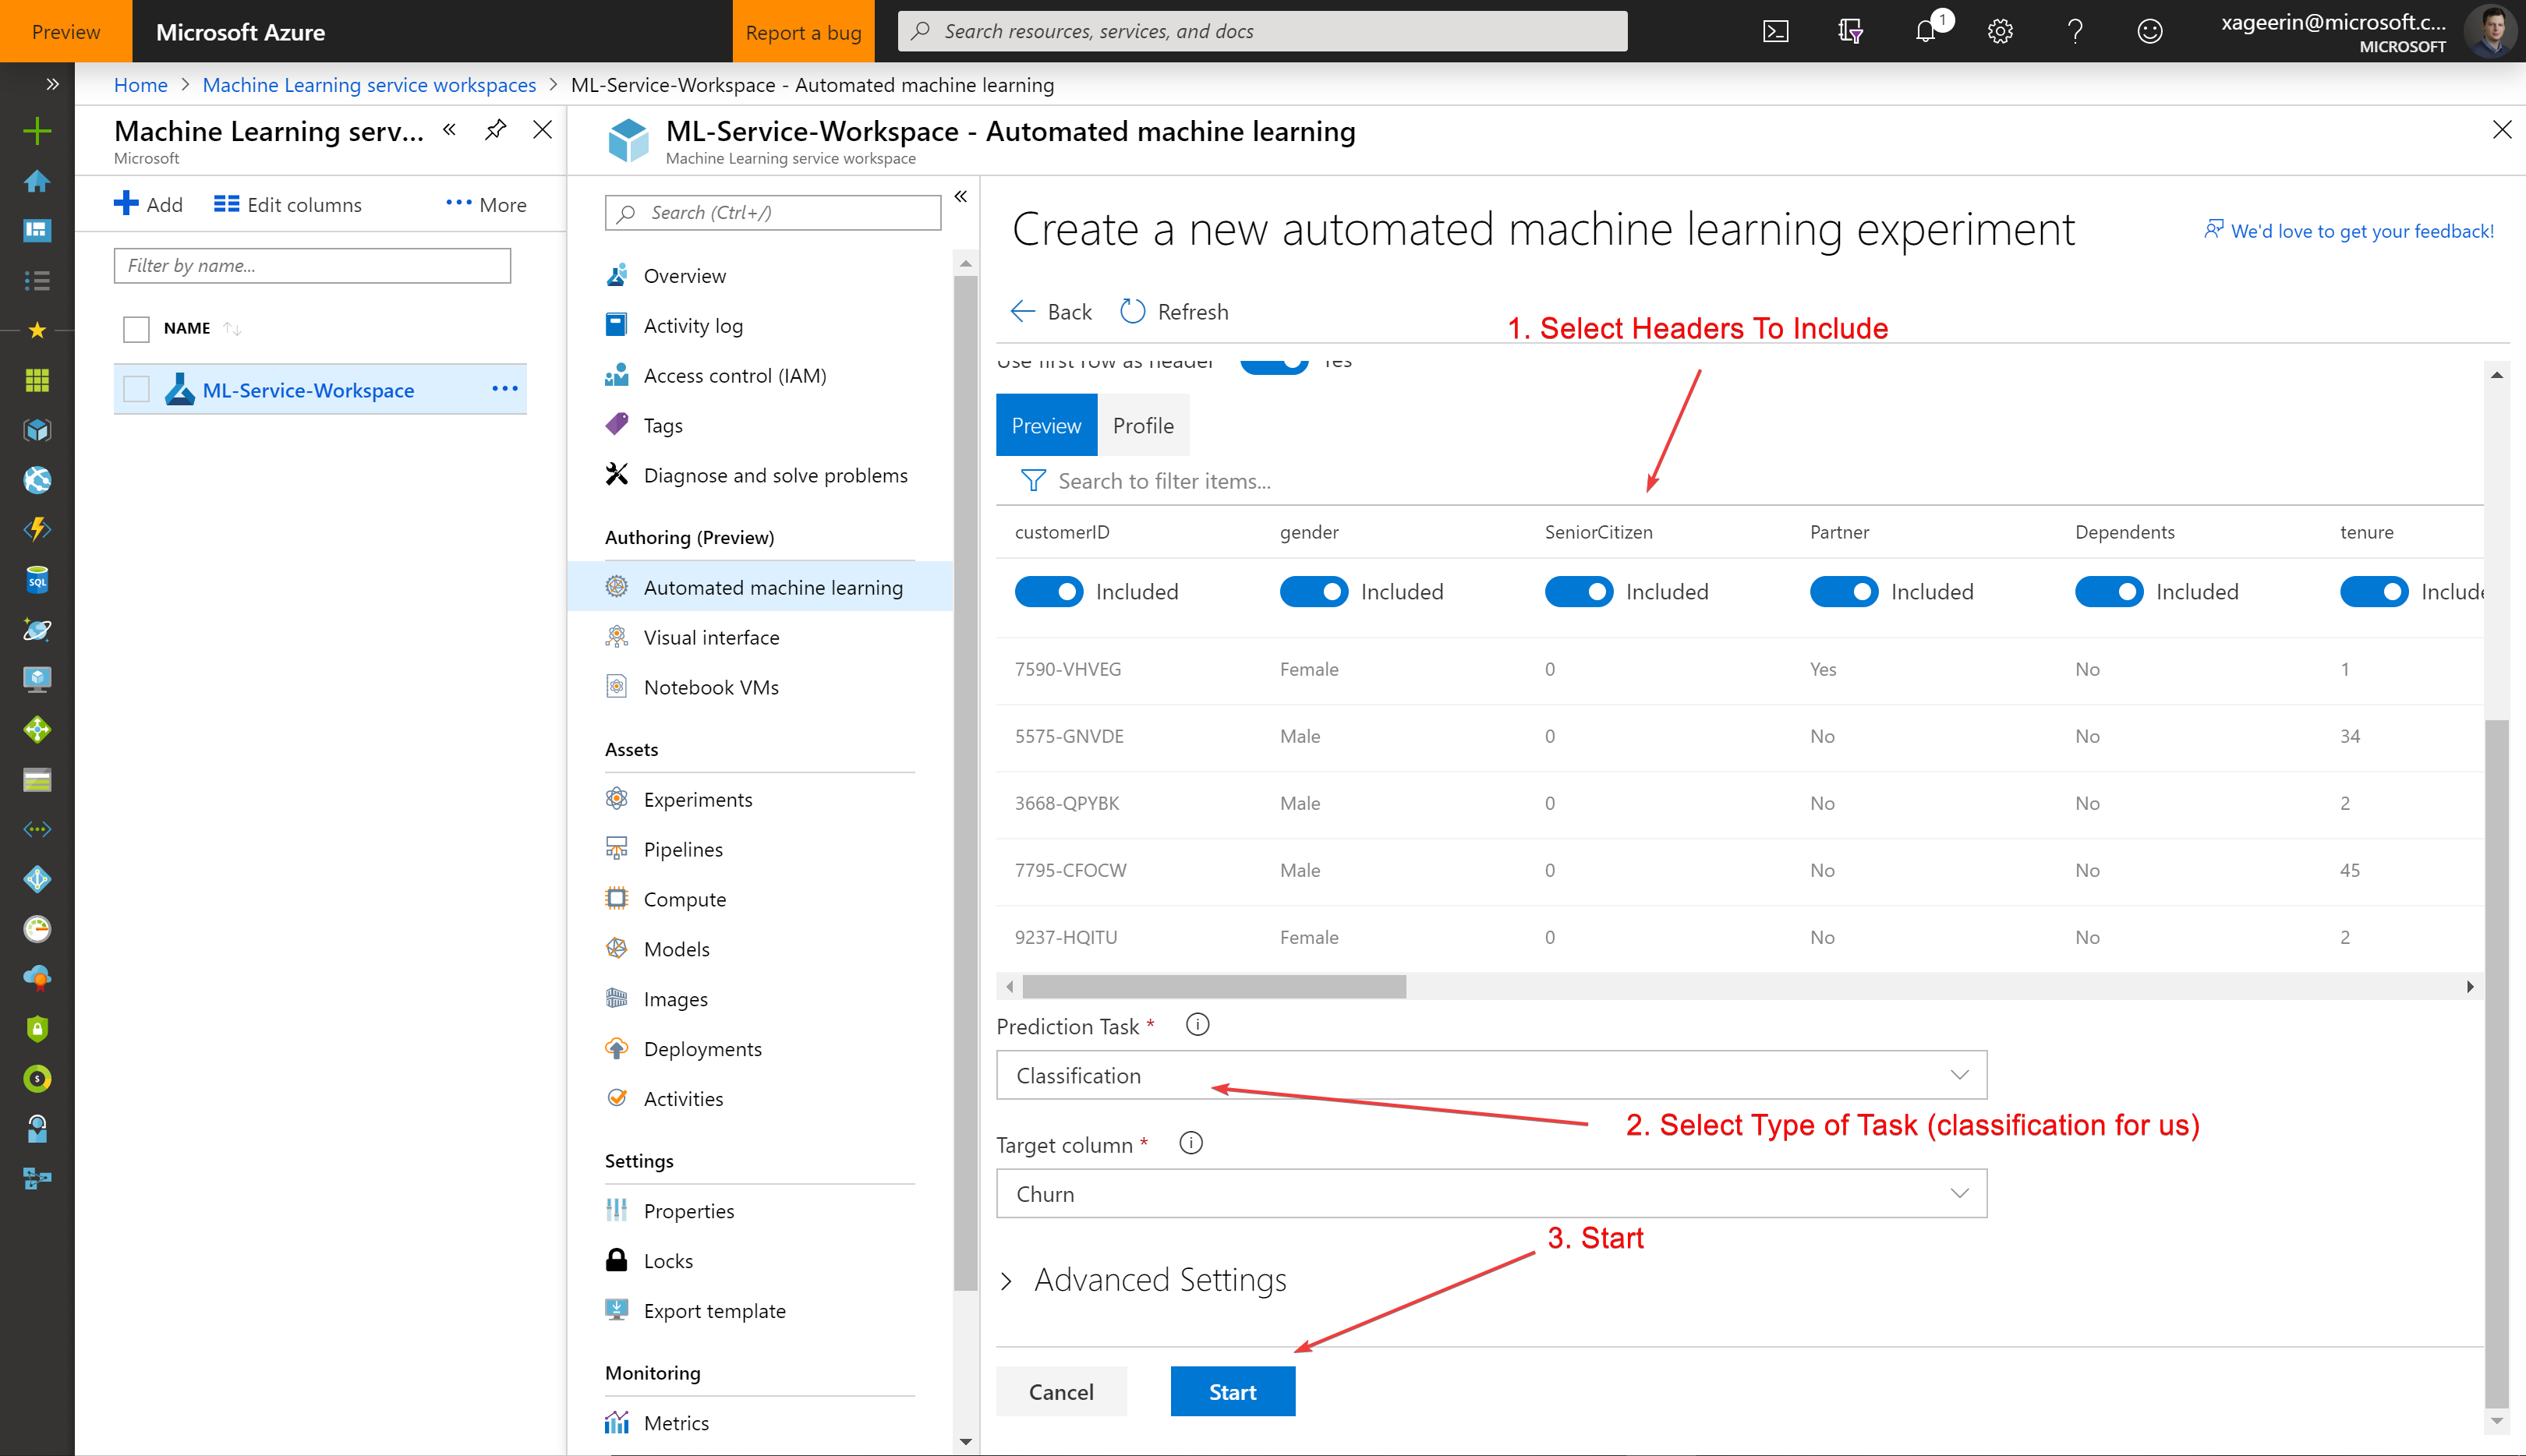
Whereafter you will see a quick overview of what the data is as well as what we want to do with it (classification).
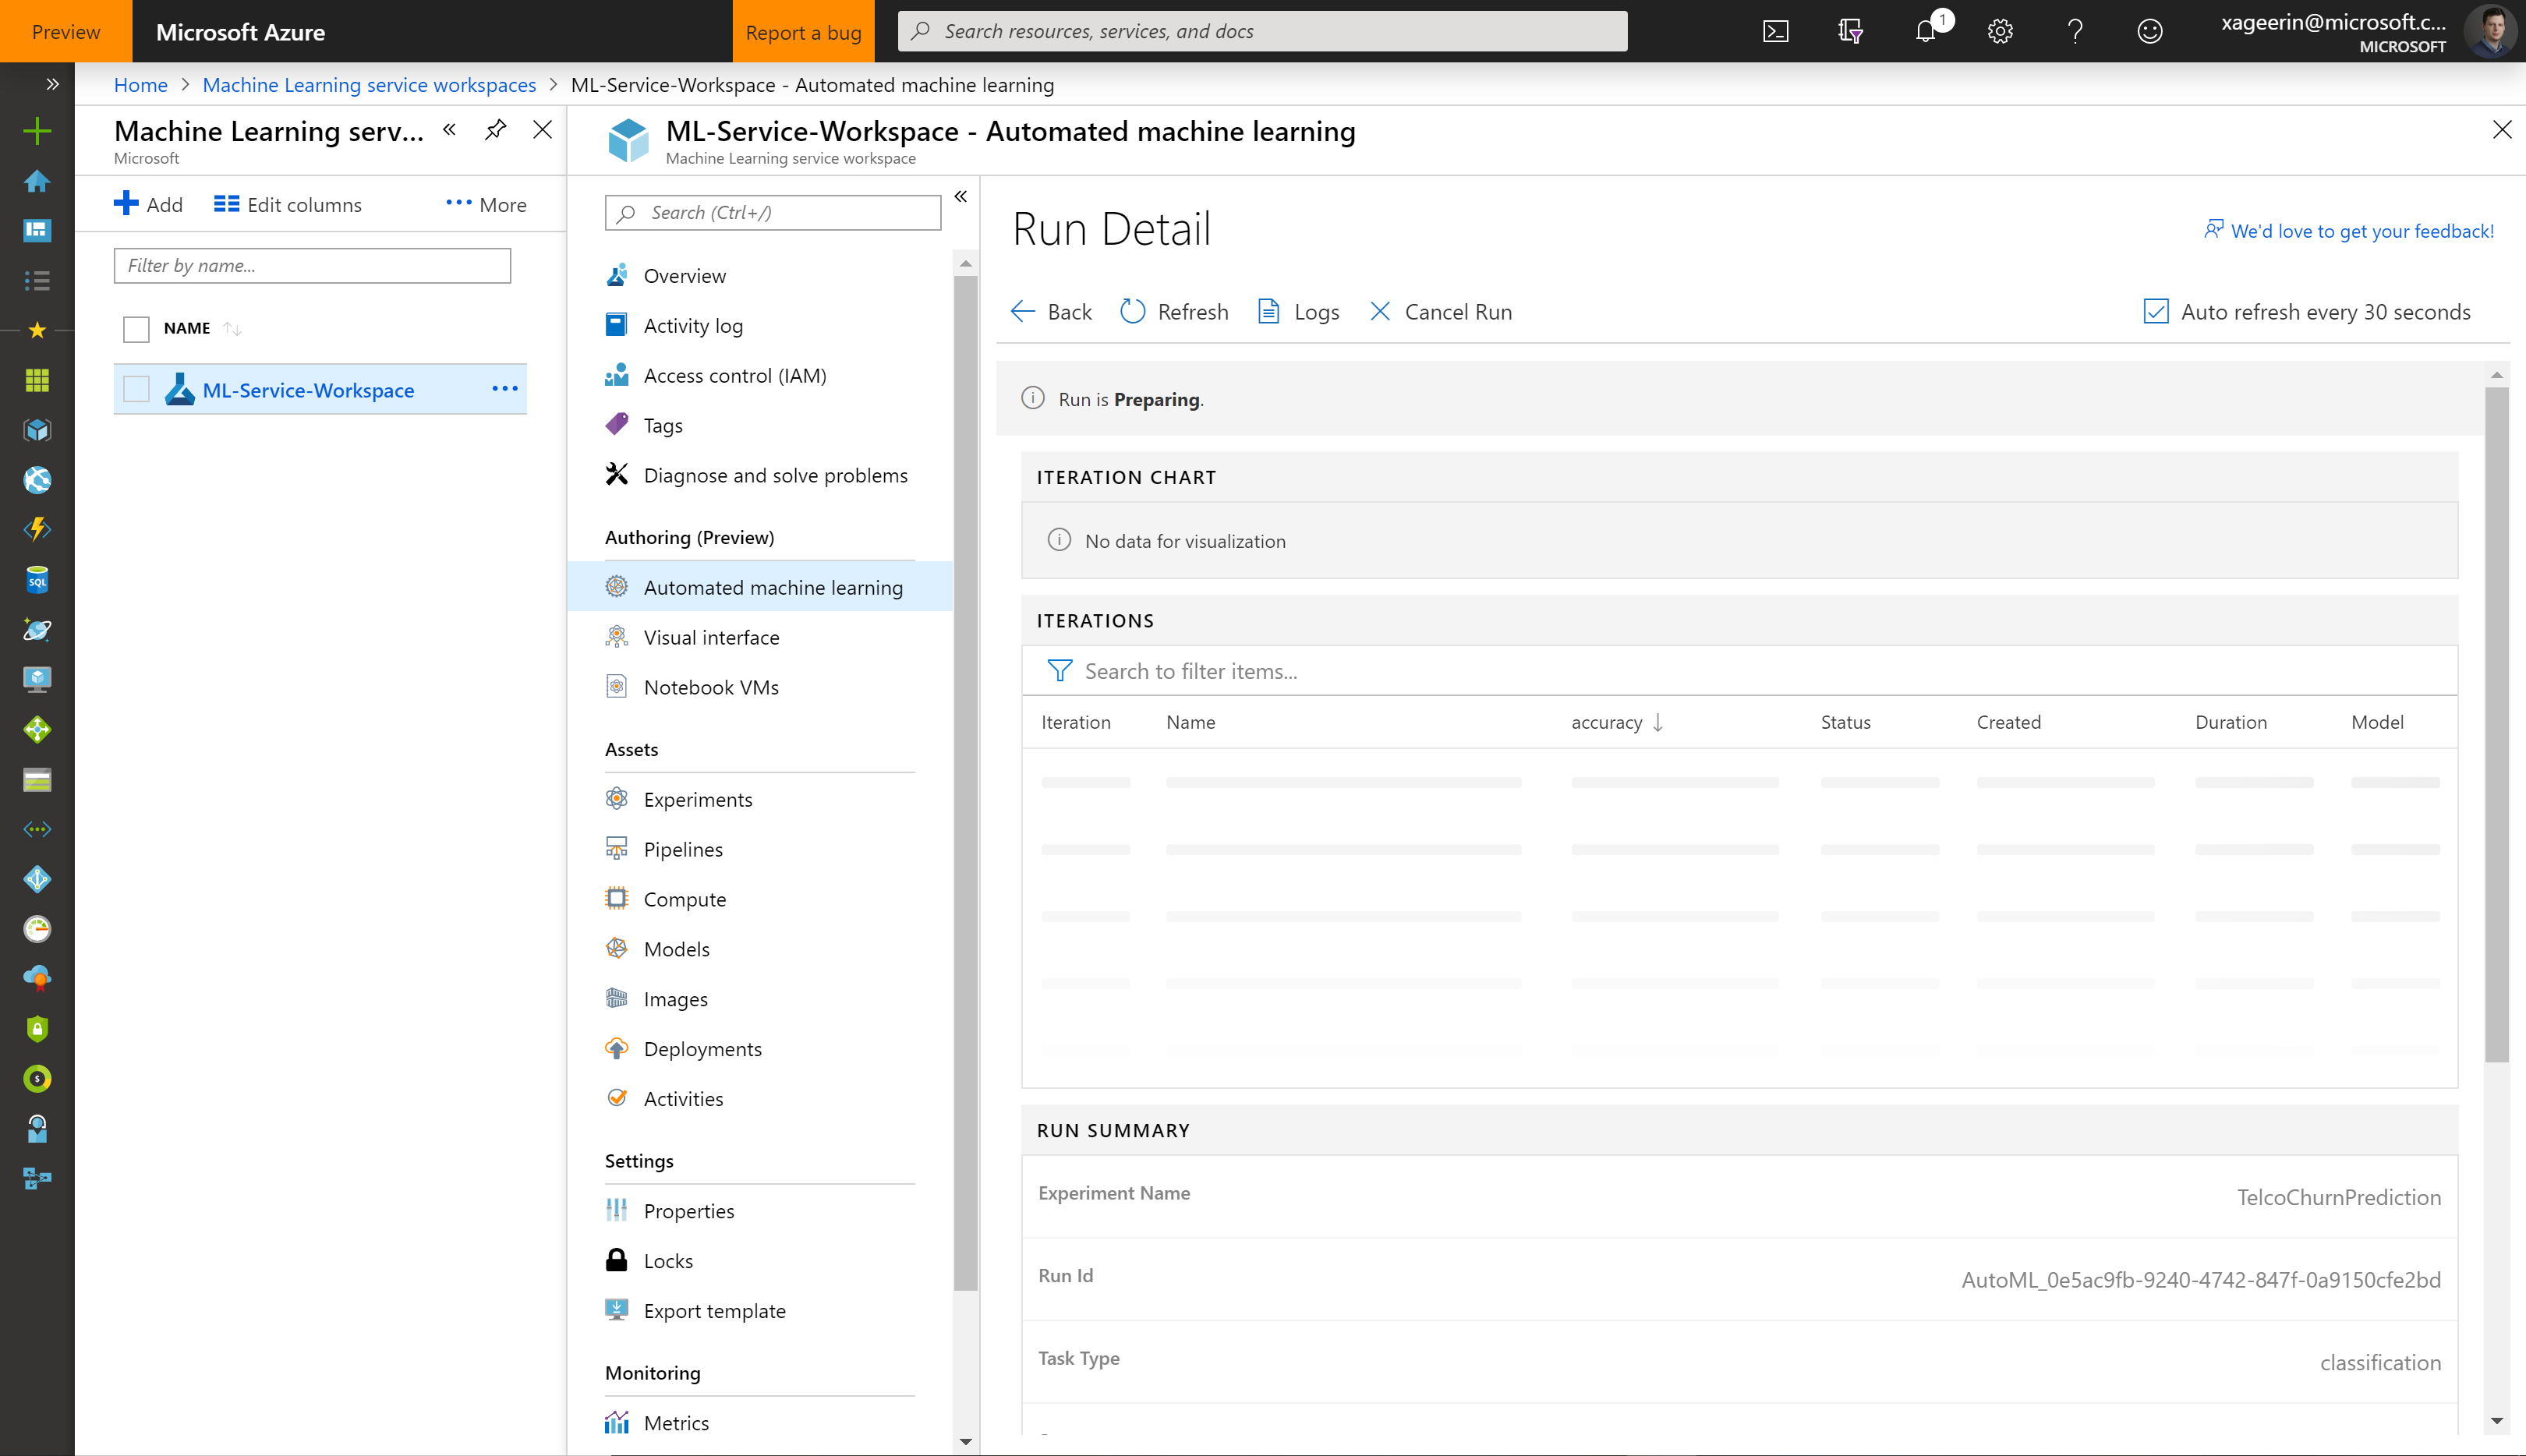
Whereafter we can see how it is running and what the results are from the different tunings:
Once the run is completed, we will see the different algorithms that were tested as well as their parameters. With the best performing one on the top.
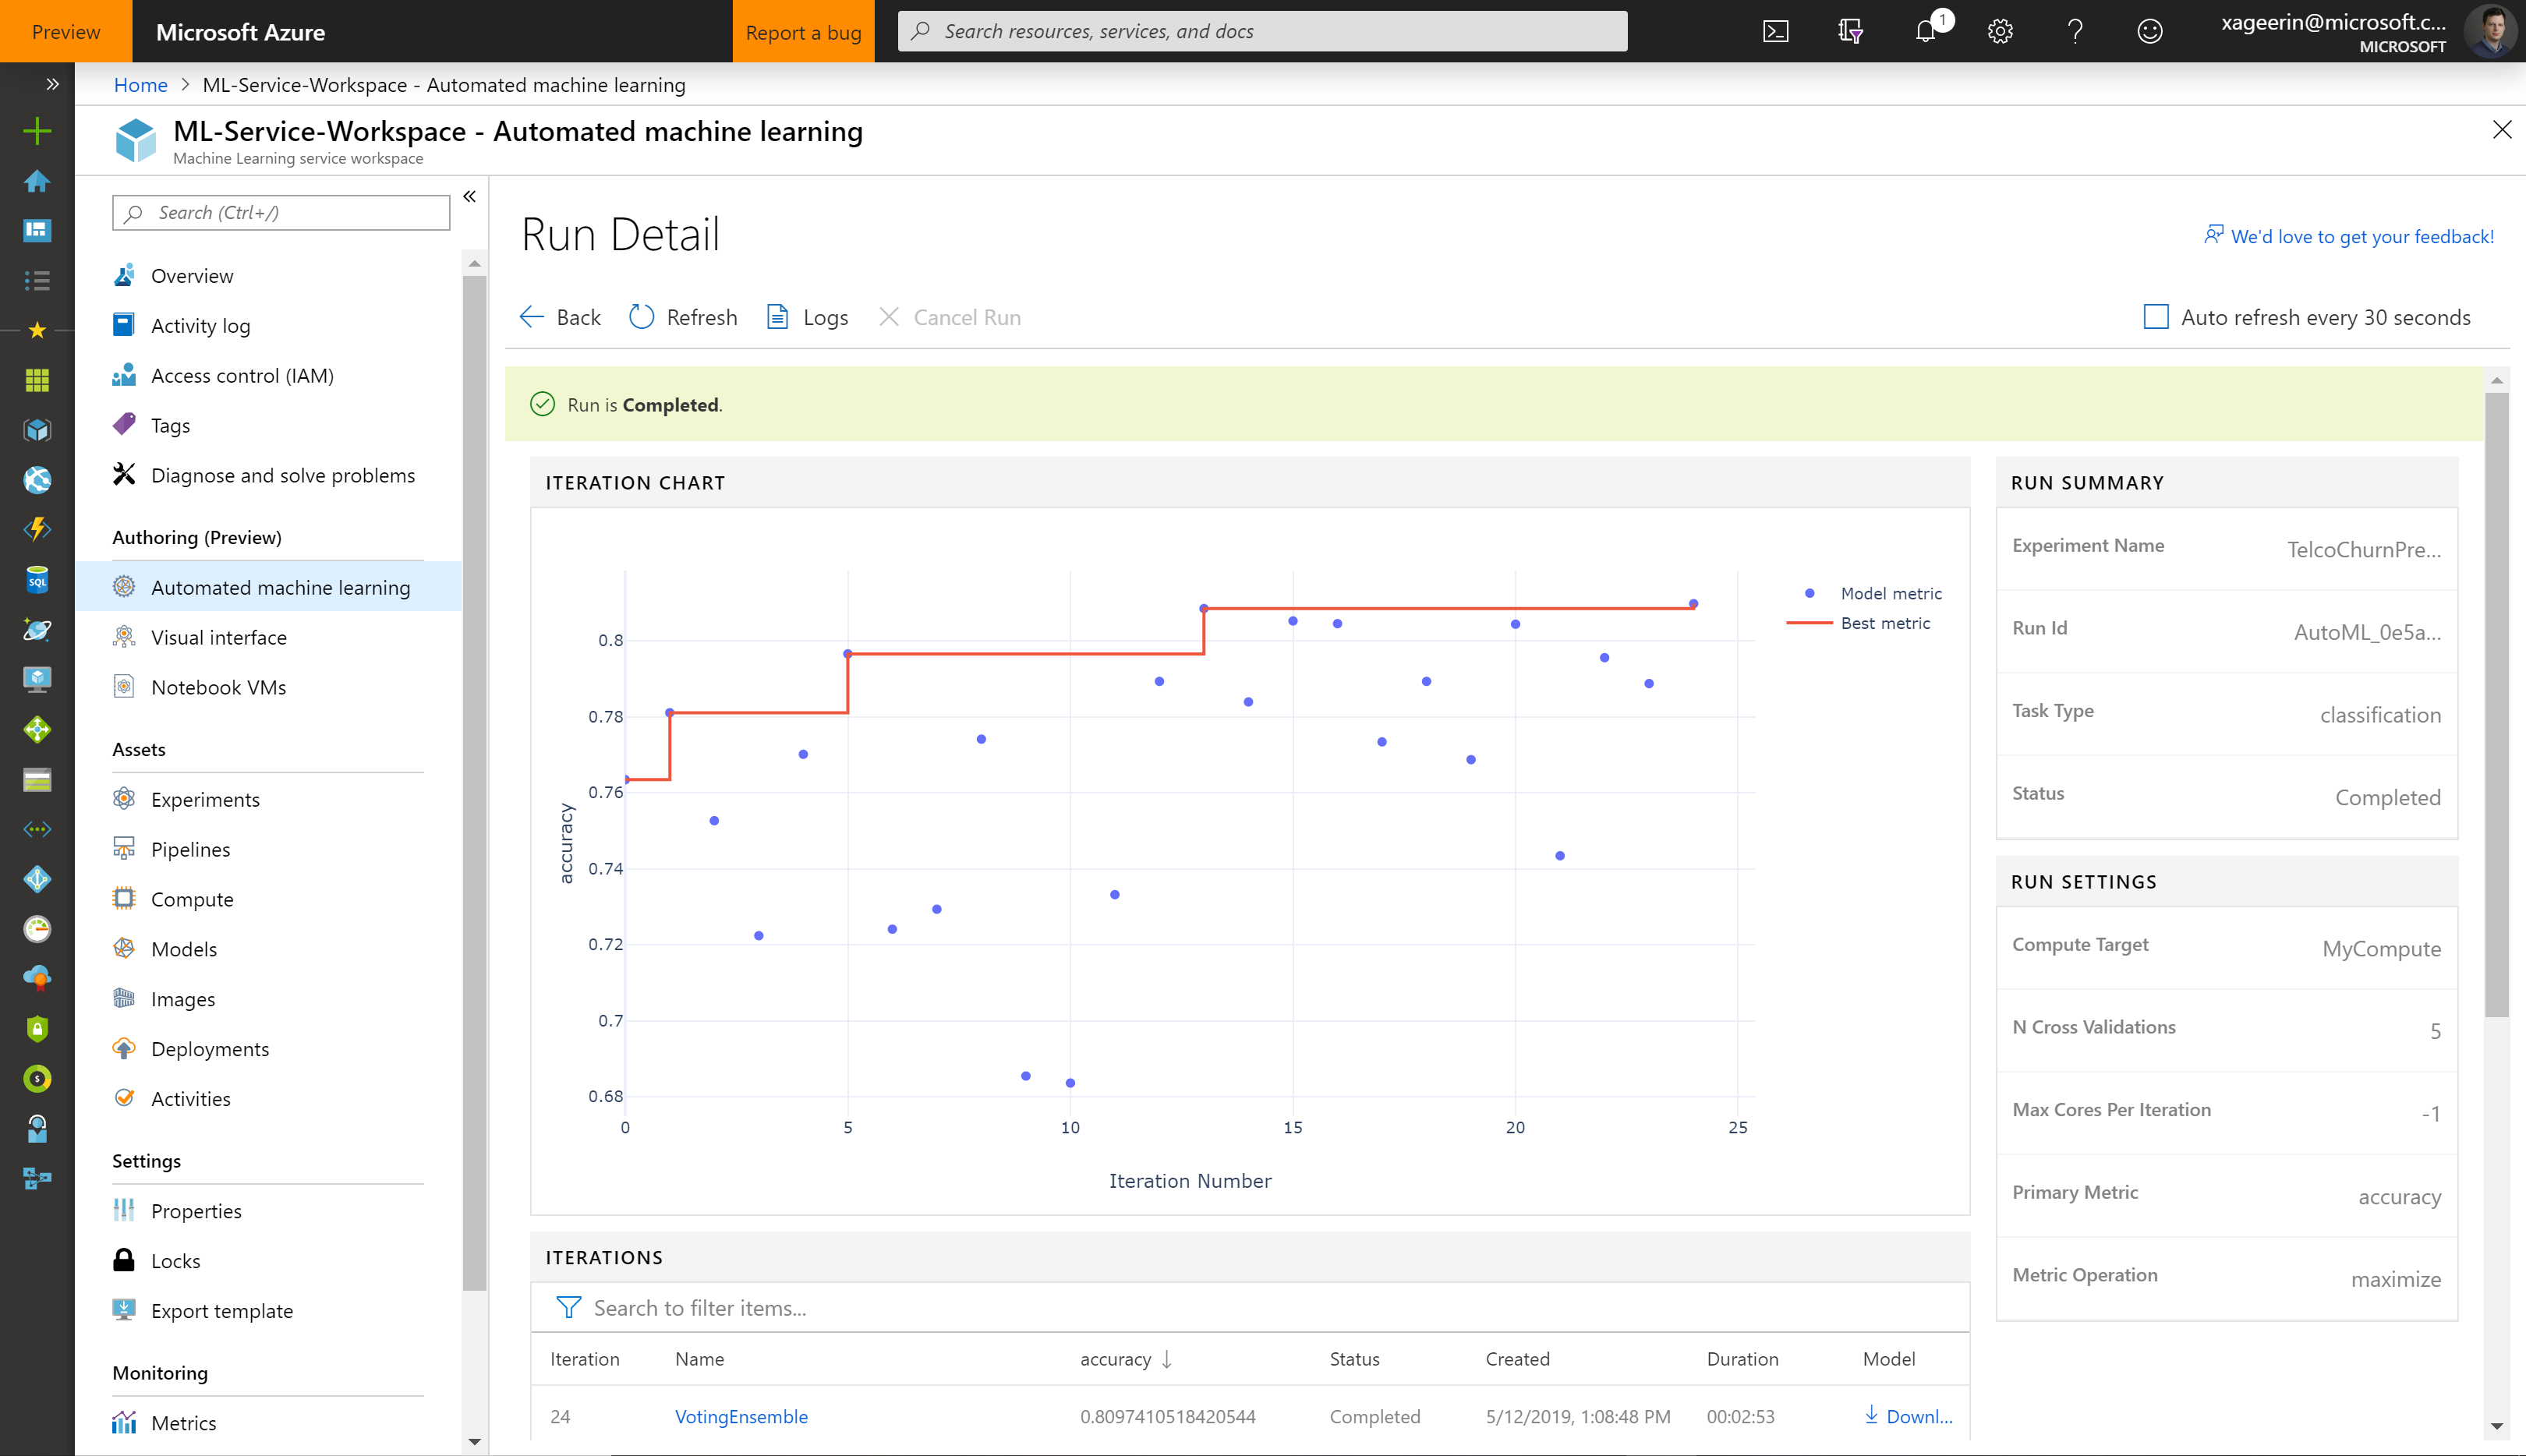
When we now click the best performing model, we will be able to download our model:
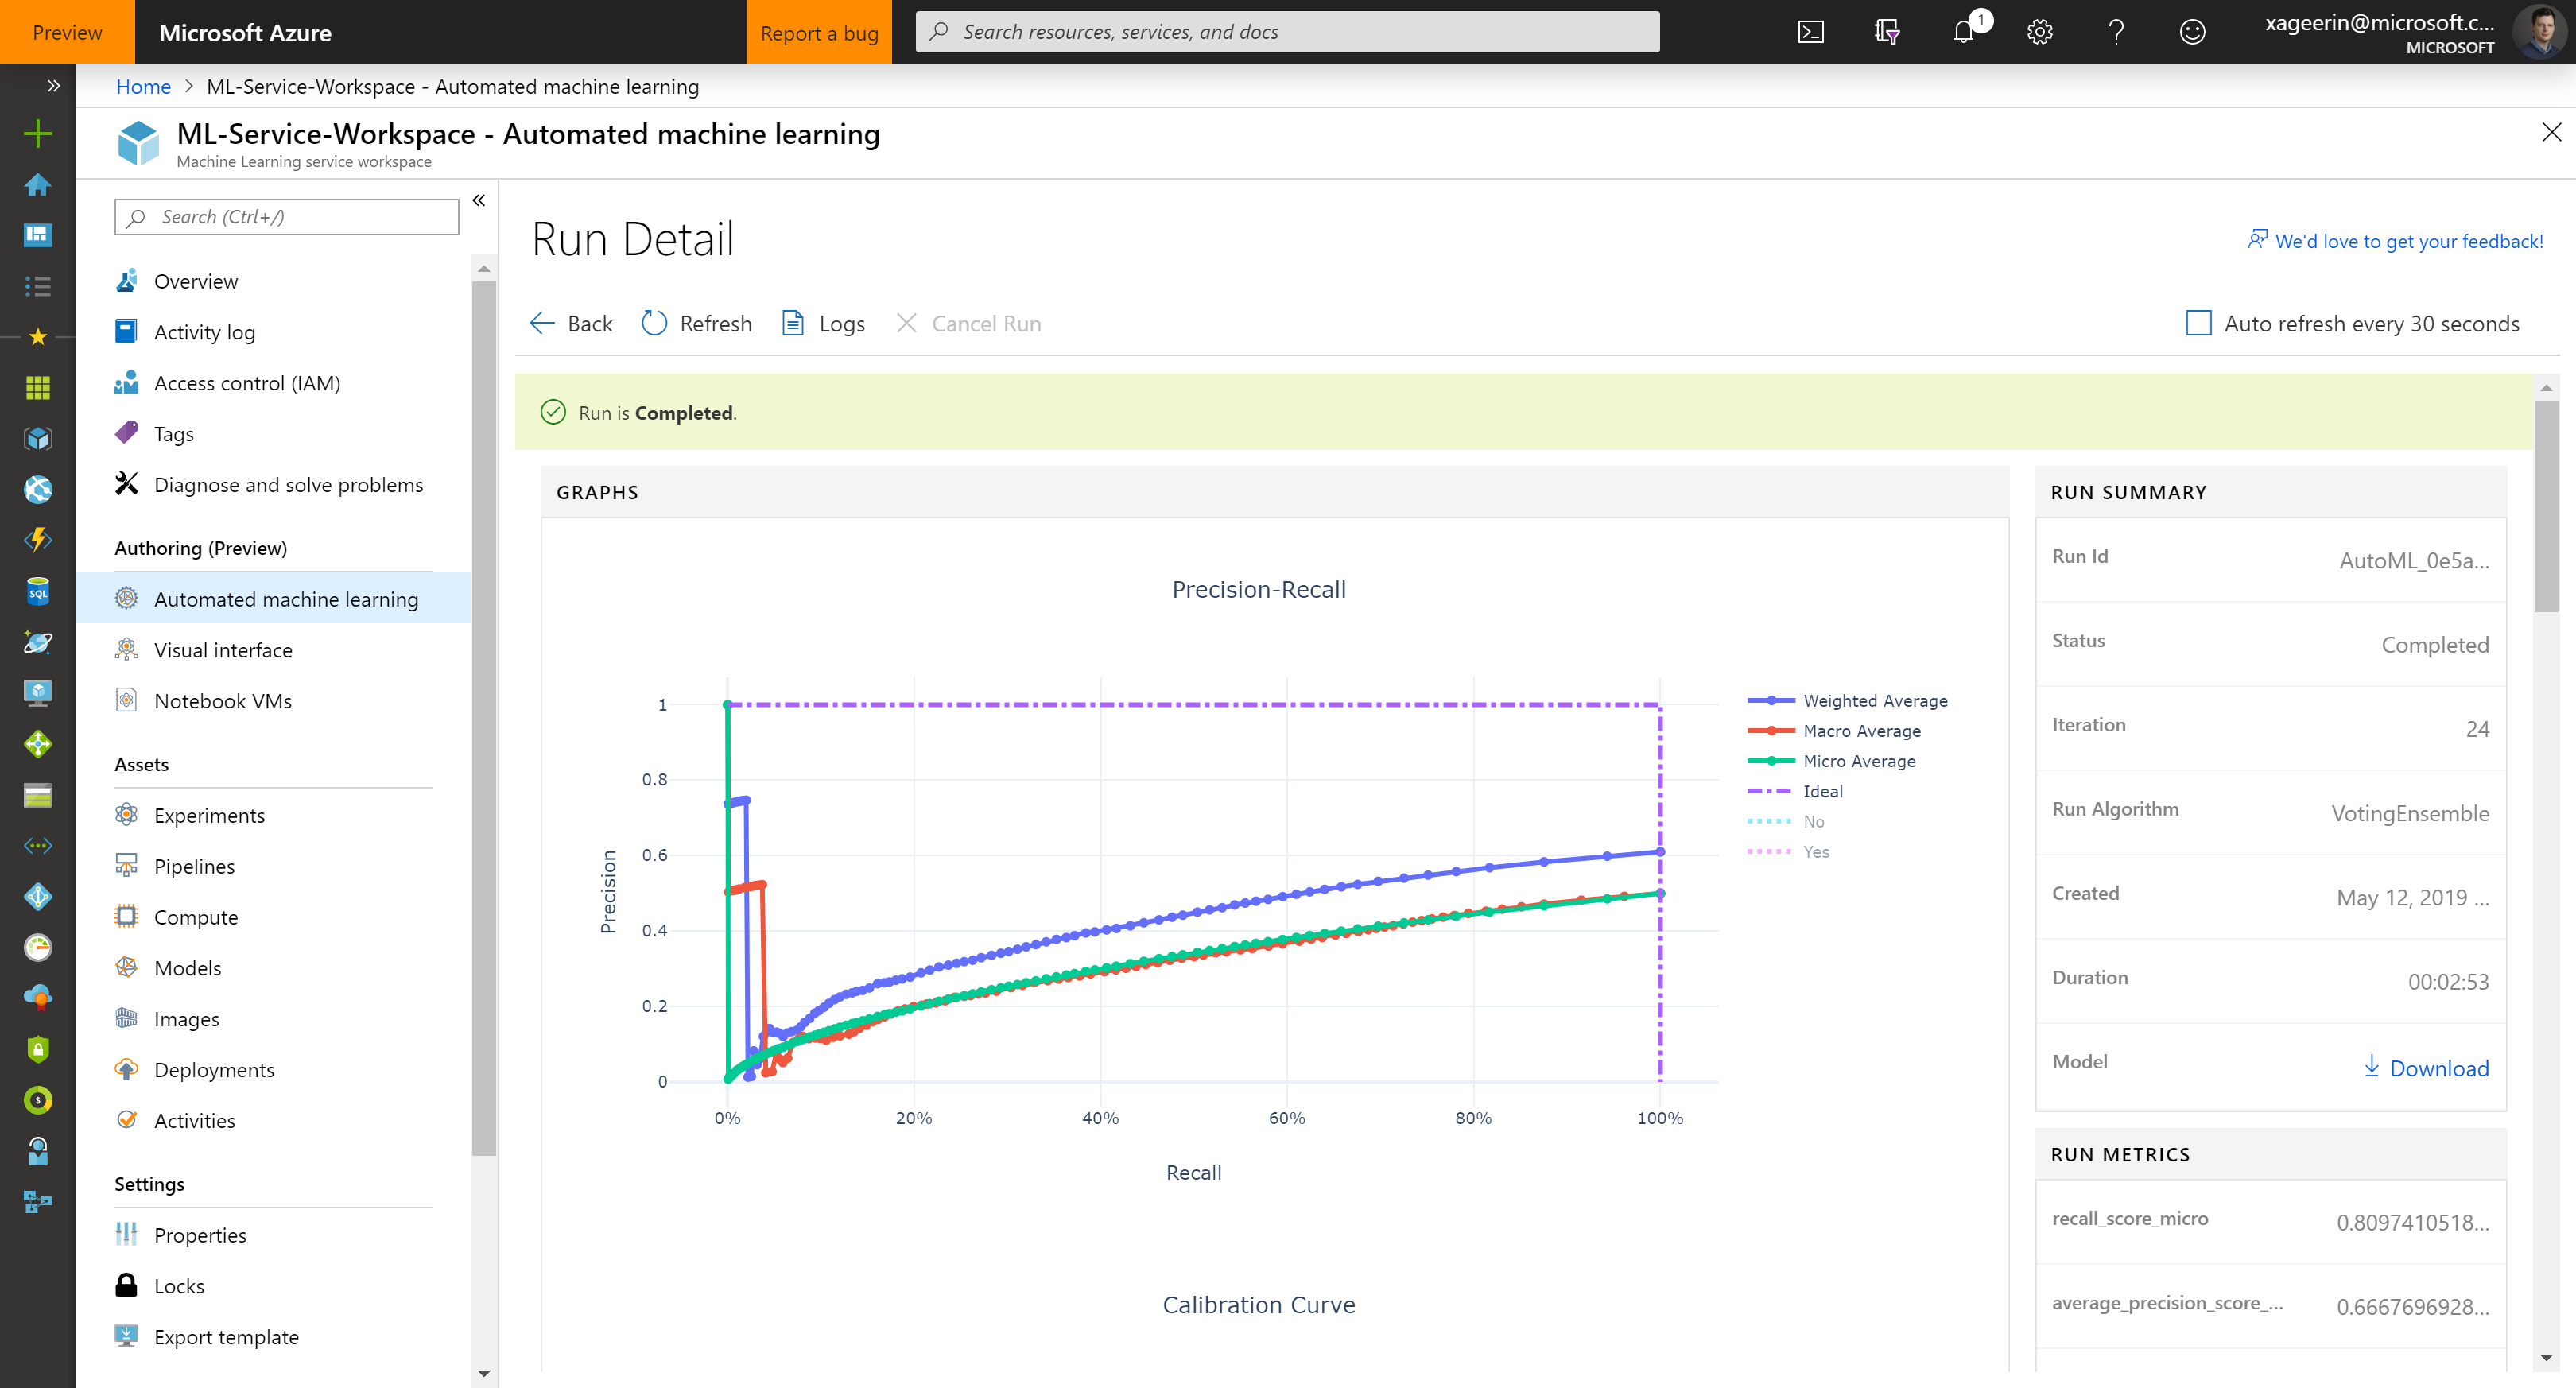
So let's download this model. This downloads us a .pkl file which is a python pickle file.
Downloading our model
Of course if we want to run in Production and completely automated, it doesn't make sense to manually download our .pkl file. That is why it is interesting to write a scrip that will do all of that automatically for us. This is what the following code does:
import numpy as np
import azureml
import pandas as pd #temp
import os
import pickle
from sklearn.externals import joblib
from azureml.core import Workspace, Run, Experiment
from azureml.core.model import Model
import azureml.train.automl

tenant_id = "<your_tenant_id>"
service_principal_id = "<your_service_principal_id>"
service_principal_password = "<your_service_principal_pw>"
subscription_id = "<your_subscription_id>"
resource_group = "<your_resource_group_name>"
workspace_name = "<your_ml_services_workspace_name>"
experiment_name = "<your_ml_services_experiment_name>"

# Print SDK Version
print("Azure ML SDK Version: ", azureml.core.VERSION)

# Set up our connection to our workspace
# Note: normally this is in an environment variable or configuration file!
from azureml.core.authentication import ServicePrincipalAuthentication
myServicePrincipal = ServicePrincipalAuthentication(tenant_id=tenant_id, service_principal_id=service_principal_id, service_principal_password=service_principal_password)
ws = Workspace(subscription_id=subscription_id, resource_group=resource_group, workspace_name=workspace_name, auth=myServicePrincipal)
experiment = Experiment(ws, name=experiment_name)
run_latest = list(experiment.get_runs())[0] # get_runs returns generator, natural way in python is to use list(<generator>) and working with that

# Print details about the run
children = list(run_latest.get_children())
metricslist = {}
for run in children:
    properties = run.get_properties()
    metrics = {k: v for k, v in run.get_metrics().items() if isinstance(v, float)}
    metricslist[int(properties['iteration'])] = metrics

rundata = pd.DataFrame(metricslist).sort_index(1)
print(rundata)

best_algorithm = list(run_latest.get_children())[0]
print("Best Algorithm", best_algorithm)

print(best_algorithm.get_file_names())
#print(run_latest.get_children())
# Register the model
model = best_algorithm.register_model(model_name="test_model", model_path='outputs/model.pkl')
print(model.name, model.id, model.version, sep = '\t')

# Download the model
model.download(target_dir=os.getcwd(), exist_ok=True)
file_path = os.path.join(os.getcwd(), 'model.pkl')

print("Model Downloaded as 'model.pkl'")
Consuming our model
As a last step, we are now able to consume our model. For testing purposes, I will do this manually, but for production this should be done through for example a library creation or an API endpoint.
The way we can consume this model is by creating a dataframe containing our columns (the ones we included in the training earlier) and adding the data to that.
After that we can then call model.predict(df) which will utilize this dataframe, send it to our predict function and return our result (yes or no in our case).
This is how you can do that in python:
import pickle
import azureml.train.automl # pip3 install azureml-sdk[automl,notebooks]
import pandas as pd

print("Azure ML SDK Version: ", azureml.core.VERSION)

with open('model.pkl', 'rb') as fd:
    best_run  = pickle.load(fd)

    columns = [ "gender", "SeniorCitizen", "Partner", "Dependents", "tenure", "PhoneService", "MultipleLines", "InternetService", "OnlineSecurity", "OnlineBackup", "DeviceProtection", "TechSupport", "StreamingTV", "StreamingMovies", "Contract", "PaperlessBilling", "PaymentMethod", "MonthlyCharges", "TotalCharges" ]

    # Churn = Yes
    data1 = [[ "Female", "0", "No", "No", "8", "Yes", "Yes", "Fiber optic", "No", "No", "Yes", "No", "Yes", "Yes", "Month-to-month", "Yes", "Electronic check", "99.65", "820.5" ]]

    # Churn = No
    data2 = [[ "Male", "0", "Yes", "Yes", "59", "Yes", "No", "No", "No internet service", "No internet service", "No internet service", "No internet service", "No internet service", "No internet service", "Two year", "No", "Credit card (automatic)", "19.3", "1192.7" ]]

    # Churn = Yes
    data3 = [[ "Male", "1", "Yes", "No", "58", "No", "No phone service", "DSL", "No", "Yes", "Yes", "No", "No", "Yes", "Month-to-month", "Yes", "Electronic check", "45.3", "2651.2" ]]

    # Predict
    df1 = pd.DataFrame(data=data1, columns=columns)
    df2 = pd.DataFrame(data=data2, columns=columns)
    df3 = pd.DataFrame(data=data3, columns=columns)

    print("Predicting Dataset #1, expect 'Yes', got: ", best_run.predict(df1))
    print("Predicting Dataset #1, expect 'No', got: ", best_run.predict(df2))
    print("Predicting Dataset #1, expect 'Yes', got: ", best_run.predict(df3))
Accuracy Measuring
A last thing to do is to check our accuracy. You can do this through the portal for the best model, showing the Accuracy or by manually going through the dataset and checking the false positive relative to the line count.
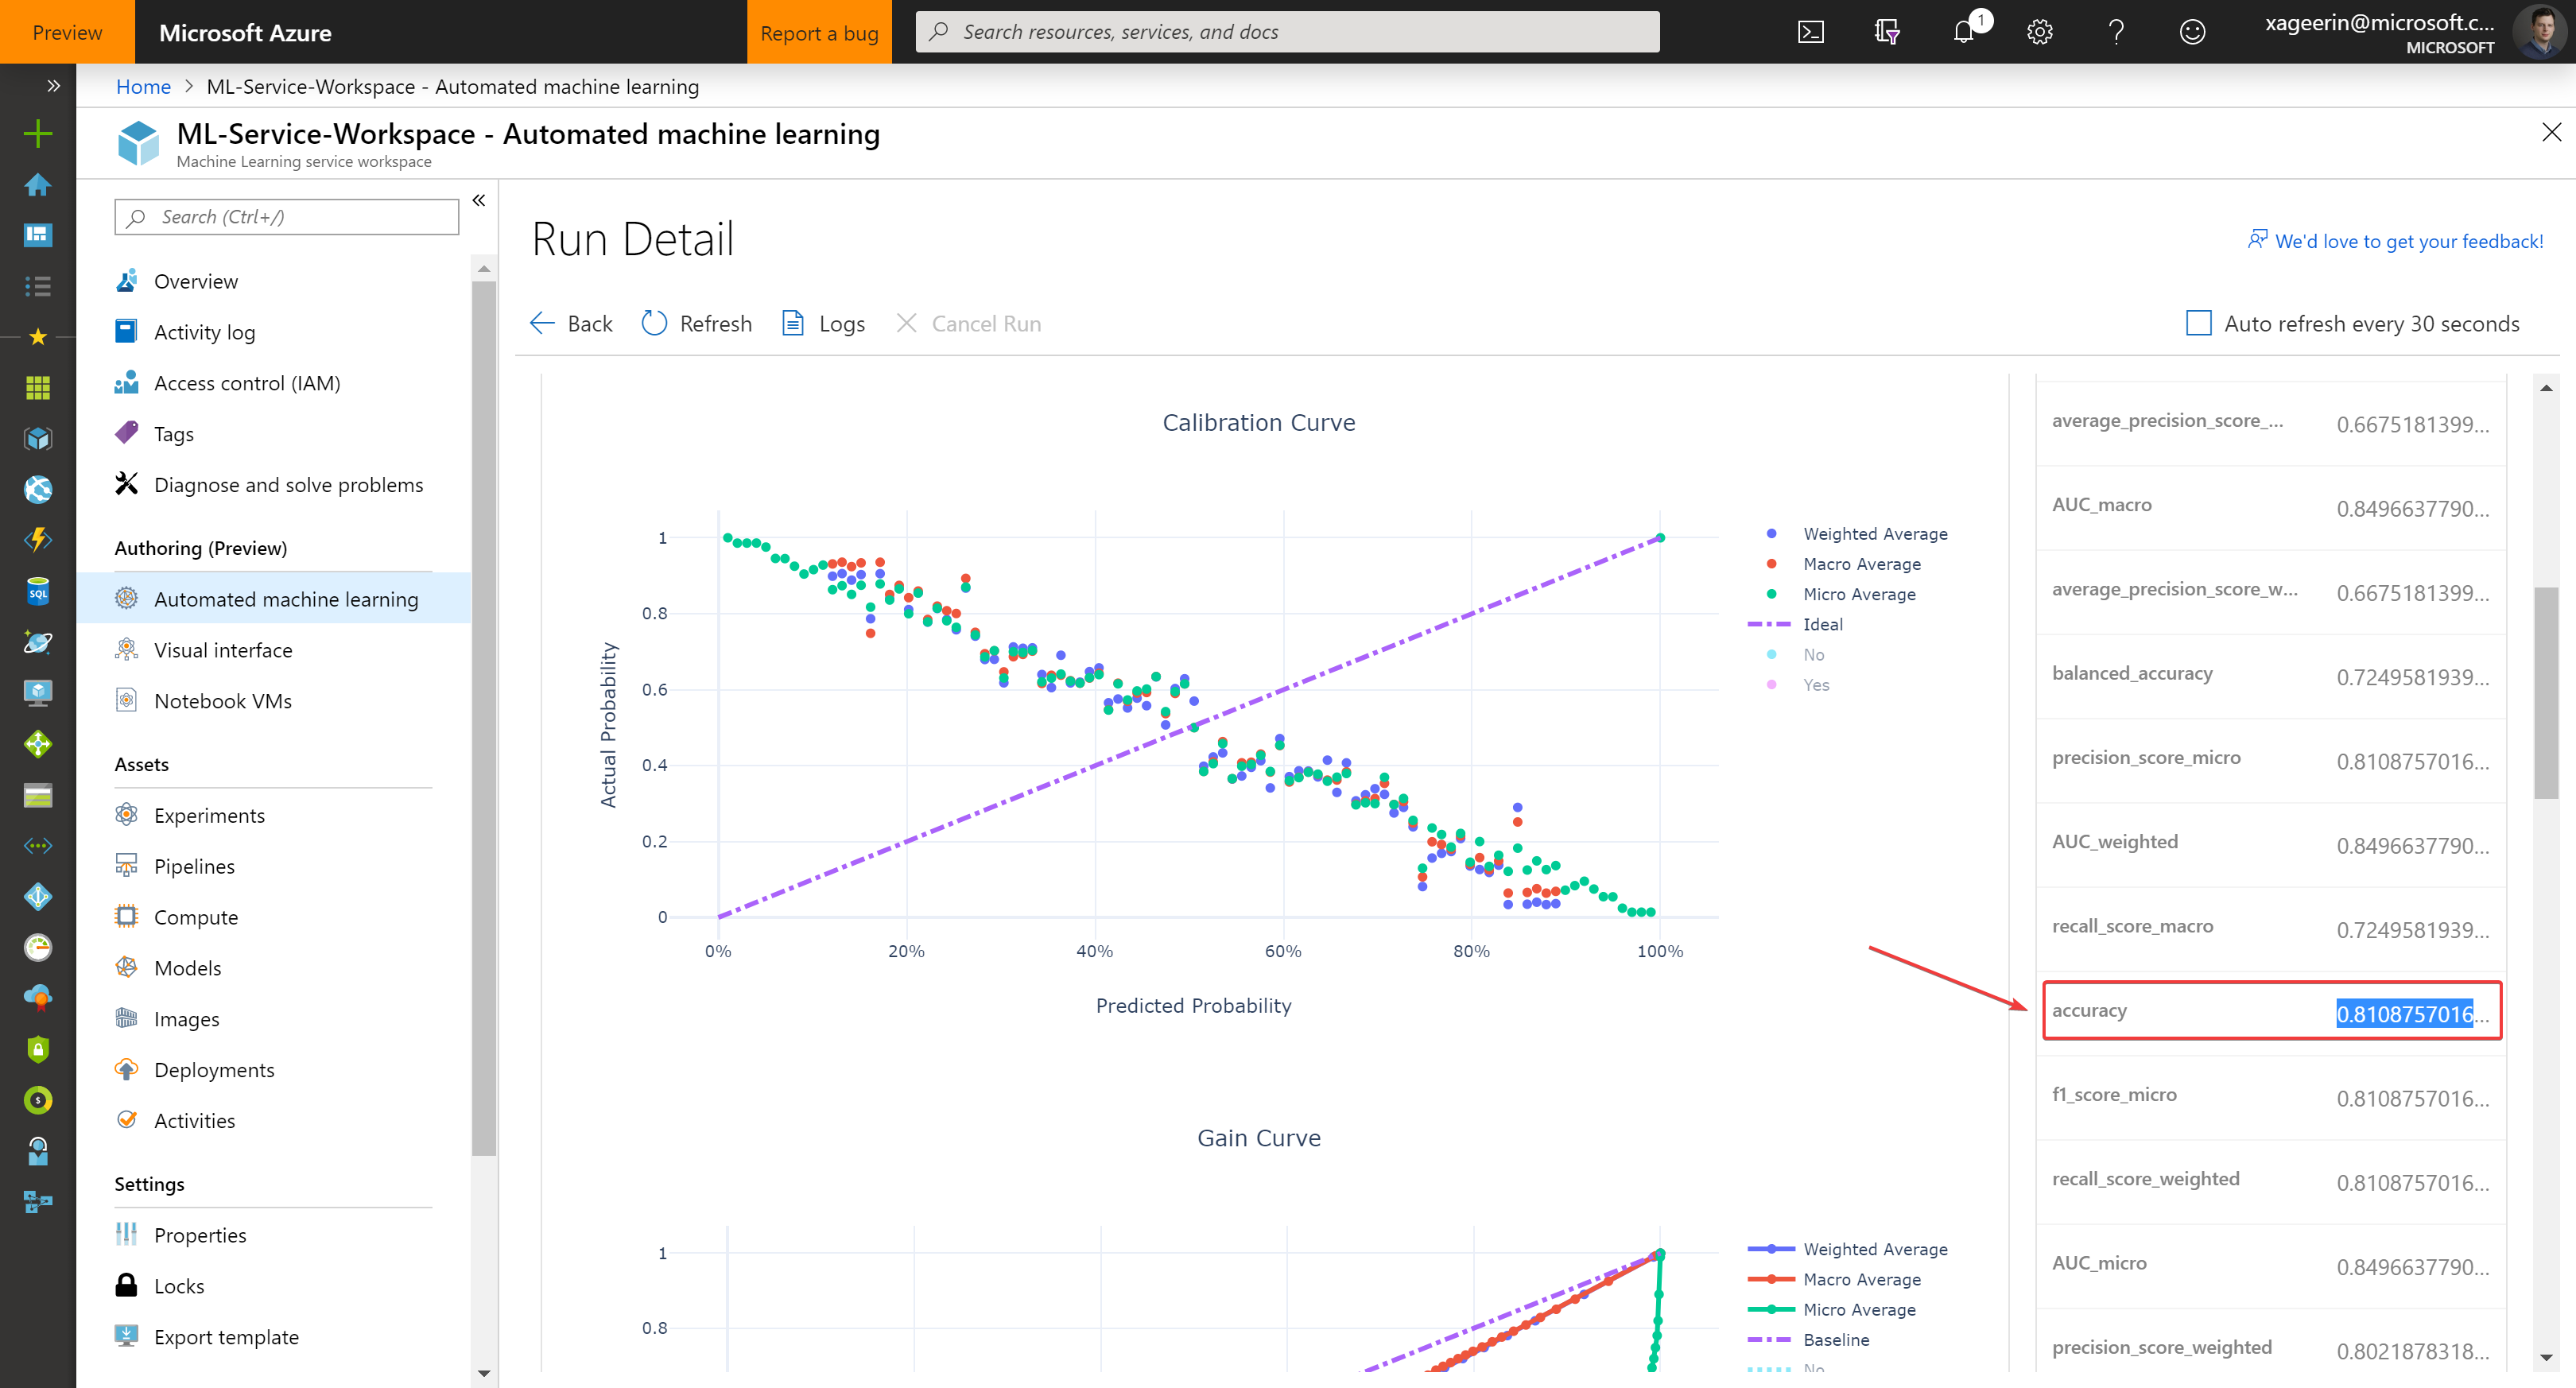
Of course since we are data scientists, we want to make sure the portal gives the correct result ;) so let's test this as well through code:
import csv
import pickle
import azureml.train.automl # pip3 install azureml-sdk[automl,notebooks]
import pandas as pd
import numpy as np

columns = [ "gender", "SeniorCitizen", "Partner", "Dependents", "tenure", "PhoneService", "MultipleLines", "InternetService", "OnlineSecurity", "OnlineBackup", "DeviceProtection", "TechSupport", "StreamingTV", "StreamingMovies", "Contract", "PaperlessBilling", "PaymentMethod", "MonthlyCharges", "TotalCharges" ]

line_count = 0
false_positive_count = 0

with open('model.pkl', 'rb') as fd:
    best_run  = pickle.load(fd)

    with open('test.csv') as csvfile:
        reader = csv.DictReader(csvfile)
        for row in reader:
            df = pd.DataFrame(data=[[ row['gender'], row['SeniorCitizen'], row['Partner'], row['Dependents'], row['tenure'], row['PhoneService'], row['MultipleLines'], row['InternetService'], row['OnlineSecurity'], row['OnlineBackup'], row['DeviceProtection'], row['TechSupport'], row['StreamingTV'], row['StreamingMovies'], row['Contract'], row['PaperlessBilling'], row['PaymentMethod'], row['MonthlyCharges'], row['TotalCharges'] ]], columns=columns)

            result = best_run.predict(df)[0]

            line_count += 1

            if (result != row['Churn']):
                false_positive_count += 1

            print(line_count)

        print("Total Samples: ", line_count)
        print("False Positives: ", false_positive_count)
        print("Accuracy:", (1 - false_positive_count / line_count) * 100, "%")
Which should give us the same results.



Comments ()